I can understand perfectly why changing the WordPress username would be a common question because it is not very obvious in WordPress.
Unfortunately, it’s not a case of merely updating your user profile. You can’t simply pop over to your profile screen and update it.
Before I take you through how to do it, let’s talk about why you would want to update your username and why you should do it for better blog security.
Why change your user name in WordPress?
There are several reasons why you may want or need to change your username:
- Your current username is ADMIN. Admin is the very first user name that hackers will use to try to get into your WordPress blog. If you log in with admin or ADMIN (the case doesn’t matter), then you absolutely must change it now to prevent unwanted people from logging in and causing havoc on your site.
- You have the WordFence or Loginizer plugin, and you can see that people are trying to log in with your current username. Please know that this will happen all the time, don’t be alarmed, but do make sure you have a strong password.
- Maybe you shared your login details with someone and want to ensure they can’t log in again?
- You don’t like your username, or it’s hard to remember.
Why change your user name in WordPress?
Maybe you prefer for your readers to see ‘by Liz‘ at the top of your posts rather than ‘by Elizabeth Harper-Jones‘ because it’s more personable? In this case, you could set your nickname to ‘Liz’ without having to change your username.
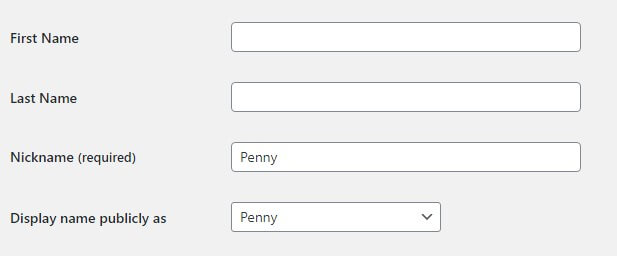
- Go to Users->Profile
- Scroll down to Nickname
- Enter your preferred nickname
- In the Display Publicly dropdown select the nickname you entered
All posts will now show your nickname as the author name rather than your actual username.
Note: you might need to clear the cache for your new author name to appear everywhere.
If you are sure you want to change the username itself, then let’s look at how to do that now. It’s not difficult to do. It’s just a couple of steps.
How to change the WordPress username
Unfortunately, you can’t just check into the profile screen and update your name because WordPress does not allow it. We will need to create a new user, logout, then login with the new user and then delete the old user.
Let’s go through this in a little more detail:
How to change the WordPress username
- Go to Users->Add New
- Fill in the new user details including a new user name and email address
- Select Show Password and copy the generated password
- Choose Administrator from the roles list
- Select Add New User
Now on the top right of the toolbar choose Log out from your profile menu.
If you don’t like the way your username appears, consider changing your nickname instead
Then login with the new username and password you copied.
Step 1 – Make a new WordPress user
- Go back to the Users screen.
- Select your old user name and choose Delete (appears when you hover over the user)
- When prompted, don’t forget to attribute content to the new user. This will ensure that all your posts show your new user as the author.
That’s it!
Changing your user name is just one thing you can do to keep your blog secure. There is more you can do, and I have all this written down in this blog post.
Read it here: Better Blog Security in 8 Easy Steps


