So you want to know how to start a money-making blog? But, you aren’t sure where to begin, or what you need to learn. Perhaps you are feeling a bit overwhelmed?
I wish I had started my own blog a long time ago. I’ve spent a number of years looking after other people’s blogs whilst thinking I really wanted to do the same. But, at the time, I didn’t have the guts to give up my day job.
My biggest blogging mistake was not starting my blog long, long ago, and it is a mistake that makes the other slip-ups I made insignificant by comparison.
One of those slip-ups was not getting on Pinterest from day zero.
In this guide, I will explain how it is paramount that you get your Pinterest account up and running as soon as you know what your blog topic will be so that it is ready to feed your blog with traffic the minute you publish your first blog post.
This post is really long and detailed. Would you like it in a PDF that you can keep and refer to as you progress?
Blogging as we knew it is dead?
Let me tell you first that blogging has changed. Not too long ago you could write about whatever you wanted. Now, that is not the case. You must treat your blog like any other business.
You wouldn’t open a burger bar in China Town, would you? Similarly, you should not write about eco-friendly nappies if your intended blog audience is mature women.
Each and every blog post must be written with the intended audience in mind. It must address a problem, and you must provide the answer. If you don’t, you will never get an audience big enough to create an income for yourself.
Most people don’t want to read about what you had for breakfast unless your blog topic is health-related, and the contents of your breakfast were pertinent to answering a problem such as, What to have for breakfast to keep snacking at bay. Then, of course, what you had for breakfast is relevant.
Do I recommend blogging?
Absolutely yes! I love it. I love writing particularly. Give me a laptop and some peace and quiet and I will write for hours.
If you can say ‘yes’ to most of these, then I recommend blogging to you too.
- You are comfortable treating your blog as a business, not a hobby
If you want to write a blog about your musings, what it’s like to be you, including what you had for breakfast, then blogging for income isn’t for you. - You are not easily discouraged
In the beginning, it can take time to get traffic, especially from Google. (However, I am going to show you a way to get traffic pretty much from day one). - You are happy working from home
For many people, this is the number one reason for starting a blog. The freedom a blog gives you to work wherever you wish is a major draw. - You like writing
You will be doing a lot of writing; it helps if you like it! You don’t need to be great at it, improvement is always possible, but if you like writing you are off to a head start. - You like to learn new things
There are a lot of things to learn when you start a blog. This guide will get you off on the right track. Learning will be a continuous thing, because the world of blogging is always changing. - You are not scared of technology
It isn’t necessary to be tech-savvy to start a blog. If you are comfortable in the knowledge that there are techie things to learn, you will be fine, but if you are plain scared of the prospect, perhaps blogging isn’t for you.
Still with me? Then let’s crack on and find out how to start a money-making blog today!
In this guide, I will take you through the complete process on how to start a money-making blog from having an idea for a blog through to setting up your blog, writing posts, setting up a mailing list, and getting traffic, and ultimately drawing an income.
Step #1 Find your niche
When you start your blog, the first thing you need to do is choose the subject of your blog.
Your blog is most likely to be a success if:
- It is specific
You should be able to define your blog subject in one sentence. - You are passionate about it
Ask yourself the question, ‘could I write about [insert subject], day in, day out?’ - There are lots of other blogs on the same subject
If making money is an aim, a good sign is if there are many other blogs on the same subject. The chances are good that it can make money.
Step #2 Choose your audience
Create a picture in your mind of whom you are writing the blog for. Perhaps your blog is for a new mum with postnatal depression, a single dad, mothers of twins, parents of an autistic child, or a mother with financial struggles.
The options are vast, but it helps if you are in, or have been in, your target audience too.
Who is your reader?
Don’t be broad. Be very precise about who your reader is. Imagine that every post you write, every email, everything you post on Pinterest and on your Facebook page is for the benefit of your one reader that you have got to know so well in your head. I used the word reader rather than readers because it really helps to think of your audience singularly.
You must know what he or she likes to read, (let’s assume a woman for now), what TV shows she watches, what her worries are, where she wants to go in life, what her struggles are, what is stopping her from reaching her dream, the list goes on.
What is her name?
You must know your lady inside and out, and this will help you to write the very best content only for her, which has the ability to attract other readers just like her.
It helps if you can give your reader a name. My reader is called Shelly. Shelly wants to start a blog, but she doesn’t know yet how to blog or how to use WordPress to achieve her dream.
My goal with every post is to educate Shelly and make everything I write clear and as non-technical as I can, and encourage her to achieve her dreams. I have her in my mind every time I sit down to write.
Shelly, you got this, the blogosphere is waiting for you! [but it won’t wait too long, so get a move on :)]
Knowing your reader makes blogging so much easier.
- You know what sites she likes to visit so you know what kind of site design she might like and what graphics to choose for your posts.
- You know roughly what her schedule might be so you can choose the best times to email.
- You know what kind of shows she likes to watch so you could mention them in your chatty intros.
- When it comes to advertising, knowing her makes it much easier to decide where to place adverts and what type of audience to target for Facebook ads.
Of course, when your blog grows, and you have an email list, you can use it to find out much more about everyone that reads and benefits from your blog.
Step #3 Choose a domain name
If you search ‘choose a domain‘ on the web. So much comes up it’s bewildering. So it’s best not to go there, and carry on reading instead!
Before we go on, let’s be clear what exactly a domain is …
A domain is your unique address on the internet. No one else will have the same domain as you.
To own a domain, you must register it with a domain registrar. You can register a domain for a minimum of one year, after that you must renew it, or you will lose ownership, and your website and email will not work.
Here is an example of a URL showing the domain in bold:
https://mynewblog.com
A domain name is made up of a series of characters followed by a domain extension.
The domain name extension may be .com for US sites, or .co.uk for a UK site.
There are many other extensions available, which can make your domain more interesting, such as .blog or , .recipes, .news, but the one I like to stick to is either .com or .co.uk because most people type them automatically into a web browser.
If you don’t have a domain yet, here are some things to consider:
- Should be memorable
Test it out with friends and family, does it roll off the tongue, or is it too obscure? - Six letters or less is good
But not always possible, so don’t worry if you can’t do that. - Avoid hyphens
myfirstblog.com is preferable to my-first-blog.com - Is your domain available on social media Twitter, Facebook, Pinterest, Instagram?
Namecheckr.com lets you know which handles are available, so do check that before you make your final choice.
My advice is not to get too hung up on your domain name. It really doesn’t matter too much, as long as you don’t go for something that has no bearing at all on your blog content or could get misconstrued.
Try out your domain idea on your friends and family. Do they think they could remember it? What picture/feeling/emotion does the name conjure up for them?
You can register a domain with whomever you like. You don’t have to register your domain with your hosting company, in fact, I always like to keep the two separate, so that if I need to re-host, I don’t need to change registrars too.
Domain registrars are NameCheap, GoDaddy, 123Reg and many more. You don’t have to think too carefully about the registrar company because they don’t do much. As long as your registrar company reminds you when to renew, and provides decent tools for editing the DNS records, they are good enough.
Find the cheapest place and stick with that. I use lcn.com for all my domains, so I recommend them if you are not sure. They always remind me to renew so I’ve never found myself in trouble with expiring domains.
Stepping ahead slightly, when you are ready to put your website online, your host will advise the changes to make to your Domain DNS records. At that point, you would head back over to where your domain is registered and update the DNS as directed.
With that said, let’s step back again and move on!
Step #4 Decide on your blog topics
I know we haven’t yet set up WordPress, we don’t even have a blog yet!
However, it is vital you think about your blog topics upfront.
If you are going to be starting a lifestyle blog, for example, your main topic areas might be fitness, healthy recipes and money-saving tips.
There is no need to get too specific at this stage, that will come later, but for now, we need a list of topic areas.
Check out blogs on a similar subject. What subject areas do they write about?
The blog topics you come up here will define the categories and tags you eventually set up in WordPress, and will also help you make your Pinterest boards in the next step.
Step #5 Embrace Pinterest
Pinterest is the number one purveyor of traffic for new blogs. In order to make sure we get traffic to our blog immediately, it is necessary that we utilise Pinterest at the very beginning. You don’t need a blog to open a Pinterest account.
Later on, when your blog matures, Google will likely be the primary source of traffic, but until then, Pinterest is your traffic feeder. So let’s set it up now.
So that Google does eventually become a traffic source, we need to pay attention to good SEO. We will be doing that in a later step when we learn how to write posts.
- Open a business account at Pinterest.
- Make Pinterest boards for each of your topics
Each board name should correspond with a topic that you decided on in the earlier step. Do a search for each topic within Pinterest to ensure that you use key search terms for your board name. For example, I have a board called Blogging Tips - Find influencer accounts
Find and follow some large accounts in your niche with a monthly view count of at least 1 Million - Start pinning
Pin regularly to each of your boards. The key thing to understand here is don’t simply hit the Save button. Each pin you save must be a new pin, otherwise Pinterest will see you as a content consumer rather than a creator. You can create a new pin by clicking through to the post and then sharing to Pinterest**
**Some Pinterest accounts don’t save their pins on the post, so when you go to share the post to Pinterest, the Pin image that you wanted to share is not available. To get over this go back to the pin and download the pin image, copy the post link and then create a new pin using the + create pin icon. Pinning this way is more time consuming, but well worth the effort.
From now onwards, you should be pinning at least a couple of new pins per day on Pinterest. These pins should originate from the large influencer accounts you identified. They must also be pins that your eventual reader would be interested in.
If you get bored with pinning, Tailwind is an option instead. With Tailwind you can find all your pins for the day and then schedule them to post at regular times during the day. I have had great success using it. However, if you don’t have the budget, but you have the time, manual pinning is just as effective.
As I said, you must always pin new pins, don’t simply save other people’s pins. You must behave like a content creator rather than a content consumer.
Fortunately, Tailwind creates all pins as new pins, so there is no problem there. However, I’ve found that Pinterest still likes you to be present on their app regularly. If you are going to go for Tailwind. Make sure that you visit the app and do some manual pinning too.
Many people have had huge success manual pinning. I credit my success manually pinning to the course I took called Pinteresting Strategies by Carly. Use my coupon code PINNING5 to get $5 off.
Carly is a Pinterest ninja and credits her 200k monthly page views per month to her unique pinning strategy, which she explains step by step in her course.
Carly also explains how Pinterest works from the ground up, which I found so useful as a beginner!
I thoroughly recommend taking a Pinterest course, even if it is not Carly’s. I wasted a lot of time at the start trying to figure things out for myself and stubbornly refusing to part with money!
**Update**
Pinterest is always changing its algorithm!. What works one day won’t work the next. The advice I gave further up this post worked for me, but my niche is different and the timing is different too. That’s why I thoroughly recommend a course. Carly keeps her course updated with the latest developments.
Step #6 Let’s be clear about WordPress
WordPress, by Automattic, is a content management system or CMS for short which can be used to create and update websites.
A CMS makes it much easier for a person without knowledge of HTML and CSS (the languages used to write web pages) to update a website.
WordPress has a simple editor which allows you to write content without knowing HTML and CSS. WordPress also allows you to do things like add pictures to your content by drag and drop and embed videos by just entering the Youtube link.
If you can use a word processor, then you should be comfortable creating content with a CMS. It is straightforward to learn how to use the WordPress editor. We will look at how to write posts in WordPress later on.
Before we move on, there is something I need to make clear, and it is a source of confusion for many people.
There are two types of WordPress
WordPress can be hosed either at WordPress.com or by a generic host such as SiteGround, who will install and run the version downloaded from WordPress.org.
I have written a detailed comparison here – WordPress.org vs WordPress.com – Which Should I Choose? If you don’t have time just now, read on for a quick explanation.
At WordPress.com, you can get free hosting on Wordpress’s own hosting platform. It is very easy to start a blog at WordPress.com. Open an account, choose a theme and start blogging … pretty easy. You can even use a personal domain name.
WordPress.com is an excellent place to host your blog if all you want to do is write, but it’s not suitable if you intend to monetize your blog, because there are restrictions on what you can and can’t do. Crucially, the can’t dos include not being able to insert your own ads, and not being able to upload your own theme and plugins.
Since we are talking about starting a money-making blog, I don’t recommend you go for WordPress.com host. But, do not fear because WordPress is what is known as Opensource.
Opensource means that the WordPress code is free, and you can run it on any web server you choose, along with having the freedom to do whatever you like with it, including putting whatever ads and affiliations you want and installing whichever theme and plugin you need to create your successful blog.
Websites that run WordPress from WordPress.org are known as self-hosted WordPress sites. You may have heard that term before, but don’t worry if not.
The technicalities of self-hosting a Wordpress site are not something you need to worry about, as all hosts that I recommend make it super easy to install WordPress with just a button click. So don’t let technical worries put you off a self-hosted WordPress, it really is pretty straightforward. The main thing, as I said earlier, is not to be scared!
Step #7 Choose WordPress hosting
As we said earlier. If you want to make money with your blog, the best hosting option is self-hosted, and this is what we talk about next.
Many hosts allow WordPress to be installed on a website with just a click of a button, so there is no need for you to be bothered with the technicalities of doing it yourself.
The next step is to choose a web host for your shiny new blog, and for self-hosted money-making blogs, I thoroughly recommend SiteGround.
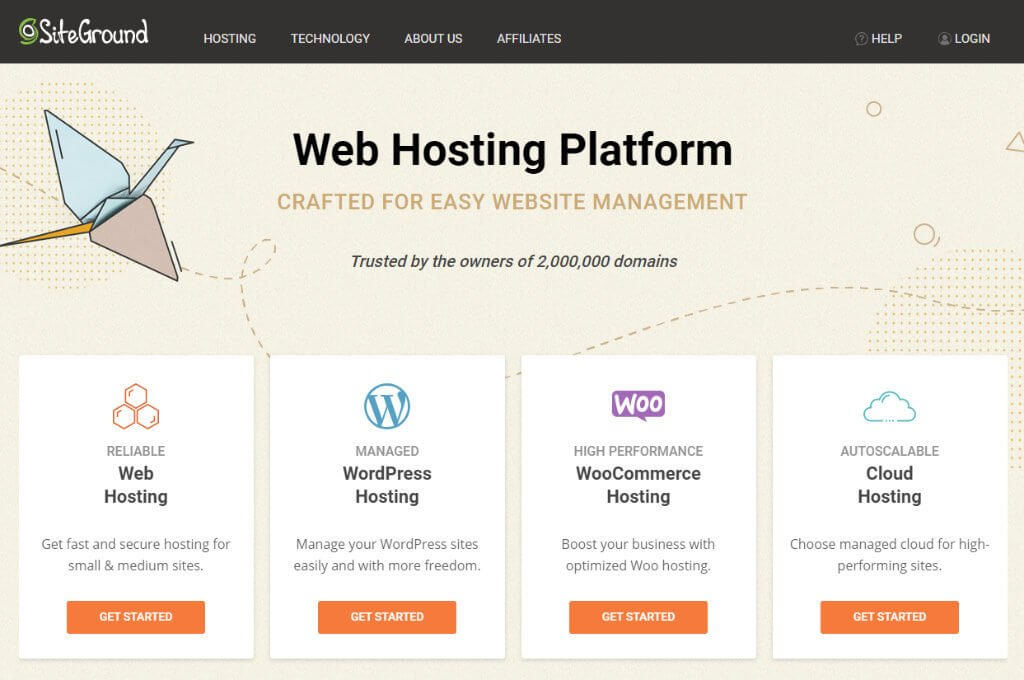
There are actually two hosts I recommend, Siteground, and Bluehost. Both of these hosts are excellent choices, with fantastic support which is crucial when you are a beginner.
I have to choose one for this post though! So by popular demand, I’m going to show you how to set up your blog using SiteGround.
Why choose SiteGround for your WordPress Blog?
I have to say that I am very fussy with hosting. Absolutely everything has to be good about the host before I will commit.
I am a tough cookie to crack. I always start a chat with potential hosts, which of course I did with Siteground, to gauge how knowledgable and helpful they are. I have to say, they really knew their stuff.
- SiteGround is recommended by WordPress
- Support is top-notch
- There is usually a 50% discount for new accounts.
- It is super-easy to set-up WordPress and start a blog in no time with SiteGround
Due to the automation they now have you can get up and running in minutes.
If you are unsure, I encourage you to start a chat with them. I guarantee you will find them amazing.
Step #8 Set up WordPress on SiteGround
Next, I am going to show you exactly how to start a money making blog on SiteGround web hosting.
Note that SiteGround has recently updated its onboarding and admin screens. This post and video have been fully updated for the changes.
Video: How to setup your WordPress blog on SiteGround web hosting
If you prefer a video, check out this tutorial.
**If you follow this video there is one extra step to do as detailed here.
Create your SiteGround account
- Go to SiteGround and click on Web Hosting or WordPress Hosting it doesn’t matter which, and they are the same products, just marketed differently (I asked them that during my chat :)).
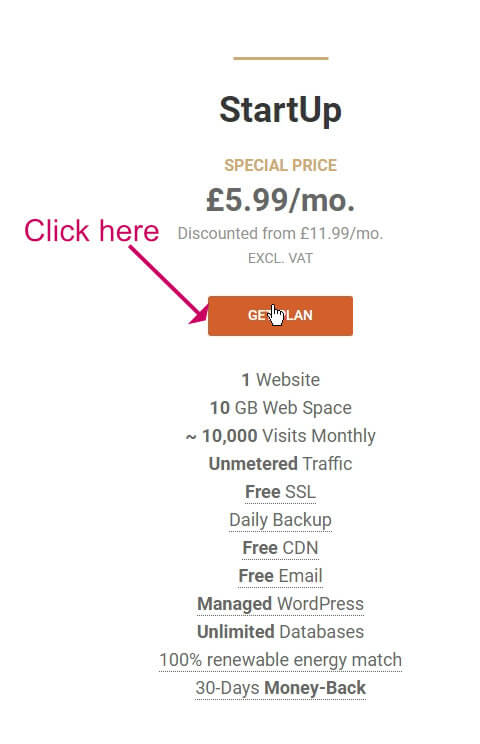
- Click on StartUp and then click Get Plan
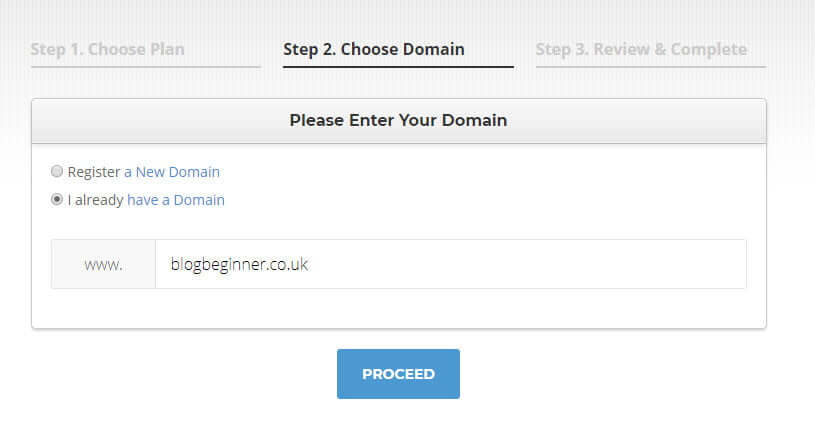
- On the next screen, enter the domain name you registered earlier, or choose one now. I already have a domain registered, so I’ve entered it in the domain box.
- On the next screen, create a login and enter your credit card details.
- You should then arrive at a success screen.

- Click Proceed To Customer Area and then login with the email address and password you entered in the payment screen.
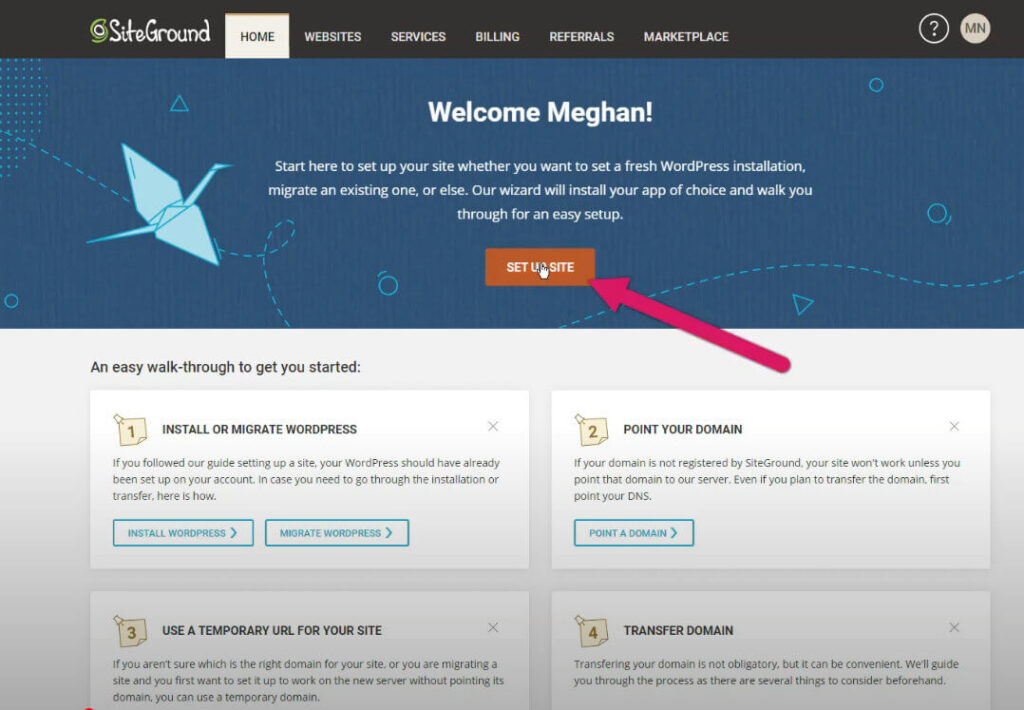
Install WordPress
- Click the orange Site Setup button.
- Now click Start New Website, then WordPress
- At the bottom of the screen enter the email address and password you will use to log into the WordPress admin dashboard, which can be different from the login you created to access your SiteGround hosting.
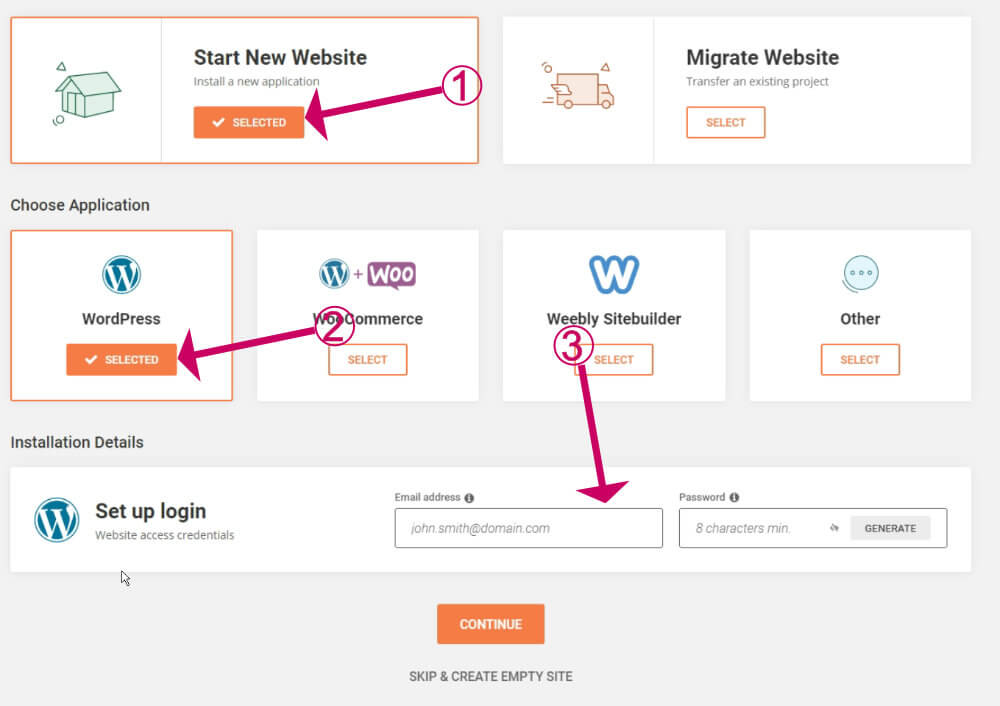
- On the next screen click Process ignoring the SG Site Scanner option because you can add that later if needed.
- Now, wait a couple of minutes for your site to be created.

- When the setup has finished you should see a screen like this:
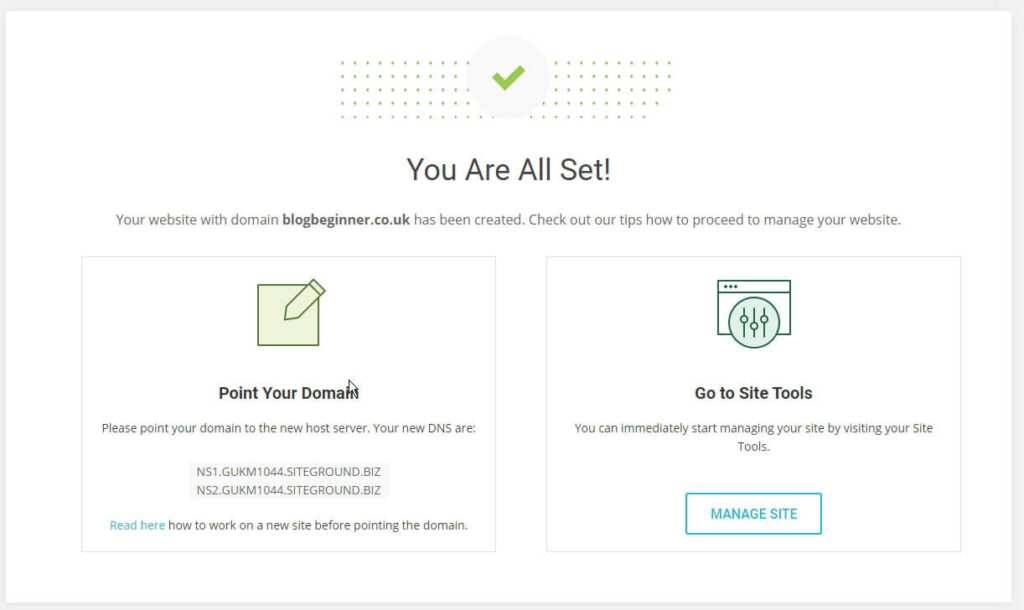
- If you already had a domain to transfer over to SiteGround when you created your account, you will need to make a note of the nameservers shown on the screen above. Then you can proceed to the next step below.
If you registered a new domain with SiteGround then there is no need to update the DNS and you can skip the below step.
Update your domain’s DNS (only if your domain is not registered with SiteGround)
If you already had a domain registered with another registrar now is the time to pop over to them and update the DNS settings, so that your domain is now hosted at SiteGround.
The nameservers will have been sent to you in the welcome email from SiteGround.
Here are the nameservers I was sent, but yours may be different:

Login to your registrar and enter the nameservers, as per the example below.
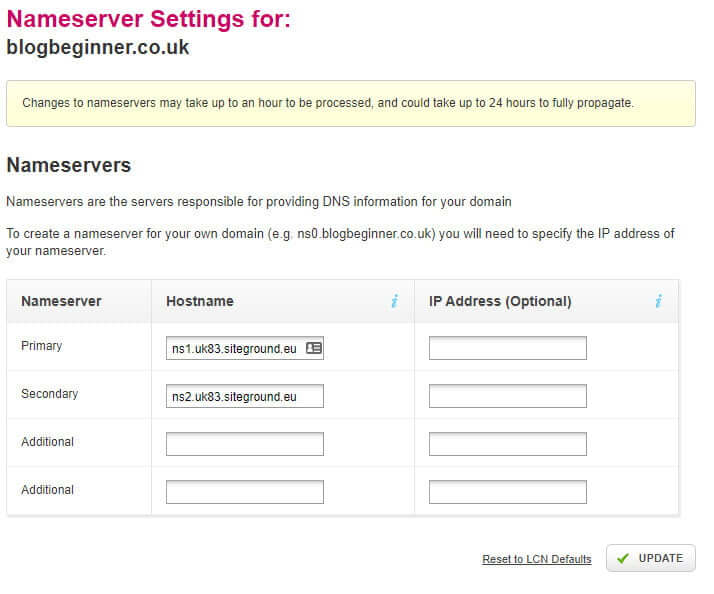
Changes to nameservers may take up to an hour to be processed and could take up to 24 hours to fully propagate. Your new domain may not work for at least an hour.
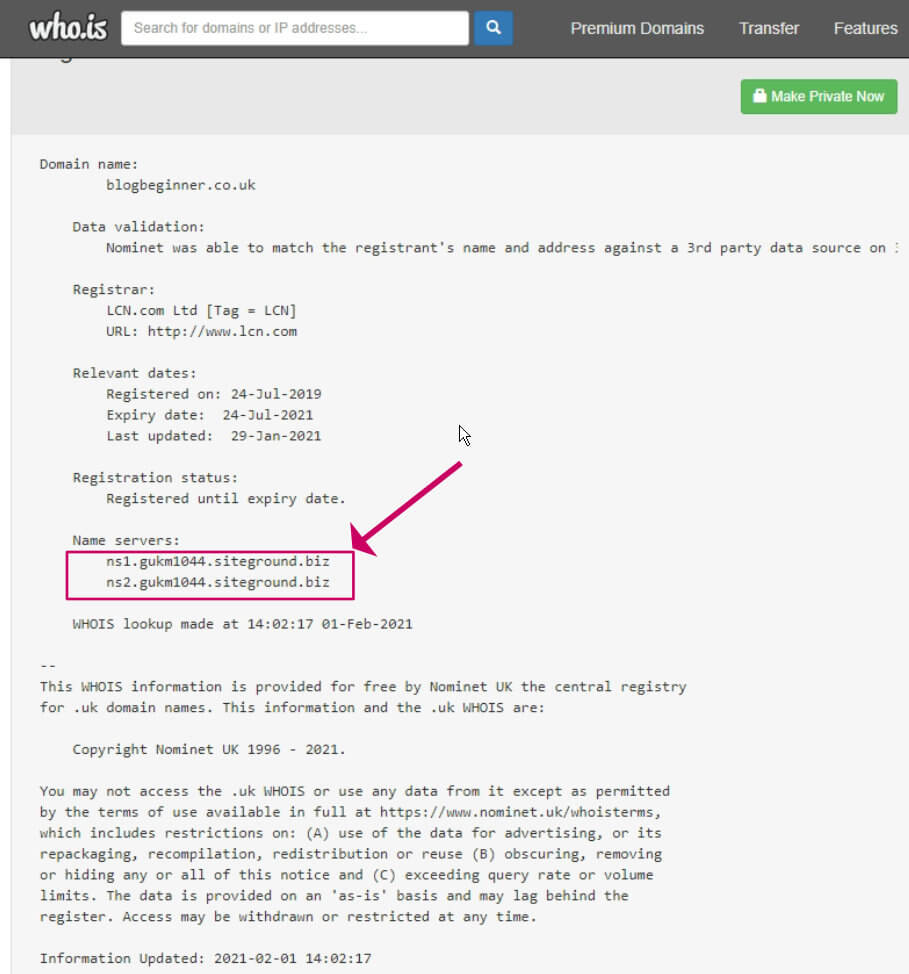
You can check whether or not the nameservers have updated at https://who.is.
If you see that the nameservers have changed then you are ready to move to the next step.
Install a security certificate
Now we will create an SSL certificate so that we can use HTTPS.
- Go back to SiteGround and log in again.
- Click on Websites then click Site Tools
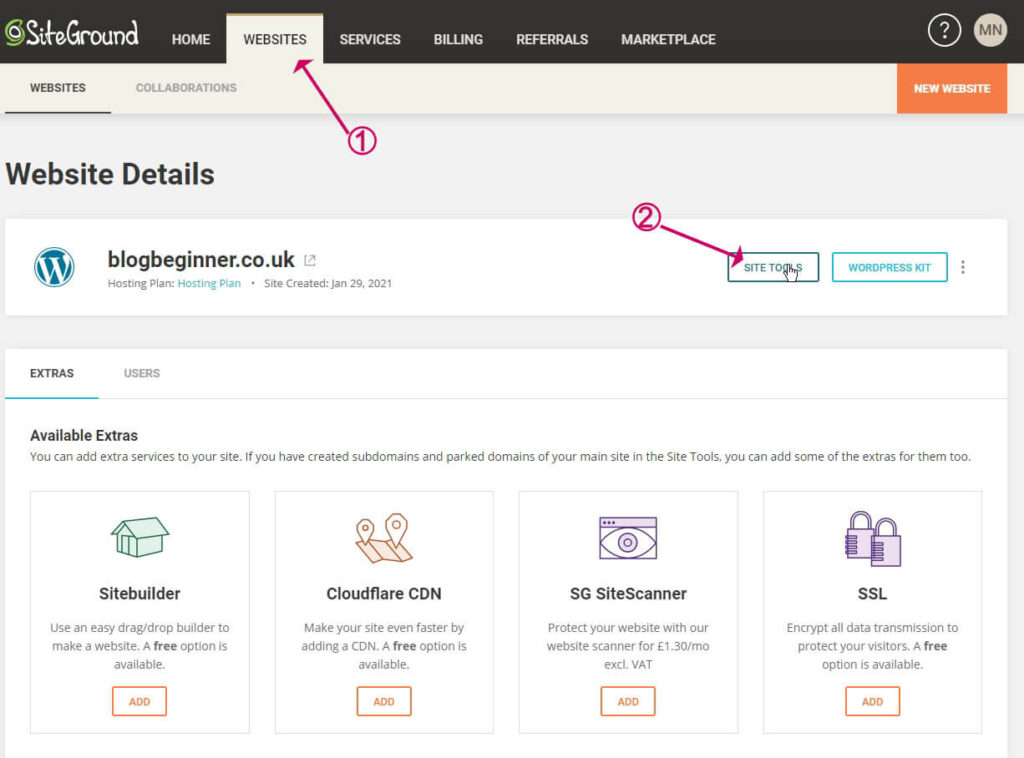
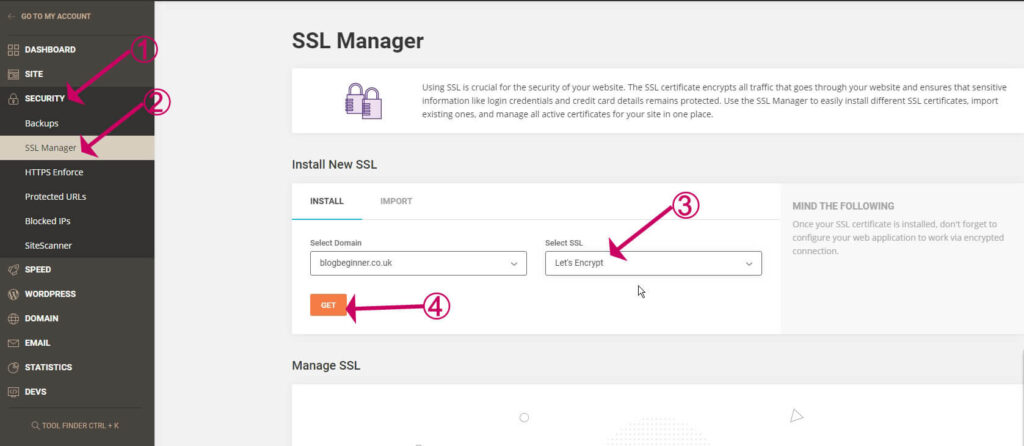
- Click Security then click SSL Manager
- Select Let’s Encrypt from the SSL dropdown
- Click Get
- Wait while the certificate is created and installed on your domain
Redirect HTTP to HTTPS
We don’t want our website to work on insecure plain HTTP so next, we will redirect all requests to HTTPS.
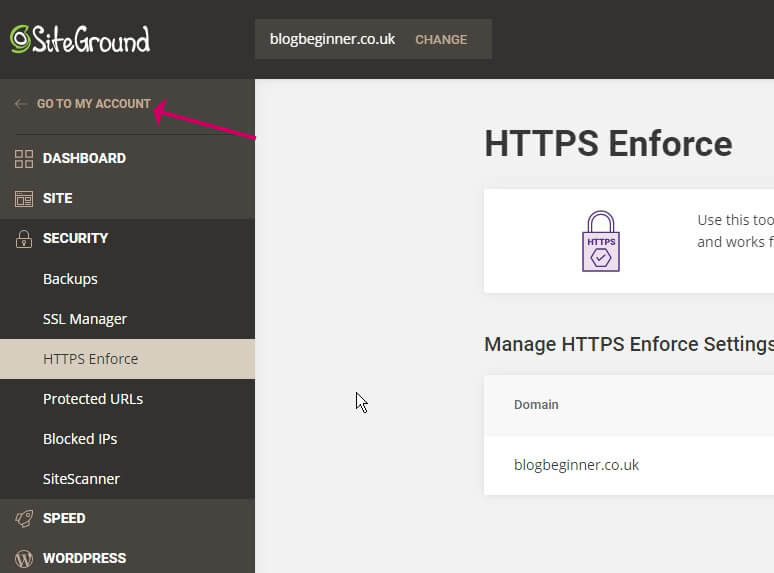
- Under Security, click HTTPS Enforce
- Toggle the HTTPS Enforce switch

Now we will log into our new WordPress blog and do one last setting.
- Click on Go To My Account
- Click on Websites
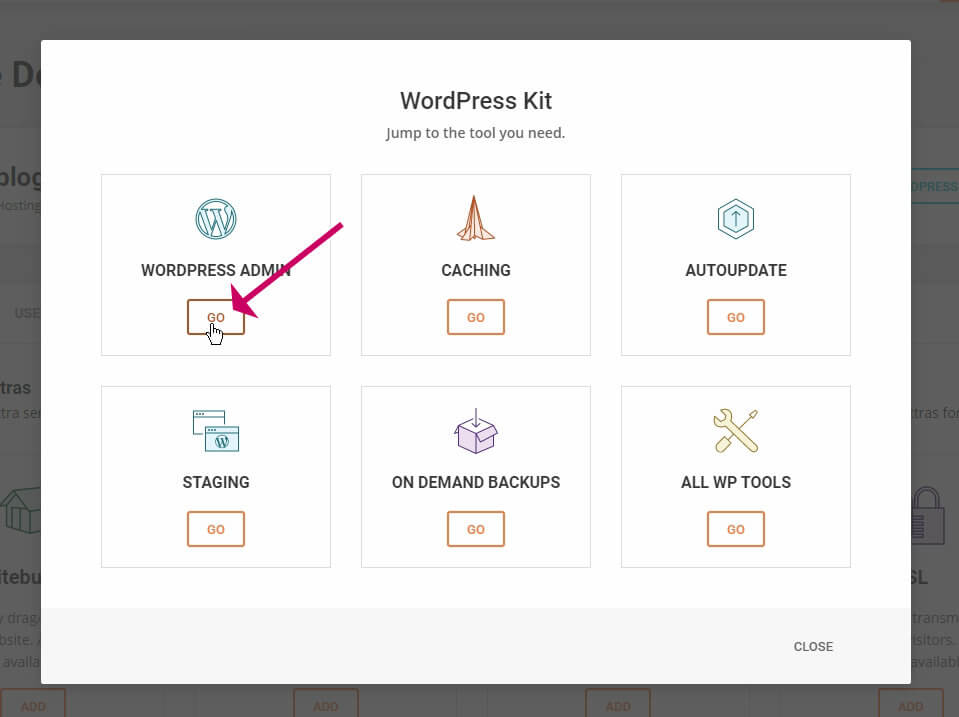
- Click on WordPress Kit
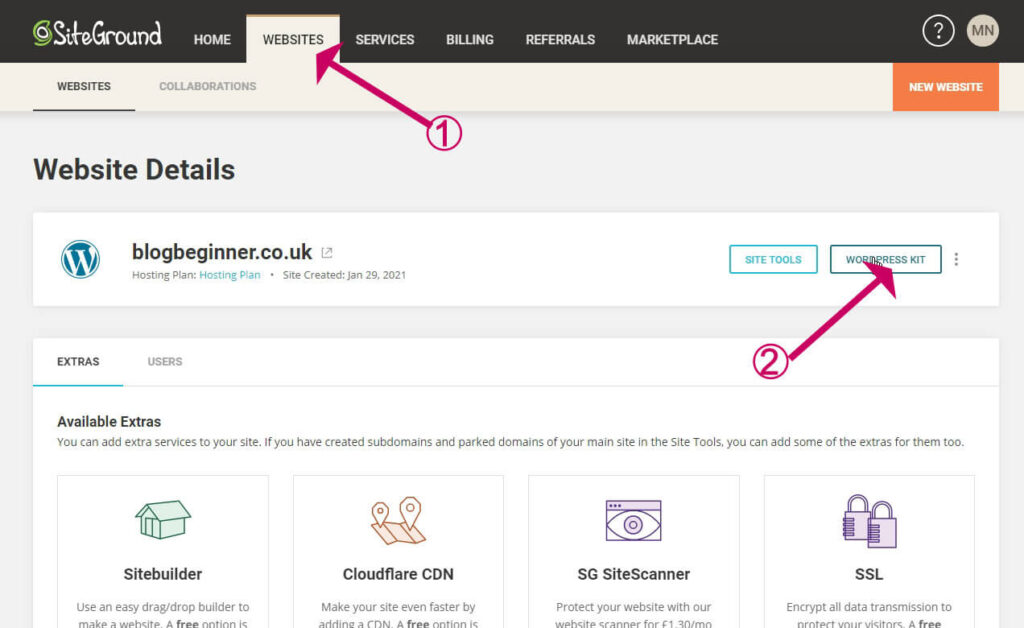
- Click on WordPress Admin
- Enter the email and password you created when you set up your account earlier.
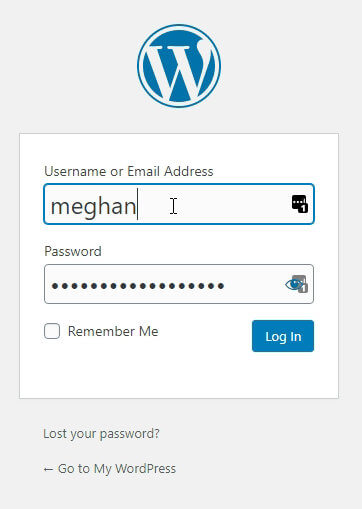
The admin dashboard of your new WordPress blog should open up.
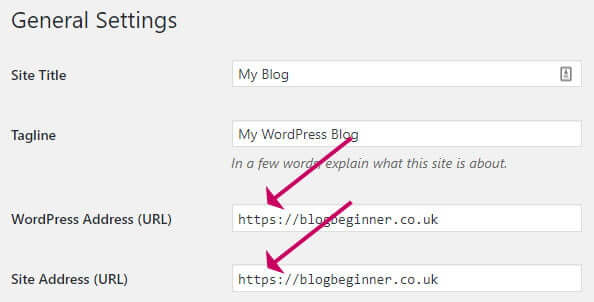
- Go to Settings->General
- Make sure that the WordPress Address URL and Site Address both begin with HTTPS rather than HTTP and update them if not.
Step #9 Get to know the WordPress dashboard
If you are new to WordPress, it is well worth getting to know the dashboard. It will save you so much time later on.
I have a guide on everything you need to know about the WordPress dashboard.
Read it here: A Complete Guide To The WordPress Admin Dashboard
Step #10 Choose a theme
This is the most important aspect of setting up your blog. You could waste a lot of time later switching themes if you don’t get it right at the beginning.
Let’s be clear on what a WordPress theme is …
Think of WordPress as a basic car, with standard paintwork and no extra options.
You can upgrade the car by adding some plugins, such as power steering and air conditioning and you can improve its look with a theme giving you some shiny metallic paint, for example.
There are thousands of WordPress themes available, and you must have one active theme on your WordPress site to make it work.
When you first set up a WordPress site, it has a default theme installed called Twenty Nineteen.
At the beginning it can be tempting to head over to Appearance->Themes->Add New, and install any free theme that takes your fancy.
Before you click ‘install‘ here are some considerations:
Don’t choose a free theme
It is tempting to go for a free theme because as a new blogger, spending money is probably something you don’t want to do too much of at the start. I quite understand, of course.
Here are two good reasons why free themes are not a good idea:
- Free themes often lack options to customise the design.
For example, the position of the sidebar, the number of widgets in the footer, and how the header is laid out. - Free themes often don’t offer support.
As a new blogger, you need the best support possible.
On the other hand, there are some things to avoid in a premium theme too:
- Avoid premium themes that are not designed for blogs.
They often have extra bloat in them, for functions that you may never use, such as a portfolio, or shop, for example. - Avoid premium themes that include an in-built page builder.
I always avoid these types of theme, because it can lead to theme lock-in, where it is not possible to swap to another theme very easily without re-working pages.
When you choose a theme, go for something that has the type of layout you need, because the layout is the hardest to change. It is easy to change fonts, and colours, and add your own logo and images, but the layout is more difficult to change.
There are some great FREE themes I DO recommend.
Having said that you should always go for a premium theme, there are some great free themes that I DO recommend. These themes have premium upgrades but have plenty of functionality in the free version. I recently went through the process of picking a new theme for this site, and I wrote a post on it:
Read it here: Best Free WordPress Themes for Blogs.
If you don’t have time to go through that post, let me spill the beans now and say that the theme I went for is GeneratePress. This site has been running with GeneratePress for a year now, and I still love it and wouldn’t swap it for anything else. Here are my reasons:
- It is extremely lightweight. Essential for a super-fast site which is crucial nowadays.
- It is highly customisable. You can pretty much achieve any sort of design with it. I’m a coder and I don’t do any extra coding now I have GeneratePress.
- It has absolutely fantastic support. I’ve posted several questions, and I always received a helpful prompt answer.
- It is free. For more theme customisations I recommend you go for the premium version, it is extremely good value compared to other themes such as Genesis for example.
I have a more in-depth review of GeneratePress here: GeneratePress Review – The Best Theme In WordPress History.
For lots more advice on how to pick your perfect theme, I have an extensive guide.
Read it here: How to pick a WordPress theme.
When you have chosen a theme, here is how to install it:
Read it here: How to Install a WordPress Theme
Step #11 Set-up your new WordPress blog
At this point, I advise taking a backup of your site and then getting to know the theme you have installed.
Before you begin, there are some essential things that are vital to get right at the start.
Read my blog post here: 24 Essential Settings After Installing WordPress
Hopefully, you have learned a bit about your new theme during your research. If not, it is well worth paying a visit to the theme site and watching any videos and tutorials they have. Find out how to get support. This will save a lot of time later.
The next tasks you need to do on your new blog are:
- Upload your logo
I have a useful post here to help you make a logo and upload it to WordPress How To Make A Logo For Your WordPress Blog - Set up your menu
How to Add a WordPress Navigation Menu - Set up the categories and tags you decided on earlier
Categories VS Tags In WordPress And How To Use Them Properly - Set up your sidebar
How to Edit Your WordPress Sidebar With Widgets
How to Add an About Me Section to Your WordPress Sidebar - Install some essential plugins
15 Essential WordPress Blog Plugins - Add Google Analytics
Find out who is reading your blog and gain valuable insights. How To Know Who Is Reading Your WordPress Blog
Depending on which theme you chose, there may be customisations available such as setting the accent colour (colours for links etc.) and font.
Usually, you can do this in the WordPress customiser which you can get to here: Appearance->Customise.
If you have chosen a solid WordPress theme (like GeneratePress), you will be able to make all your changes I list above within the customiser itself, with the added benefit of being able to see the effect of changes immediately.
My favourite thing about the customiser is that, should you not like what you see, you can always hit the Discard button, and nothing will change.
Of course, if you happen to hit Publish instead and you need to go back, you can always restore the backup you made earlier (so don’t forget to do that!).
I have a full post on using the theme customiser:
Read it here: How To Customise a WordPress Theme
Step #12 Start writing posts
What we have done up to now is probably the easy bit. The next much bigger step is to start writing your blog content!
I have some helpful posts to get you started with WordPress, and writing your posts in the right way.
- All About Images in WordPress
- 5 Ways To Add Images to a Blog Post in WordPress
- 7 Mistakes You Are Probably Making With Images – And How To Fix Them
- How To Write a Post With The WordPress Block Editor (Gutenberg)
- 21 Things To Do Before You Publish Your Blog Post
- How To Embed a Video In WordPress (with the block editor)
Here are the top three things that I have learned about blogging:
- Content is king!
Google your blog idea and make sure that your article is better than anything you see ranked in Google. - A catchy title is a must
The title should be something that your readers can’t help clicking on. - Market, your posts like mad
Create a Facebook, Twitter and Pinterest page and post your articles regularly. Social media marketing, is a huge subject and I recommend that you find out more on this, but the main thing to know is, don’t expect your readers to find you, you must find them!
How to find topics to write about
This can be the most perplexing question for many new bloggers. Fortunately, we have a plan!
If you want to make money from your blog, what you cannot do, is write whatever you fancy writing about. I’ve done it, and it doesn’t work!
We want to write about subjects that our tribe wants to read about. The way to find out is to do some research.
Up to this point, you will have been diligently pinning popular pins from the influencer accounts you follow.
You need at least a month of pinning to get meaningful results. If you don’t have this yet, then hold back on this part until you do.
- Open your Pinterest Account
- Click on Analytics then Overview
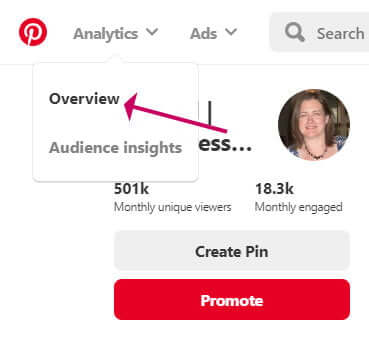
- Select Link clicks from the Top Pins drop-down because we are interested in the pins that achieved the highest number of clicks.
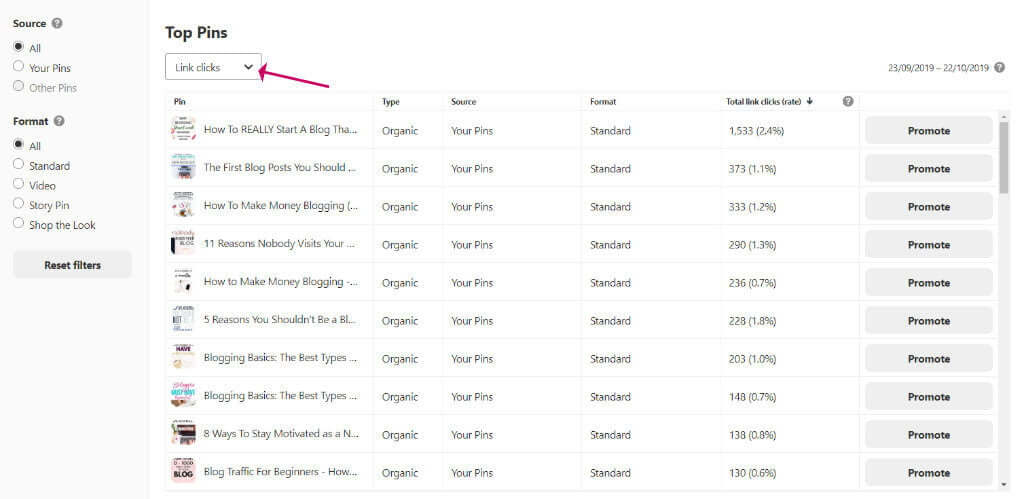
You will see a list of the most clicked pins you posted from your account.
In the above list, we see that the top pin achieved 1,533 clicks over 30 days. Based on that information I would definitely write my own take on the same topic, without copying it, of course.
Other ideas for finding post topics:
- Buzzsumo
Buzzsumo is a tool that can help you find the most popular posts from your influencers. Enter the URL of the blog, and it will list out the top five posts. Then write your own version of the same post. - Answer a question to a problem
Answer the Public is a site that lists out possible blog post titles based on a topic. - SemRush
SemRush gives you the top-ranked posts for your influencer blogs. The free version gives you a few searches a day, or you could open a trial account. Ahrefs is a similar service, and I have found the interface to be cleaner and easier to understand. - Facebook groups
If you haven’t already done so, join some Facebook groups for your niche and keep an eye on what type of questions people ask. - Your mailing list
If you don’t yet have a mailing list, this one is for the future. One of the many good reasons to have a mailing list is that lists can be a source of topic ideas. Ask your tribe of subscribers to let you know their biggest struggles.
Step #13 Set up a mailing list
Every blogger I speak to or read the blog posts of will say how important it is to cultivate an email list, and the best time to start one is yesterday!
I recommend you get started with MailChimp because it is a fantastic email provider and it is free for the first 2,000 subscribers.
Many bloggers also recommend Convertkit, but it isn’t free. The smallest plan is $29 per month for up to 1k subscribers. If it takes you a year to get to 2k subscribers, you will have saved $348 by going for MailChimp instead.
MailChimp now offers automation on their free plan, which means you can now send out an automated email series if you want to, triggered when people sign-up or join a group. There is nothing I miss on the free plan. You get grouping, segmentation, a form builder, templates, the lot.
It is really worth getting to know MailChimp well because it can be an excellent sidekick for your blogging business.
I have a few great posts to get you started with MailChimp immediately.
- How to Start a Mailing List With MailChimp
- How To Use MailChimp With Your WordPress Blog
- The Best MailChimp WordPress Plugin for Newsletter Opt-ins
- How to Add a MailChimp Email Signup Form to Your WordPress Sidebar – Without a Plugin
Step #14 Get ready to launch!
Technically your blog was launched as soon as you signed up for hosting, whoops sorry I forgot to tell you that!
We didn’t make your new blog private in the sense that no-one has access to it but you, because there is no point, no one knows about your blog yet unless you told some friends. Anyway, I don’t recommend you ever make your blog private, because it is all too easy to forget to turn it off.
Here are some pre-launch checks to make before you start marketing your blog to the world.
Read it here: WordPress Blog SEO – a 17 Point Pre-Launch Checklist
The above post will help you to get a head start on SEO. If you have been following this guide, a lot of what is written here you will already have done.
Step #15 Make a home page
This is an optional step because most themes will show your latest posts on your blog. It was a while before I put a home page on my blog. I have a post to help you.
Read it here: How To Create A Stunning Home Page For Your WordPress Blog
Step #16 Getting traffic to your blog
Because we very diligently created our Pinterest account right at the start, the potential for gaining traffic to our blog at the very start is high.
The work on SEO optimisation we did to our blog in general, and within blog posts, means we have laid the foundations for potential traffic from Google. But traffic from Google will take time to come.
In the meantime, Pinterest will provide us with our readers.
Here are some pointers for helping you to get traffic from Pinterest:
- Make at least one fabulous pin (several is better) for each blog post
Great pins are tall (800×1200-1600px), have large catchy titles, and look great. Look at your Pinterest Analytics and notice the kind of pin designs that get pinned and clicked on the most. - Use keywords in the pin title, and description
Keywords will help Pinterest to understand what your pin is about and help then to rank in searches.
Step #17 Monetising your new blog
Traffic from Pinterest will start to trickle through and it will get larger as you have more blog posts and get better at creating attention-grabbing headlines and graphics.
Later on, the hard work you did on SEO will pay off and Google will start sending you traffic.
I named this post ‘how to start a money making blog’ because of course we all want earn money from blogging. Having thousands of page hits per month, per day, or less earns you nothing unless you can convert that traffic to income.
How you monetise your blog will depend on what you are comfortable with. There is more than one way and you can use a combination.
Here are some options:
- Advertising
When you have achieved steady traffic you can apply to various ad networks. The include AdSense, Mediavine and AdThrive. Mediavine and AdThrive require a minimum number of monthly sessions to qualify for acceptance on their programme. - Sponsored posts
You can approach products that are aligned with your audience or they will approach you. You then write a review of their product in return for cash. - Affiliate links
You talk about products that are relevant to your readers and then add a link which when your reader clicks and makes a purchase you will receive a fee. - Create and sell your own product or service
Once you get to know your audience it may become clear that a particular type of product is desirable.
Wrapping up
In this guide on how to start a money-making blog, we have gone through everything that you need to do to start your blog with WordPress.
I hope you now have a clear picture in your mind about what is involved, and how to create your dream blog.
I have a lot of posts on wpkind.com to help you with technical struggles, and it is growing all the time. If you have a particular problem that you can’t find the answer to, do let me know on my contact page, or comment below. I’m always looking for new ideas for blog posts.
I love blogging, it gives me enormous pleasure, and I am sure that you will love it too, just keep pushing, and you will have the money-making blog you dream of!
