When you first set up a theme for your blog, and some content the next step is to add a WordPress menu so your readers can navigate through your site.
In this post I am going to take you through:
- Creating a new menu
- Adding items to the menu
- Assigning the menu to a location (so that it shows up on your site)
- Editing an existing menu
Before we start, you may already know that there are two ways to edit menus, via the WordPress admin screens or the WordPress Customiser.
The directions for both methods are similar, except that via the customiser you can see the changes as you make them. To keep things simple, this tutorial gives you directions for the former, and I will save the customiser option for another post.
How to create a new menu in WordPress
- Go to Appearance->Menus
- Type in a name (e.g. Header Menu) for your new menu in the Menu Name box
- Click the blue Create Menu button.
Heads up: if you don’t see a blue Create Menu button, click create a new menu link first, and then it will appear.
How to add items to the WordPress menu
Once you have created your menu you can start adding pages, posts, categories or custom links, to it.
If you are not already there, go to Appearance->Menus and select your menu at the top of the screen if you have more than one.
The box on the left-hand side shows the types of content that you can add to a menu, which includes pages, posts, categories, or custom links. You can expand each box by clicking the arrow on the right to reveal a list.
- Click the items that you want to appear on your menu
- Click Add To Menu
- Click Save Menu
To add Home to the menu select Custom Links and then type your blog domain address in the URL box.
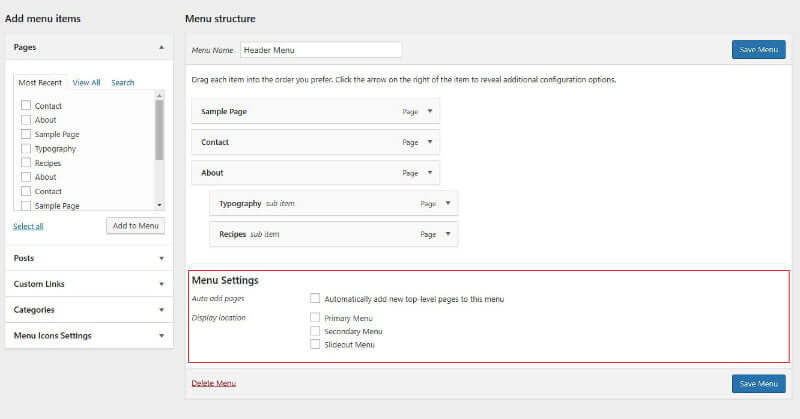
Once you have added items to your menu, you can re-arrange them by dragging or nesting them underneath other items to create a drop-down menu.
How to assign a menu to a location on your blog
To have your new menu display on your website you need to tell WordPress where you want it to appear, you do this by assigning your menu to a location.
The theme developer will have created at least one menu location for you, usually in the header and this location is often called Primary Menu.
You can see a list of locations in the Menu Settings section, or by clicking the Manage Locations tab.
- Click the box corresponding to the location that you want the menu to appear in
- Click Save Menu.
The menu should now appear on your website in the location that you specified.
How to edit a menu in WordPress
You can modify existing menus by adding, removing and ordering its items. You can also create a drop-down menu by nesting other items underneath a parent item.
- Go to Appearance->Menus
- If you have more than one menu defined, select the menu that you want to edit at the top of the screen.
- Click the down arrow icon on the menu item to expand the options.
- Edit the text that is displayed for the menu by editing the Navigation Label.
- Remove the menu item by clicking the Remove link.
Usually, you won’t need to edit anything more than the navigation label, but for more advanced editing, click the screen options tab at the top of the screen, and you can enable more options:
- Link Target: whether the menu item opens in a new window or an existing one
- Title Attribute: the text that appears when you hover over the menu item
- CSS Class: allows you to target the menu item in your CSS
- Link Relationship: the relationship between the current page and the page you are linking to
- Description: usually not needed but some themes may display this
You can reorder menus by dragging them, and you can also create drop-down menus by indenting them underneath another item.
Wrapping up
In this tutorial, we have created a new menu, assigned it to a location, and learned how to edit a menu.
You can also do everything I have just shown you directly in the WordPress Customiser too. The advantage of doing it that way is that you can see your menu visually as you create it, plus you can choose to discard changes if you don’t like what you see.


