Welcome to my mega exhaustive list of 24 essential settings after installing WordPress that you must make to get you on the right track for blogging success.
WordPress famously advertises the five-minute install, but if you want to start your WordPress blog off in the right way it is vital that you carry out some essential settings before you start publishing.
Here are a few tasters, to demonstrate the ramifications of not doing the leg work up front:
- If you don’t set your permalinks scheme properly from the get go it could have serious adverse effects on your site ranking if you change it later, so best get it right now.
- If you happen to leave the reading settings on ‘private’ your site will never be seen in Google, seriously damaging!
- If you don’t set up your mailing list right at the beginning, you could miss out on some essential leads.
Don’t be put off by the number of things there are to do because a lot of these are quite small. Some tasks might take you longer to complete such as choosing a theme, but a theme is crucial to get right, so it’s worth spending time on that.
I know you want to create the best blog that you can. Following my guide here will send you on a course for blogging success.
So, let’s get started!
#1 Update WordPress and plugins
Of all the essential settings that you must make after installing WordPress, this is the most important.
In fact, I would like you to get into the habit of keeping WordPress up to date on a regular basis.
You must make sure that you have the latest version of WordPress and the latest versions of any plugins you have already installed on your blog. It can be a security issue if your blog is not entirely up to date.
There are lots of bad bots out there, intent on hacking into your site. If you have an out of date plugin, hackers can use known flaws to help them cause havoc on your website, so it’s essential to keep up to date.
#1 Update WordPress and plugins
- Make sure you take a backup first.
- Head over to Dashboard->Updates.
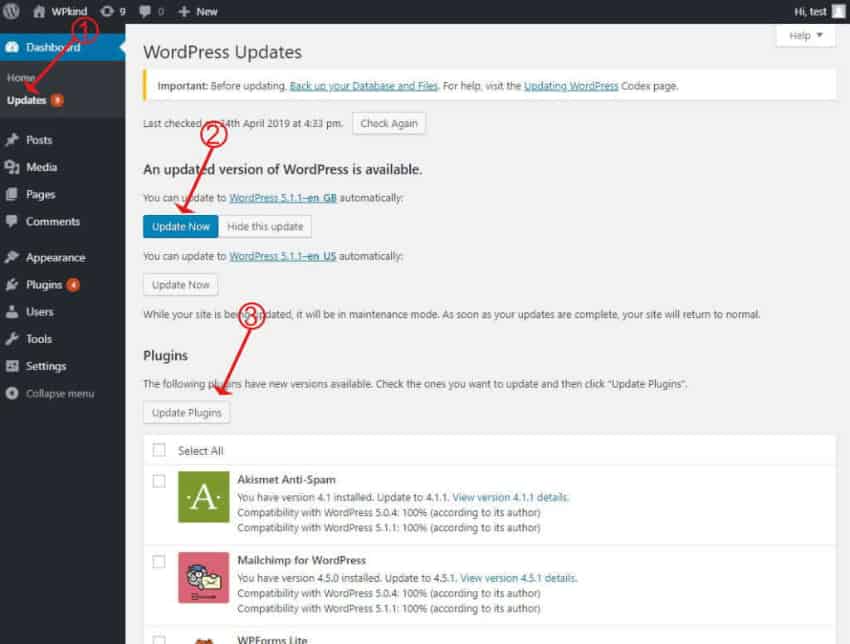
- If you don’t have the latest version of WordPress, a blue Update Now button will show up, click it to update WordPress, do this before you update the plugins or themes.
- Click the Select All button to tick all the out of date plugins and then click Update Plugins.
- Further down the page update any themes that need updating too.
Further reading: How to Update WordPress the Right Way
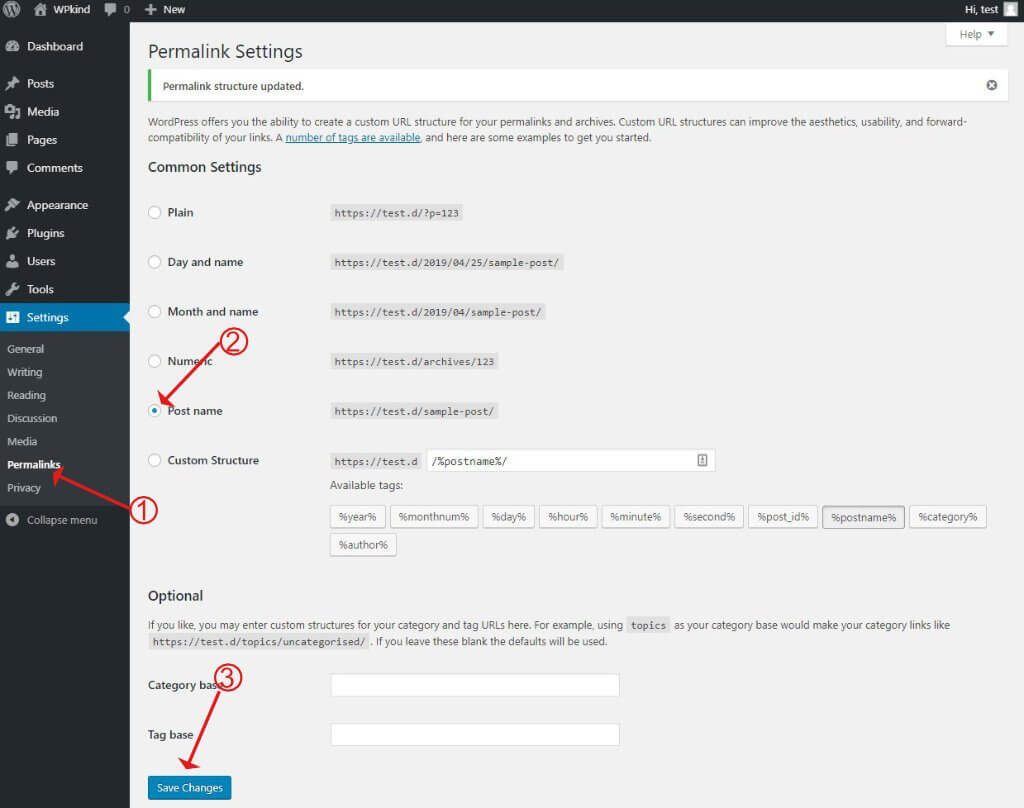
#2 Change the permalinks
When you first start your blog, WordPress will set the URL structure up like this:
https://exampleblog.com?p=45678or like this:
https://exampleblog.com/2021/03/17/five-good-reasons-to-start-a-blog/For better SEO and usability it is better to have just the post name in the URL, e.g.
https://exampleblog.com/five-good-reasons-to-start-a-blogWhen you use a friendly URL, it is a chance to add some keywords pertaining to the subject of your post, which gives Google more information and your page ranking improves as a consequence.
There are two recommended ways to set up your permalinks. One is to include the category and the post name like this:
https://exampleblog.com/tutorials/how-to-fell-a-treeor just the post name like this:
https://exampleblog.com/how-to-fell-a-treeI like to go with the second option because if I subsequently change the category of a post the URL does not change. Which means I don’t introduce another problem of having to create redirects from the old URL to the new.
You should never update your permalink scheme if your blog is already live and has posts indexed by Google.
Updating the permalink scheme after going live will cause the pages that Google has already indexed to return ‘page not found’, otherwise known as a 404, which is very bad for your site ranking.
#2 Change the permalinks
- Go to Settings->Permalinks
- Select the Post name option
- Click Save
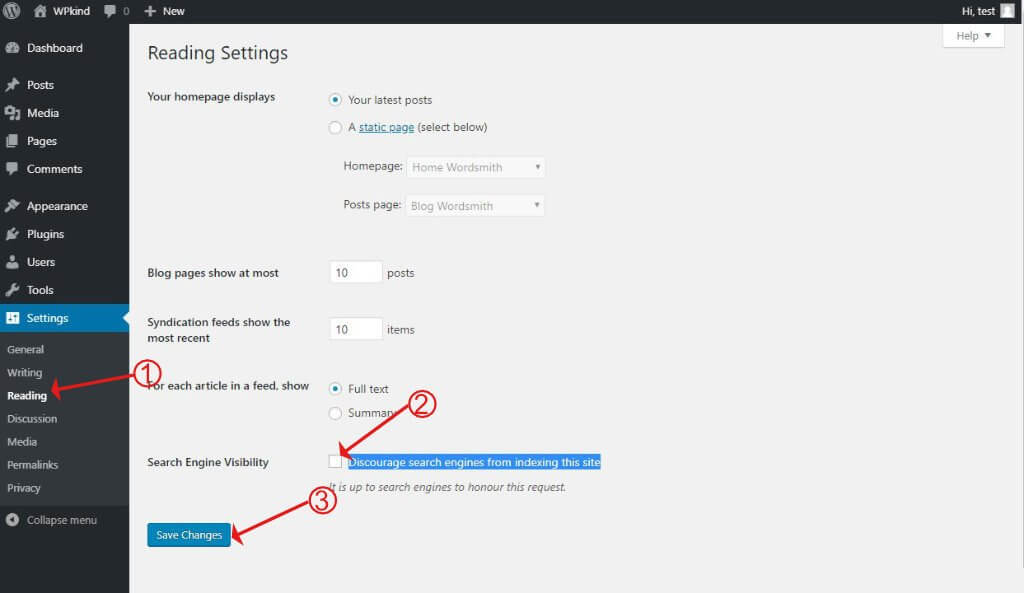
#3 Set Reading settings
In this step, we make sure that Google, Bing, Yahoo, and other search engines can index your blog.
When you first create your blog, the setup wizard will ask you if you want to ‘Discourage search engines from indexing this site‘.
It is tempting to turn this on when you start a new blog because you probably don’t want people to see it when you are in the process of creating it.
When you discourage search engines, WordPress adds a special noindex code to all pages, which has the effect of sending search engines away when they try to index it, and therefore your site will not appear in search results.
It is pointless doing this because a new blog will likely not rank highly enough to appear anywhere in search results anyway.
When you first create your site you may think that you would want your website to be kept private from search engines and you may have ticked this box during set up, and if you did this, I thoroughly recommend you turn privacy off again, as you may forget to do it later which will be disastrous for your SEO.
#3 Set Reading settings
- Go to Settings->Reading
- Check that Discourage search engines from indexing this site is un-ticked
- Click Save
#4 Set up the site name and tagline
The site name and tagline is a way to describe your website to your visitors and to search engines. Often the Site name is the domain name without the extension. On this site it is WPkind.
The tagline is a short sentence that gives a little information about your website, and it is an opportunity to incorporate some SEO keywords within the sentence.
If you are going to add keywords, make sure you keep it readable and don’t stuff keywords into it.
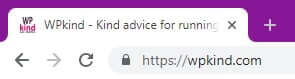
For the home page, the site name and tagline is used to make up the title that is shown in the browser tab along with your favicon if you have one. On this site, I currently have a tagline: Kind advice for running your blog with WordPress.
Below is how it shows up in a google search:

#4 Set up the site name and tagline
- Go to Settings->General
- Update the site name
- Update the tagline
- Click Save
To make changes about how the site name and tagline make up the title for your home page, you can use the Yoast plugin. The Yoast plugin is one of the essential plugins I recommend for WordPress blogs.
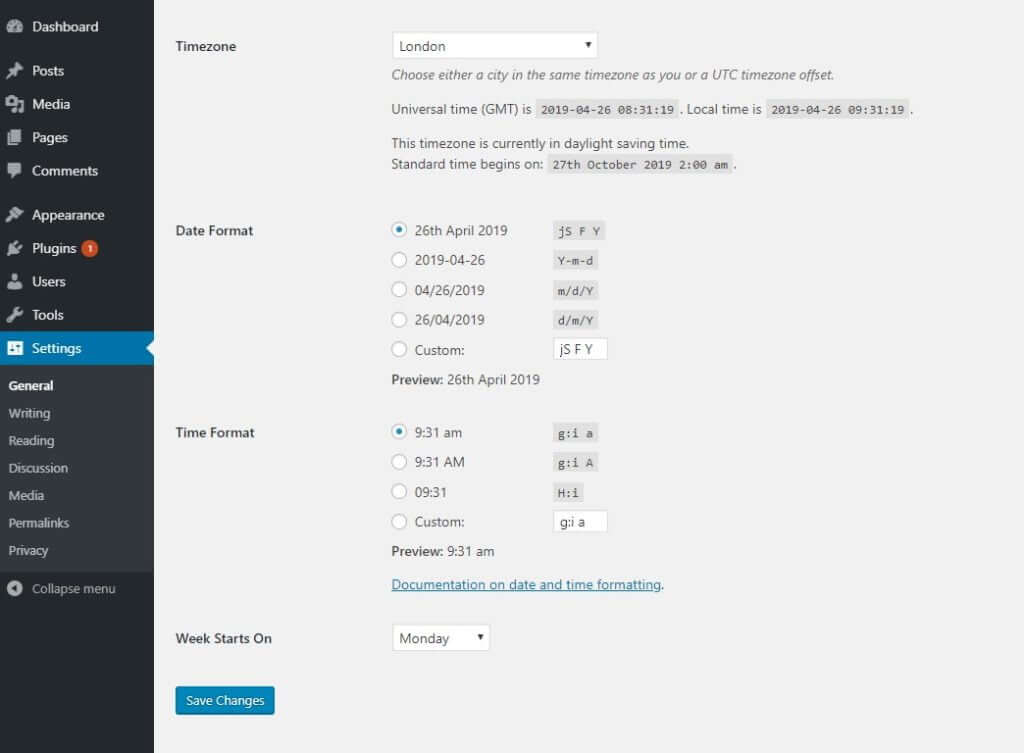
#5 Change the time zone, date and time format and language
Setting the time zone to your local time is important because it affects the times that appear when you publish a post, and also affects any posts you schedule for publication at a later date.
You can also select how the dates display on your post by choosing a date and time format.
If you need to have the admin screens in a different language, then updating the language, will make the admin screens magically translate. Note that doing this will not translate your site content, you would do that with a plugin such as WPML.
#5 Change the time zone, date and time format and language
- Go to Settings->General
- Scroll down until you see Language
- Select your chosen Language
- Select the correct Timezone according to where you are (not where your site visitors are from)
- Select a date and time format
#6 Change the admin username to something else
In older versions of WordPress, a user called ‘Admin’ was created automatically during setup. Trying to log in and guess the password for user ‘admin’, was a popular way for bots to hack their way into WordPress sites.
Thankfully WordPress does not do that any longer, and you can choose your own username during setup. If your current administrator username happens to be ‘admin’, you must change it to something else.
The best way to do this is to create a new administrator account with a new username and password, then log in as that new user and delete the old admin account.
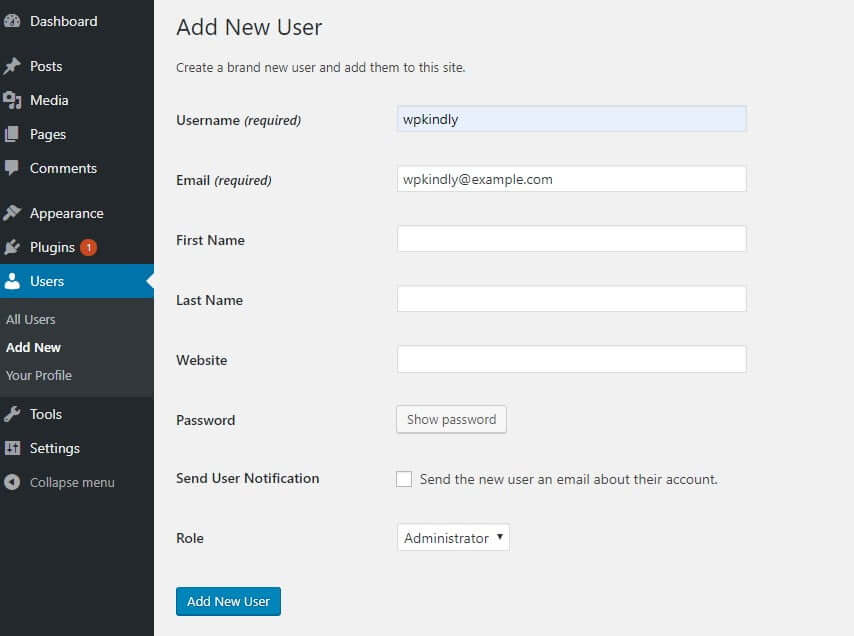
#6 Change the admin username to something else
- Go to Users->Add New
- Enter a new username
- Enter an email address. This cannot be the same email that you used in the previous admin account. If you do not have a spare email address enter the same one but with a number at the end, e.g. [email protected]
- Uncheck Send User Notification. It is important to uncheck if you have entered an email address that does not exist because you will not be able to confirm the address via email.
- Optionally enter a first name, last name, and website
- Select the Administrator role
- Click Show password and copy the password to a safe place
- Click Add New User
- Now log out of WordPress and log in again as the new user you have just created
- Go back to Users
- Delete the old Admin user
- Update the email address of your new profile if necessary
- Use this new login from now on to log into WordPress
Helpful post – How to Change Your User Name in WordPress
#7 Complete your user profile (Get a Gravatar)
In your user profile screen (Users->Your Profile) you can make settings such as change your password, enter a bio, and change your Gravatar (the little picture that is displayed against your name when you comment).
A Gravatar is associated with an email address, so setting it will allow the same picture to show on all sites where you leave comments using that address.
I also like to enter a Nickname, which will display instead of my actual user name as the author of posts and comments.
#8 Delete sample content
When you first set up your WordPress site, you will find a sample post and page. Before you start to add your content, you will want to delete those pages.
#7 Complete your user profile (Get a Gravatar)
- Go to the Posts tab
- Mouse over the Hello World post
- Click Bin
- Do the same for the Sample Page post on the Pages tab.
WordPress also creates a Privacy Policy page that you will want to keep to comply with GDPR. You will need to update this page according to what data you collect on your site (contact form, email opt-in) and add a link to this page on your website, usually in the footer.
Related reading: Three Legal Pages You Need On Your Blog and How To Make Them
#9 Delete the Hello Dolly plugin
The Hello Dolly plugin was created by Matt, the founder of WordPress, as a little motivation tool to keep people blogging each day. It is extremely lightweight and harmless, and you could keep it if you wanted to, but I usually delete it as I like to keep plugin numbers to a minimum.
#8 Delete sample content
- Go to Plugins
- Scroll down until you see the Hello Dolly plugin
- Click Deactivate
- Click Delete
#10 Choose a good theme (remove old ones)
When you first install WordPress, a default theme is activated called TwentyTwentyOne. You will probably want to pick a different theme.
I recently went through a process of choosing a new theme for my blog and this is the post I wrote about that – Three of the Best Free WordPress Themes for Blogs.
If you have read my post you will know that I eventually chose GeneratePress, and here is the review I wrote – GeneratePress Review – The Best Theme In WordPress History.
Update: I have since swapped to Thrive Theme Builder theme. Here is the post I wrote about that: Why I Switched To Thrive Theme Builder WordPress Theme.
Choosing a theme is an important step, and you don’t want to rush it, so you may want to carry on with the tasks in the rest of this post while you do your research. When you do make your choice, here is my guide to installing a theme.
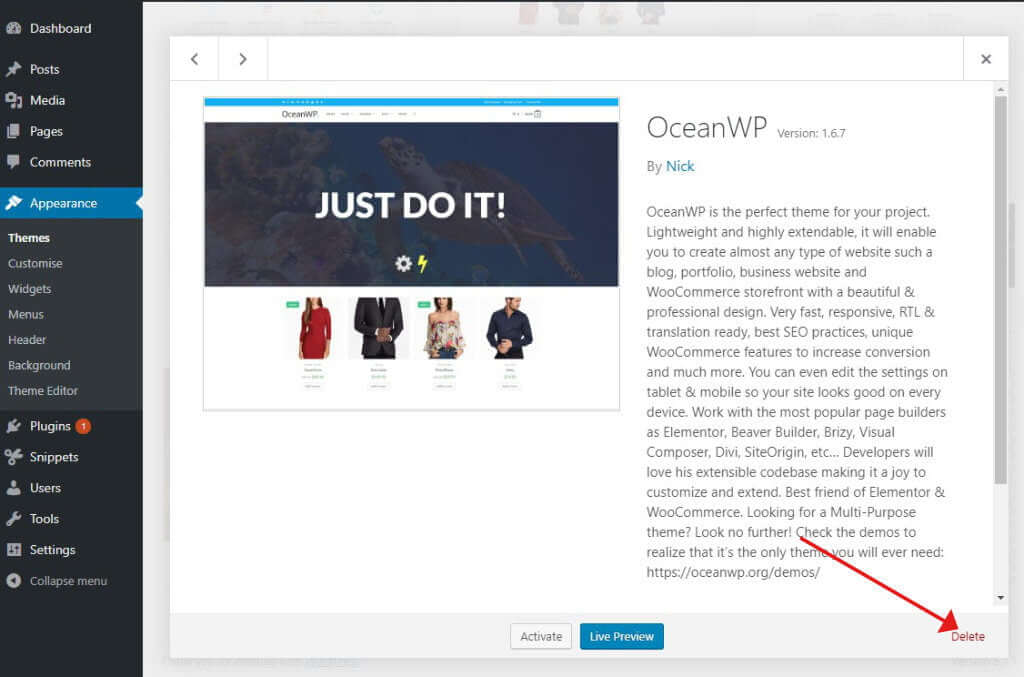
When you have your new theme installed, don’t forget to remove the themes you are not using. It is a good idea to keep at least one spare though. I usually keep the default theme installed Having a spare theme is useful should you need to troubleshoot your site, by swapping to another theme temporarily.
#9 Delete the Hello Dolly plugin
- Go to Appearance->Themes
- Click the theme you wish to delete to open it
- Click the delete link on the bottom right
#11 Set up your categories (and change the default one)
If you know what you are going to blog about, then it is a good idea to set up your categories at the start if you can.
Categories allow you to group related posts. WordPress will create an archive page for each category, so don’t create more than you think you will need, you can always create more later. You can group categories to create a hierarchy if that makes sense for your blog.
You can also create tags which is an additional way to group your posts. Tags are not hierarchical, but again WordPress will create an archive page for each tag, so don’t get too liberal with your tag creation, just create the tags that you think you will need, you can create more later as needed.
When you name your categories and tags it is an excellent opportunity to use a keyword that people might be searching for. For example, I have a category called Learn WordPress.
Depending on what theme you are using the categories and tags for each post will typically appear under the title, or at the end of the post.
#10 Choose a good theme (remove old ones)
- Click the Posts tab
- Underneath the Posts tab, you will see further tabs for Categories and Tags
- Click either Categories or Tags and begin entering your category or tag names
WordPress will create a slug for each category/tag based on the name you give it. Slugs make up the URL, for example:
https://example.com/camping-equipmentWhere camping-equipment is the slug for the category Camping Equipment.
You can edit the slug that WordPress creates if you need to.
Related reading: Categories VS Tags In WordPress And How To Use Them Properly
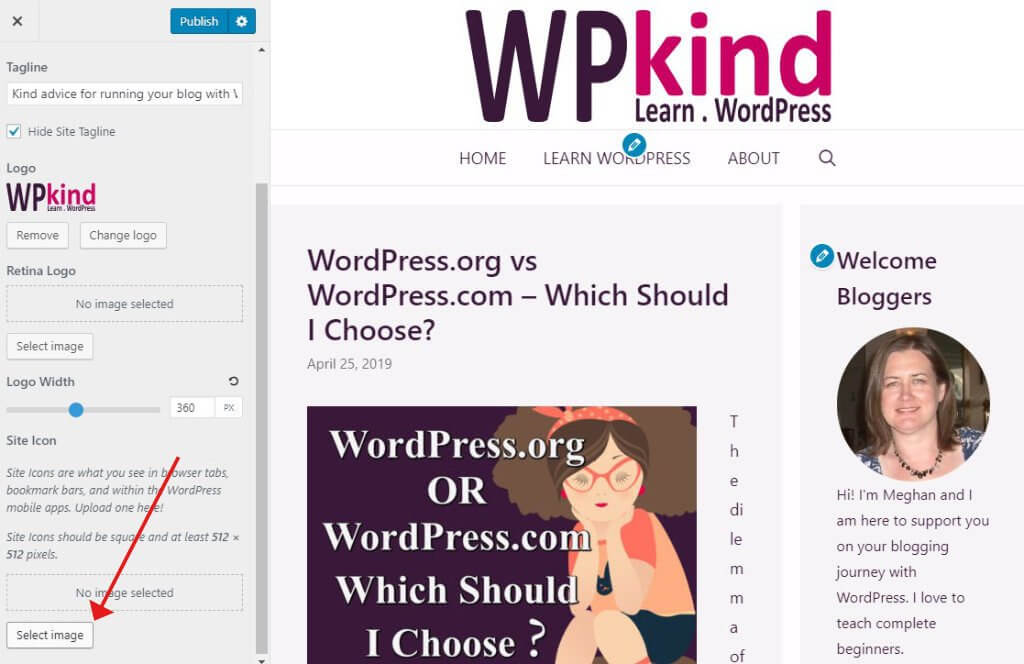
#12 Add a favicon
Favicons, or site icons, are the little icons that appear to the left of the title in the browser tab and in bookmark bars. It looks much more professional if you have one. If you don’t have an icon yet, this is something that you can make a note to do later.
Site icons should be a minimum size of 512px X 512px.
Having a favicon allows you to use rich pins on Pinterest, so it is very worth having one. You can design one quite easily using Canva.
#11 Set up your categories (and change the default one)
- Go to Appearance->Customise
- Select Site Identity from the Customiser
- Scroll down to Site Icon
- Click on Select Image
- Select your favicon from your Media gallery or upload one
#13 Set up commenting
When you first install WordPress, comments will be turned on by default. Now is a perfect time to make some site-wide settings as it avoids extra work later going through existing posts and changing the comments settings individually.
I have a great post here on how to manage comments in WordPress.
You will find the discussion settings under Settings->Discussion.
#12 Add a favicon
The modifications you can make are self-explanatory on the whole, but here is what I like to set:
- Tick Comment author must fill out name and e-mail because it’s nice to know the names of people who comment.
- Tick Show comments cookies opt-in checkbox, allowing comment author cookies to be set, which means people can optionally save their details in a cookie so they don’t have to type them again the next time they comment.
- If you run a very popular blog you might want to close comments after a period of time, if so check that option.
- Tick Enable threaded (nested) comments 5 levels deep, allowing replies to existing comments to be indented, which I think looks neater.
- Tick Break comments into pages with a maximum of 50 top level comments per page
- Set newer comments to display at the top, because it’s nice to show the most recent comment first.
#14 Create a navigation menu
Creating a menu is something that you need to do, but it won’t be possible if you have not yet created the pages for your site. If that is the case, then it is an excellent time to think about what pages you will need and which of those need to appear on the menu.
Bear in mind that you can also have categories on the menu. I have a category called ‘Tutorials’ on my blog menu where I put all my WordPress tutorials so that people can find them easily.
When you get to the point of needing to create a menu, you can do this by selecting Appearance->Menus.
This post – How to add a WordPress navigation menu takes you through step by step how to add a menu. If you are not quite ready to do this just yet, do bookmark the page and come back later.
#15 Avoid spam by installing a plugin
If you enabled comments in the earlier step, then, unfortunately, you need to worry about spam, sorry! I didn’t mention this earlier because I didn’t want to put you off enabling comments, but really it is pretty easy now to deal with comment spam by installing a plugin.
The spam plugin I recommend is Akismet. I have written another detailed post here on how to install the plugin and set up spam detection – How to Prevent WordPress Spam.
Update: I now recommend a plugin called Cleantalk instead of Akismet because in addition to stopping comment spam it also stops spammers using contact and opt-in forms. Read more about it here: How To Banish Comment and Contact Form Spam With The CleanTalk Plugin.
#16 Add Google Analytics
Once your blog starts to grow it is very useful to know how much traffic you are getting and where it is coming from along with a whole host of information that Google provides about your visitors, including their location, what device they used to access your site and how long they spent browsing, and much more.
The theme you are using may allow you to connect a Google Analytics account to your website, but don’t worry if not because it is very straightforward to do this with a plugin.
#13 Set up commenting
The first thing you need is a google account. If you don’t already have one, you can create one here. I have a full guide here on how to set up google analytics in WordPress.
How To Set Up Google Analytics On Your WordPress Blog
#17 Install a security plugin
My favourite security plugin is Wordfence. It protects your site in a multitude of ways. You can use it to scan your website for any changes in WordPress core files, plugins and themes. It has an inbuilt firewall which will block anyone attacking your site. It will also limit login attempts for anyone (or thing) trying a brute force entry.
There is much more you can do to secure your site which I cover here – Better Blog Security in 8 Easy Steps.
#18 Add Yoast SEO plugin
The Yoast SEO plugin is one of my Essential WordPress Blog Plugins. There is a free version, so you don’t have to part with any money. The Yoast SEO plugin adds the necessary metadata to all your blog posts, making them more shareable, and more friendly for search engines.
If you are going to be using Pinterest and want to use rich pins, then you need the Yoast SEO plugin activated to get verified.
The Yoast SEO plugin is great for prompting you to enter metadata for your blog post and helps you to optimise your post for the best page ranking, so it is a must-have plugin in my view!
#19 Add a social sharing plugin
When you start to publish your blog posts, you will need to share them on social media sites, and as well as that, you need to make it easy for other people to share your posts too.
The best way to do this is with a social sharing plugin. My favourite plugin for social sharing is Grow by Mediavine (previously called Social Pug) Another popular one is Social Warfare. I like these plugins because they are both lightweight and look good too.
I don’t often recommend upgrades, but I recommend the Grow premium upgrade in this instance because it allows you to set different images for the various social networks.
If you haven’t started using Pinterest to share your blog posts, then you probably will very soon, and if you didn’t already know, Pinterest favours tall images rather than wide ones.
For each featured image you create for your post, you will need to create a tall one for Pinterest.
The Grow premium plugin allows you to enter the tall Pinterest image, and a wide image that you will share on Facebook along with the normal featured image that will appear on your posts, so it is a must-have upgrade. At just $34 (at time of writing) for one year of updates, it’s a steal!
#20 Add an about me page
An about me page is something easily forgotten when you first start your blog, but it is an important page because it is a way to introduce yourself to your visitors and to let them know what you can do for them.
Here are some ideas of what to put on the your page:
- A picture of you, so people can see that you are a relatable person.
- Some interesting information about you and what you do
- How your blog can benefit your reader
- Your opt-in form, because if people are interested enough to look for more information about you they, may also want to hear from you via email
- Social follow icons, so people can easily find and follow you on social media
#14 Create a navigation menu
- Go to Pages->Add New
- Add a title and start creating your page
The next step is to add your new about page to the menu:
- Go to Appearance->Menus
- Select the header or footer menu
- Add your new about page to the menu
Here is a great post I found on how to create an about me page from our friends at WPKube – Create a killer about page.
You could also add a little about me section to your sidebar along with a link to your about page.
I recommend the Elementor page builder plugin for designing pages. I have a tutorial here for using to create a home page, but the same principals can be applied to your about page too.
You can now do a tremendous amount with just the block editor. You will need some extra plugins but they are all free.
Related reading:
- How To Use The GenerateBlocks Plugin To Supercharge The Gutenberg Editor
- How To Make a Contact Form With Kadence Blocks
#21 Add cookie notification
The European Union’s GDPR (General Data Protection Regulation) cookie law requires that websites servicing residents of European countries obtain their consent before storing data in the form of cookies in their browsers.
If you have enabled Google Analytics, then you have at least one cookie that needs user consent.
To obtain consent, you need to display a banner asking first-time visitors to accept or reject cookies from being stored in their browser.
There are various ways that you can add the banner, either using a plugin or a service and I have talked about the various ways you can achieve compliance here.
The plugin I use currently is this one and I have a tutorial on how to use it here – How To Add A Cookie Notice To Your WordPress Blog For FREE.
#22 Add a privacy page
When you first set up WordPress, a draft privacy page is automatically created for you, with headings and some sample text for you to edit to suit.
The details that you enter into your privacy policy depends on what data you collect and store on your WordPress site. For example, if you have a contact form on your site, you will need to state where the contact details are stored, how long they are kept and what steps the user should take to request deletion.
You can set the Privacy page by going to Settings->Privacy.
Specifying a privacy page doesn’t do much other than remind you where your privacy page is located and provide quick access to viewing it and editing it.
You should periodically review your privacy page making sure that it is still relevant for any extra functionality you may have added since the last update, such as a mailing list for example.
I have more help for you here on creating a privacy page for your blog.
#23 Add a mailing list and opt-in
Many people who advise on blogging say that you must have a mailing list from day one of launching your blog, and I agree with this. I have read a lot of posts from people who regretted not adding a mailing list immediately and therefore missed out on vital sign-ups.
ConvertKit and MailChimp are popular mailing list providers for bloggers. MailChimp has a free tier for up to 2,000 sign-ups, and Convertkit now has a free plan for up to 500. I now also recommend Mailerlite which has a free tier for up to 1,000 subscribers with full functionality.
Once you have an account, you need to add an opt-in form to your blog. The sidebar is a good place. You can also add one at the bottom of posts or have a popup, to draw people in using something like Thrive Leads.
Elementor Pro has a form builder that allows you to connect to the popular email apps.
Related reading
- How To Start A Mailing List With ConvertKit
- How To Use Mailerlite Email Marketing With WordPress
- How To Use MailChimp With Your WordPress Blog
#24 Install a backup plugin
Having a backup up of your whole blog is very important.
If your site is hacked, or you delete something by mistake, you may need to restore it, and if you don’t have a backup it could be a tricky task getting your site back.
Top hosting providers will create a daily backup for you automatically. Siteground will back up your site and send it to Dropbox every day. However, I don’t recommend you rely solely on your host for backups, you need to have one that you can access personally.
You can take backups yourself by installing a plugin. I like to use a plugin called Updraft.
For more help on taking a backup see my post – How to Take a WordPress Backup. The advantage of having a plugin do the backup is you can have more control on where the backup is stored and how often backups run.
Final thoughts on the essential settings you need to make after installing WordPress
This post has been a very extensive and intensive rundown of everything you will want to do after you first install WordPress.
Although there are a lot of separate tasks to do, many of them are very quick, so it won’t be long before you can get down to doing what you came here to do and start blogging!


