Today, I am going to take you through how to start a mailing list using ConvertKit.
ConvertKit is an email marketing service for bloggers. Its primary purpose is to allow you to gather and maintain a list of email addresses, organise them, and send marketing emails.
With the provided WordPress plugin, you can easily add sign-up forms to your website so that you can maximise your opt-in rate.
When you begin to gather subscribers, you can send one-off or automated email campaigns using ConvertKit’s visual campaign planner. It has a straightforward email designer that allows you to write and send emails to your list quickly and easily.
ConvertKit can connect to a myriad of other apps including Teachable, Woocommerce, Shopify, Zoom and much more.
I have a full review of ConvertKit here.
Why you need a mailing list
Just like any other brick and mortar business, marketing is vital for providing leads and ultimately, sales, it’s a way of turning window shoppers into potential clients.
When your window shoppers (aka website visitors) come to your site, you want them to become potential customers, and to do that you need to contact them.
ConvertKit provides several ways to encourage customers to leave their contact details with you:
- A form inside a blog post
- A landing page with a sign-up form
- A popup
- A form at the bottom of every post
You can use ConvertKit to sweeten the deal even further by providing an opt-in freebie, or lead magnet.
Let’s find out how we can use ConvertKit with our WordPress website to gather subscribers.
Open an account at ConvertKit
When you sign up for a new account, you should use an email address from your website domain rather than a free email address like Gmail.
If you don’t already have an email address, you can create one in the control panel of your hosting. Here is a guide to setting up an email address with Siteground; the method will be similar for other hosts too.
When you have your own email address, you can proceed to sign-up for a new account.
- Visit ConvertKit and click the Sign Up button.
- ConvertKit has an onboarding wizard to start you off.
- If you already have your blog set up with a custom domain, make sure you answer yes to the question – Do you have a website?
- At the end of the wizard, you will be able to enter your domain email address and password.
Create a ConvertKit opt-in form
Now we have an account at ConvertKit you will find that you already have a list set up.
ConvertKit only allows one list. But don’t worry that your list could get unwieldy, because ConvertKit makes heavy use of tags.
Tags allow you to categorise your email list. People that sign-up for a particular opt-in such as an email course or a printable can be given a tag. You could also tag people who visit a certain page on your website or click a link in an email.
You can only have one list, but you can have multiple opt-in forms. You could create a form to deliver a printable, a form to trigger a series of automated emails or just a simple general opt-in to your list.
Let’s find out how to create a form.
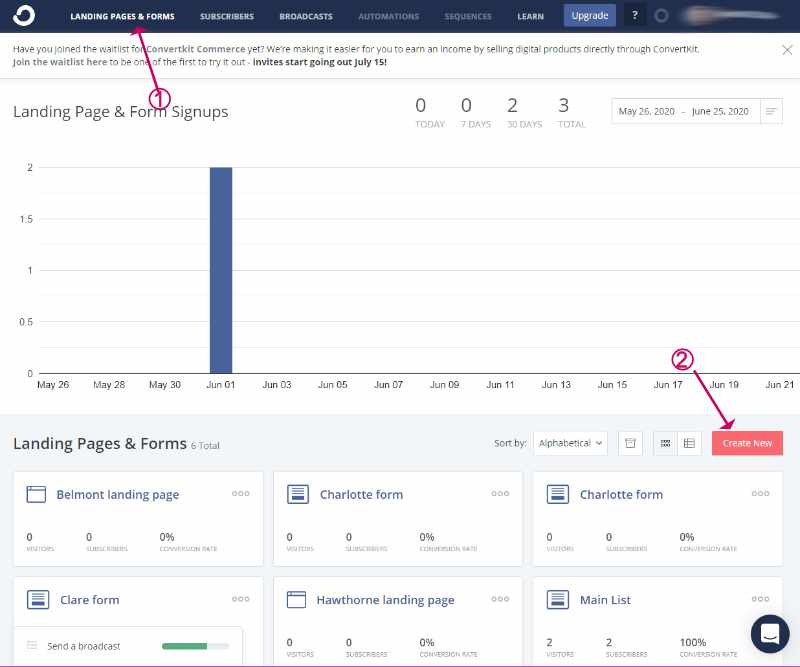
- Click on LANDING PAGES & FORMS from the top bar.
- Click the orange Create New button.
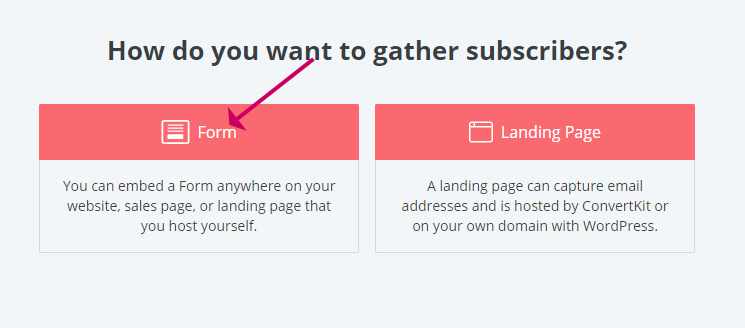
- On the next screen select Form because we want to create a form rather than a full landing page for our opt-in.
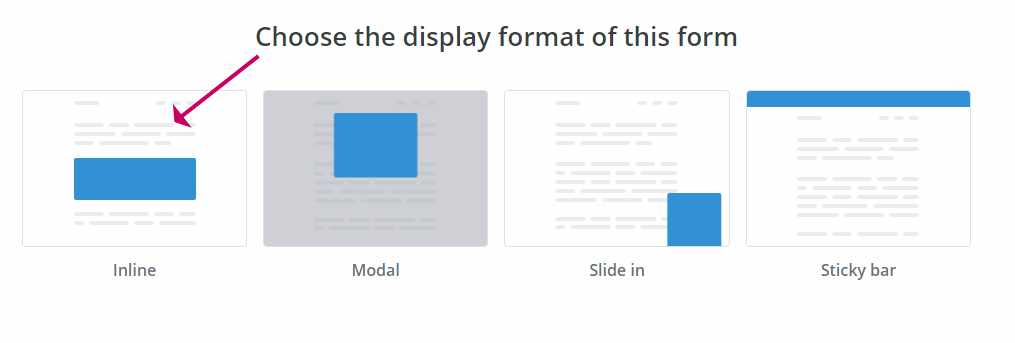
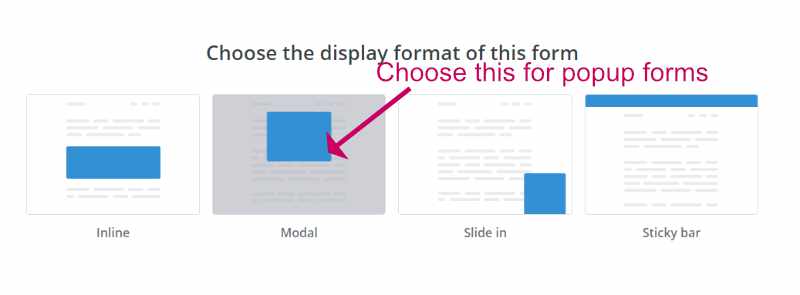
- On the next screen, choose Inline because we want to embed this form at the bottom of our posts. Modal allows use to make the form popup on our website, Slide In is similar, but the form will slide into view. Sticky bar opt-ins can be used to make an opt-in more visible to users.
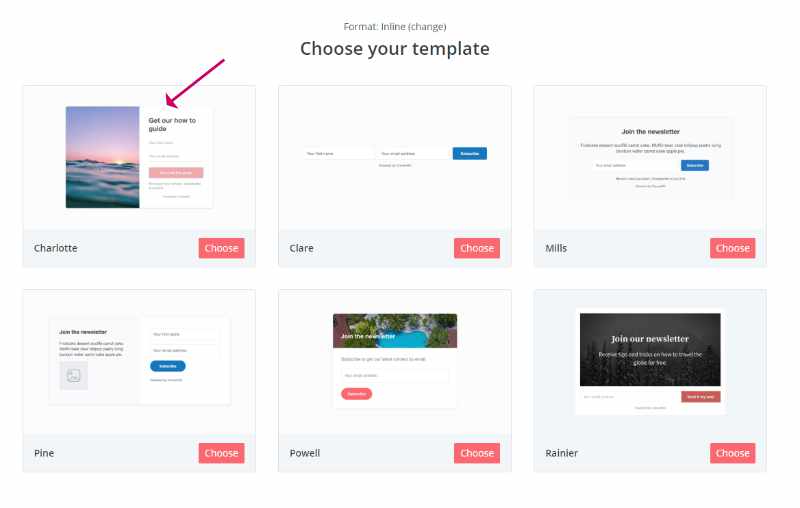
- Next, we will choose a template for our form. In this example, we will go for the first option that shows an image on the left and the sign-up form on the right. Choose the option that most fits the form design that you have in mind. You can change the images and text later.
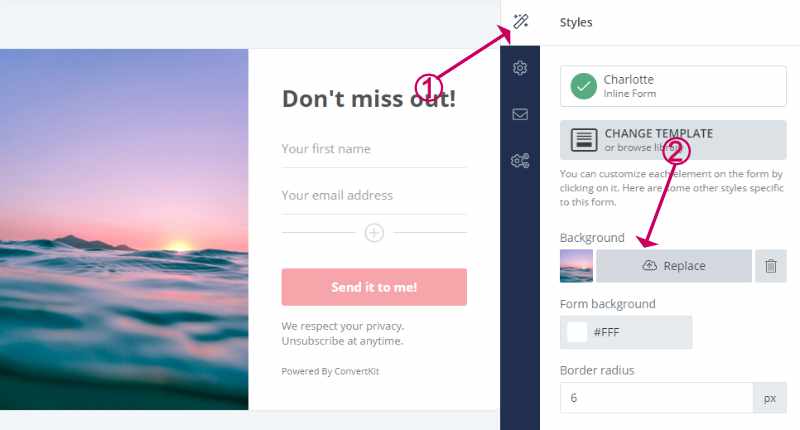
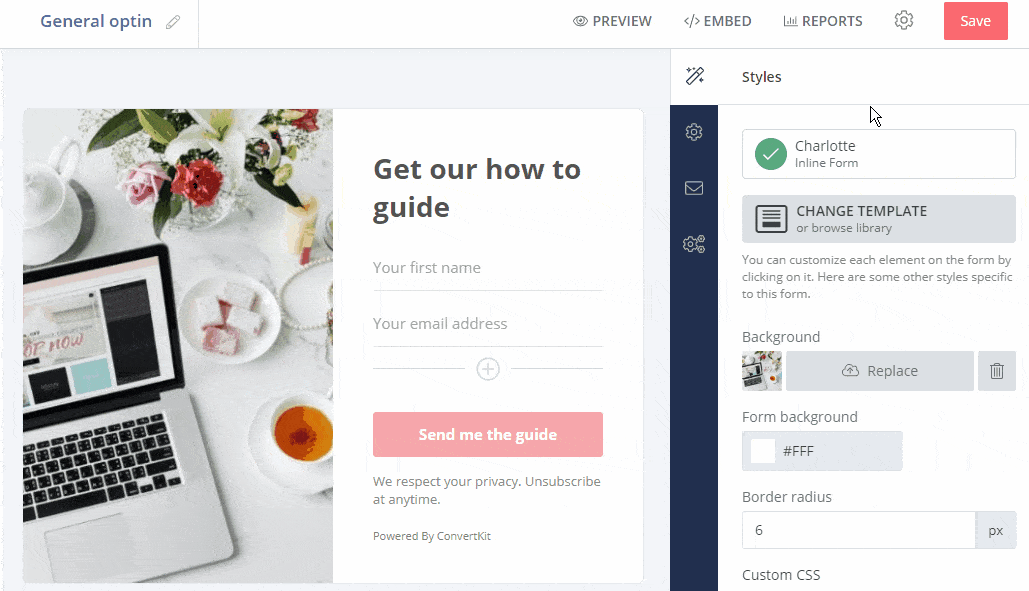
- On the next screen, we can modify the form.
- The form text can be edited directly by simply clicking on it, as shown below.

- Change the image by clicking the wand tab then the replace button.
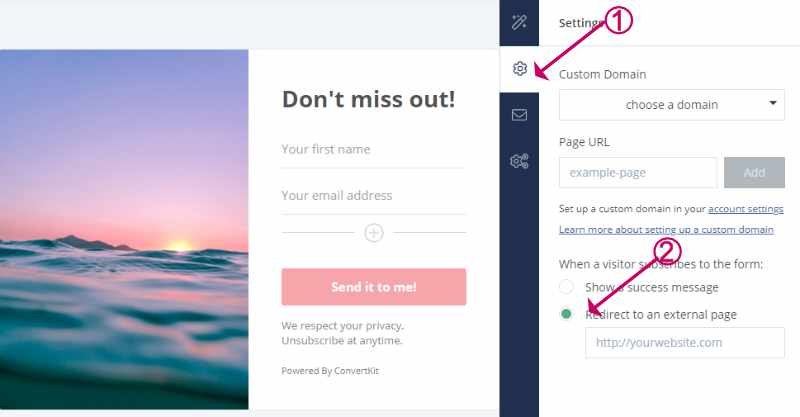
- Next, I advise redirecting to a success page after sign-up. If you do that it is much easier to track your opt-in conversion rate in Google Analytics.
- If you don’t yet have a success page set up, leave it blank and you can complete it later.
- Lastly, you may want to edit the confirmation email that is sent to your user when they first sign up. This is known as double-opt-in.
- Note: you can sign-up subscribers immediately by clicking Auto-confirm new subscribers. However, ConvertKit doesn’t recommend this method because it can lead to spam sign-ups.
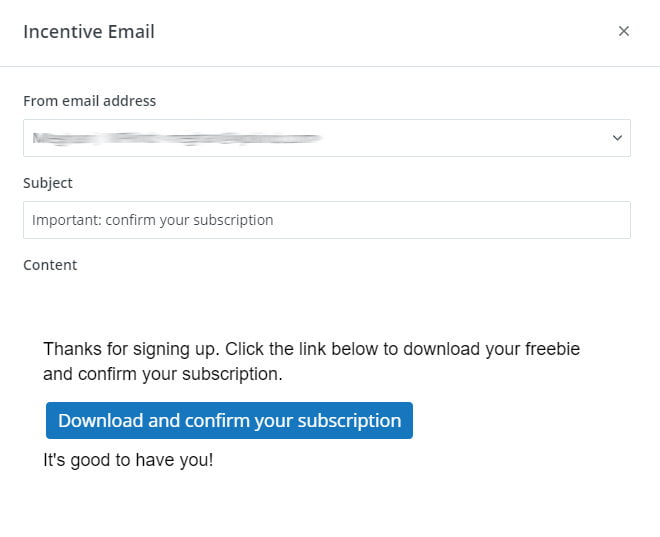
- If you are going to be using the form to deliver an opt-in freebie, click the Download button and then upload your media.
- Click the Edit Email Contents button to edit the confirmation message. ConvertKit calls this email an Incentive Email because it allows you to give away your freebie in turn for an email address.
- If you are delivering a freebie you will want to edit the Confirm Your Subscription button text to something like Download and confirm your subscription.
- The last step is to save your new opt-in form using the Save button at the top.
Install the ConvertKit WordPress plugin
Now we have created an opt-in form the next step is to integrate ConvertKit with our WordPress blog so we can capture email addresses from the website.
ConvertKit very conveniently provides a free plugin to help you add ConvertKit forms directly in WordPress.
- Go to Plugins->Add New
- Search for ConvertKit
- Click Install Now
- Then click Activate when it appears
Now the ConvertKit plugin is installed we need to connect it to your WordPress account.
Here’s how:
- Go to Settings->ConvertKit
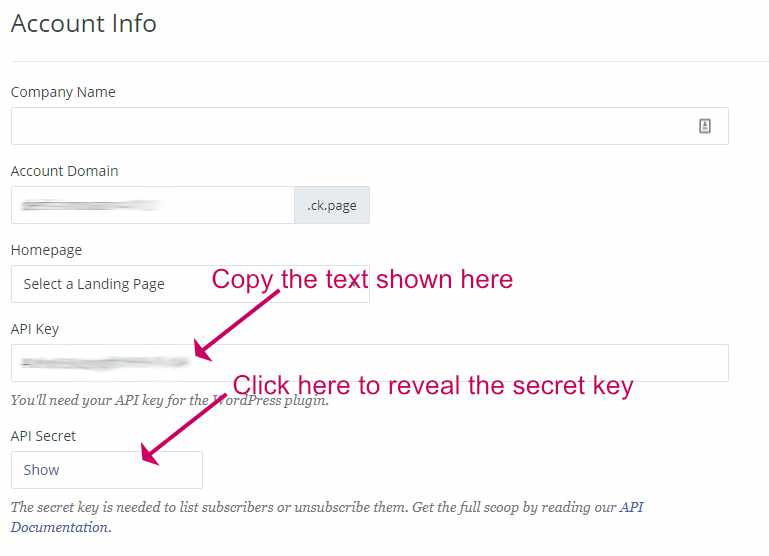
- Click Get you ConvertKit API Key
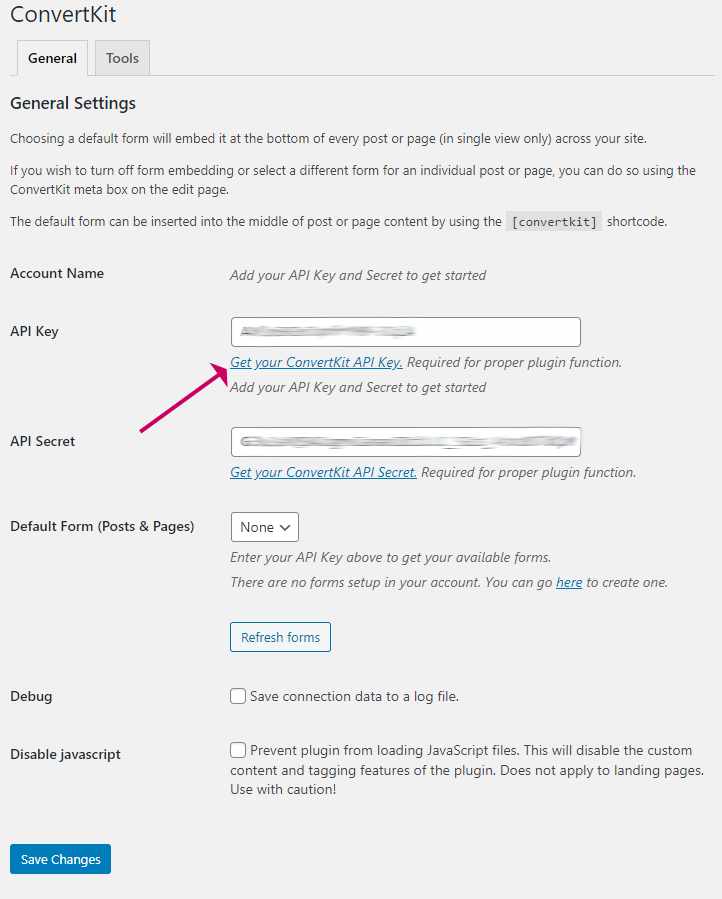
- Copy the API Key and paste it into the API Key text box above.
- Click the Show button to reveal the secret API key, copy it, then paste into the API Secret text box in the screen above.
- Click Save Changes
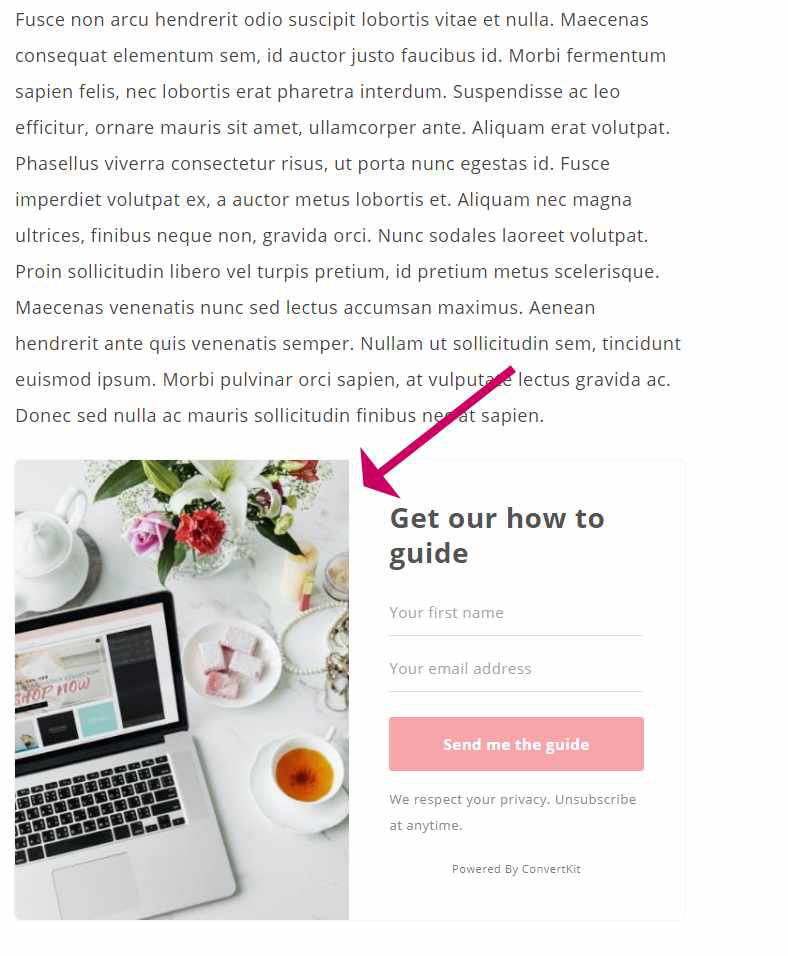
Add the ConvertKit opt-in form to the bottom of your posts
- Go to Settings->ConvertKit
- Make sure you have entered your API key and API secret in the earlier step.
- The Default Form drop-down will populate with the form you created earlier. If you created more than one form, you will have a selection to choose from.
- Choosing a default form will have the effect of placing that form at the bottom of all your posts and pages.
If you want to have a different form on a particular post or page, you can edit the options of the specific post/page.
- To change which form appears for a particular post or page, click Edit Post
- Select a different form or select None if you don’t want a form to appear.
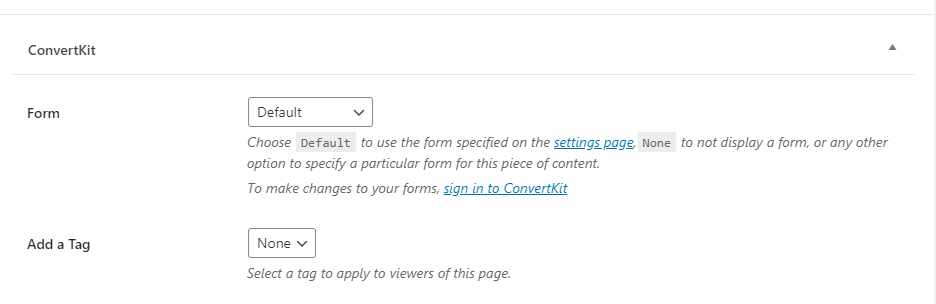
- You can also select a Tag that will be added to a subscriber when they visit that particular page. This can help you to learn more about your subscribers.
How to embed a ConvertKit opt-in form in the middle of a post
The above directions were for adding an opt-in form to the bottom of a post. But what if you need to have an opt-in half-way through a post?
We can do that with a shortcode.
For every form you create, ConvertKit also creates a shortcode that you can use in WordPress. The shortcode will be something like [convertkit form=1234567].
- To get the shortcode, go back to ConvertKit and select the form you created earlier.
- Choose Embed->WordPress
- Copy the code.
- Go back to your WordPress post and add a new shortcode block.
- Paste in the code that you copied from ConvertKit.
How to create a ConvertKit popup opt-in
Creating a popup opt-in is very similar as for creating a regular inline opt-in. I recommend you read the section above to get familiar with the method of creating regular forms first.
- Create a ConvertKit form by navigating to Landing Pages and Forms->Create New->Form
- When you get to the screen name, Choose the display format of this form, choose Modal.
- Choose the template you want to use on the next screen
- Design your form as before
Modal forms have extra settings to control when they appear. You can set this on the Settings tab (cog icon).
- When you have finished editing your form, save it, then go to the Embed tab, select WordPress, then copy the shortcode.
- Go back to your WordPress admin screen and select your form as the default in Settings->ConvertKit->Default form.
- When you visit the webpage where you activated the popup, it should appear according to the display settings you entered for the form in ConvertKit.
- To test the form for a new visitor, open your website in an incognito window in your browser (SHIFT+CTRL+N).
How to send your first email
When you start to gather email addresses, you can begin to send out emails.
ConvertKit has three types of emails; broadcasts, which is a one-time email, sequences which are a series of emails sent one after another, and automations where you can design a flow of emails depending on specific criteria.
In this tutorial, we are going to send out a broadcast email.
- Click Broadcasts at the top of the screen
- Click New Broadcast
- Next, we can select who the email will be from and who will receive the email.
- You can choose all subscribers or create a filter for a more targeted email.
- Your filter could be based on a tag (choose Subscribed To->Tag), or a subscription date, or whether they are Cold subscribers.
- Select Any, All or None from the Matching drop-down list to further refine your selection.
Here is an example where we select all subscribers who have been assigned to the tag Blogging and who subscribed via the form called General optin and who subscribed after June 1st.
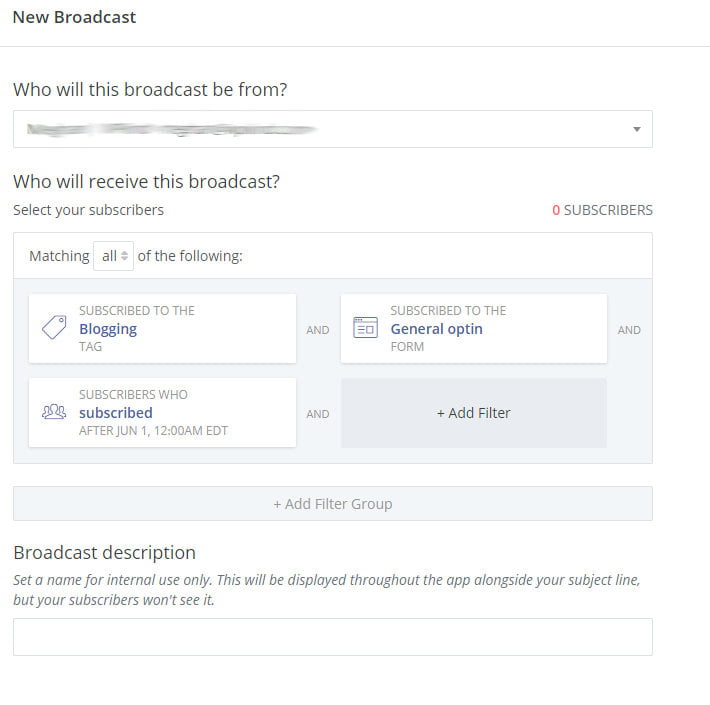
- When you are happy with your selection, give your broadcast a description and click the Next Step button.
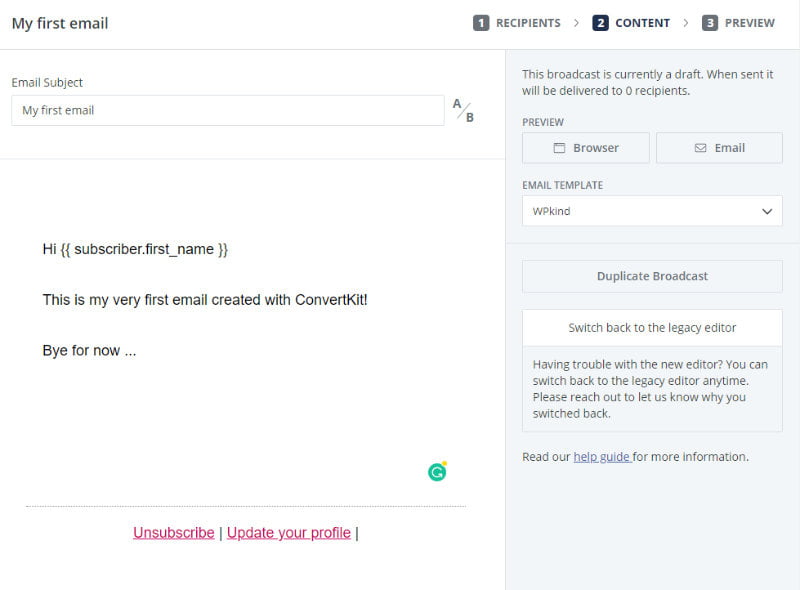
On the next screen, you can begin writing your email.
The text editor is straightforward to use, all you need to do is to type, but if you need to do anything more such an image, heading, or a list, click the + icon on the left.
You can personalise the email with the subscriber’s first name (if you collect it on your forms) using the + icon and choosing Personalization.
Here is an example of an email that begins with the subscriber’s name.
- When you have finished writing your first email, click the Next button.
- On the next screen click the Send Broadcast button, or schedule it to send later.
Frequently asked questions
Open an account at ConvertKit
You can open a new ConvertKit account for free. The free account allows you to send broadcast emails to the first 500 subscribers on your list. You can create unlimited forms and landing pages with a free account.
When your blog begins to grow, and you need to send more emails, you will need to upgrade to a paid plan. Paid plans include automations and email sequences.
The entry price is $29 per month (at time of writing), and that allows you to manage up to 3,000 subscribers. After that, the price rises with your subscribers.
Find out more about ConvertKit’s pricing.
Create a ConvertKit opt-in form
Yes! ConvertKit has a very easy to use automation system. You could use automation to send emails based on emails opened and links clicked. Note: automation is not available on the free plan.
Install the ConvertKit WordPress plugin
Yes, you can multiple opt-in forms, and you can add them to your website via a shortcode if you have the ConvertKit WordPress plugin, or you can embed forms directly using the supplied HTML code.
Add the ConvertKit opt-in form to the bottom of your posts
Double opt-in is recommended, but not enforced.
How to embed a ConvertKit opt-in form in the middle of a post
Yes, ConvertKit allows you to be GDPR compliant because you can add a checkbox to sign-up forms to obtain consent or you can add text under the form explaining what it means to opt-in to your list. Having a double-opt-in is a way to provide proof of consent.
How to create a ConvertKit popup opt-in
You can add Google Recaptcha to your forms which can detect if a bot is using your form. You could also use double-opt-in to prevent spam.
Have more questions? Please leave a comment, and I will try to answer.
Final thoughts on how to start a mailing list with ConvertKit
In this post, I have taken you through, opening an account at ConvertKit, making a form, embedding the form in your WordPress blog and sending your first email to your new subscribers.
We have covered a lot of ground in this post, but at the same time, I have kept this tutorial as simple as possible.
There is more you can do with ConvertKit, such as create complex automations and email sequences, and I encourage you to explore further.


