Nurturing your mailing list is an essential part of growing your blog. Having a healthy mailing list means your blog is better able to withstand algorithm changes, that otherwise might damage traffic. It is also a fantastic way for you and your audience to get to know one another.
To create a healthy mailing list, you need a great mailing list provider, and MailChimp is a fantastic choice for that.
If you haven’t yet selected MailChimp for your mailing list provider, then let me say that I love it, and here are seven reasons why I think you should choose it too!
- Free for the first 2,000 subscribers
- Allows you to group and tag subscribers so you can keep one list (and only pay once)
- You can group and tag subscribers automatically as they sign up
- You can automate a series of emails, and create autoresponders welcoming your subscribers
- Integrates with Woocommerce, so you know who has bought what product
- There is a fantastic plugin available for WordPress sign-up form integration
- You can put opt-in forms in a popup using a wonderful popup plugin
Once you have chosen MailChimp as your mailing list provider you need a way to integrate opt-in forms into WordPress so you can get people on your list from your WordPress site.
Don’t have time to set up MailChimp yourself? Or perhaps it all seems too technical? Don’t worry! Let me help you out.
The best plugin for getting MailChimp sign-ups
The very best plugin for integrating MailChimp with WordPress is the free MailChimp for WordPress plugin. This plugin connects with your MailChimp account and then allows you to create a signup form, which you then place anywhere on your site with a shortcode or using the supplied widget.
There is a premium version that you can upgrade to if you need to have more than one sign-up form design, but if you only need one, there is no need.
Here are five reasons why this plugin is the perfect partner for MailChimp:
- No page refresh on sign-up, the sign-up success or failure message appears instantly.
- You can optionally redirect to a welcome page
- You can embed a hidden group name so you can keep track of which lead magnet your subscriber has signed-up to
- You can set the opt-in form to update the subscription, allowing people who have already subscribed to sign-up to a new lead magnet
- The plugin pairs perfectly with the free Icegram Popup plugin allowing you to super-charge your conversion rate with popups, welcome mats, action bars and much more! (more about that later)
How to install the MailChimp for WordPress plugin
You can download the plugin from the WordPress.org repository and then upload it to WordPress, or:
- Go to Plugins->Add New
- Search for Mailchimp for WordPress
The best plugin for getting MailChimp sign-ups
How to install a WordPress plugin
How to set up the MailChimp for WordPress plugin

If you haven’t done so already, create your account at MailChimp before you carry on.
Once you have installed and activated the MailChimp for WordPress plugin, you are ready to connect it with your MailChimp account.
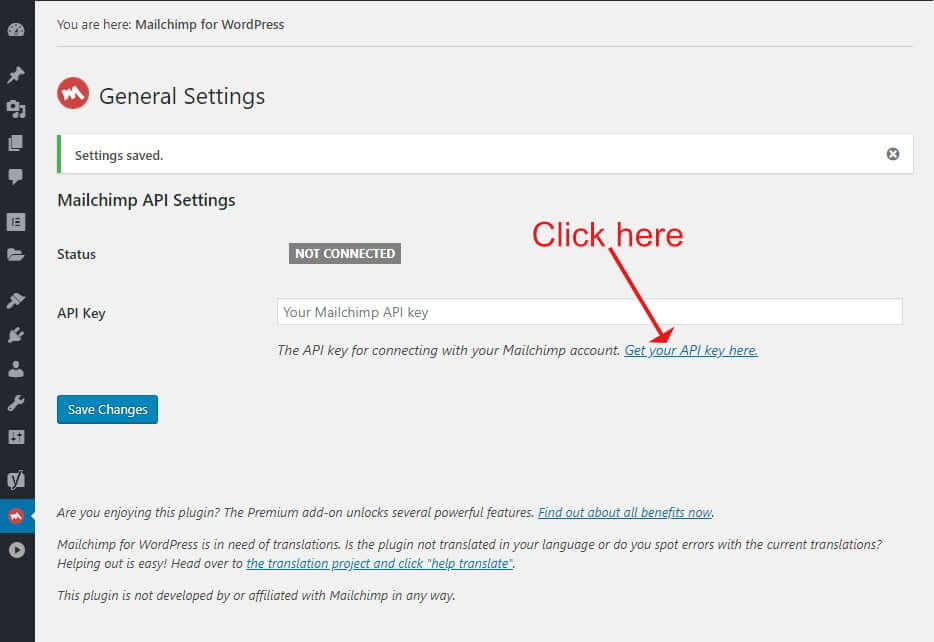
- Go to Mailchimp for WP->Mailchimp
- Click the link Get your API key here which will take you to the API page of your MailChimp account.
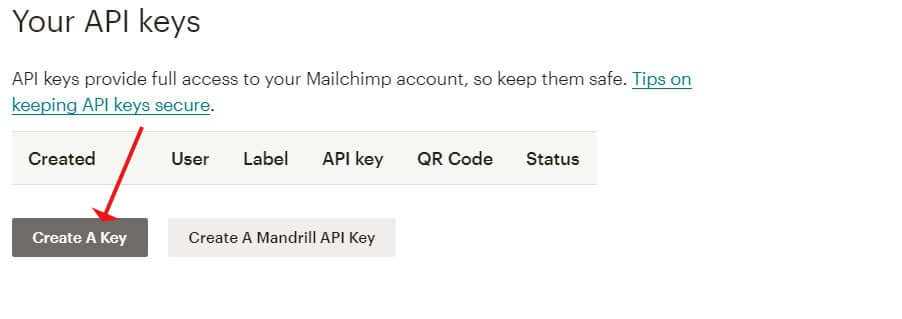
- Scroll down to Your API Keys.
- Click Create a Key.
- Copy the API key that has been created.
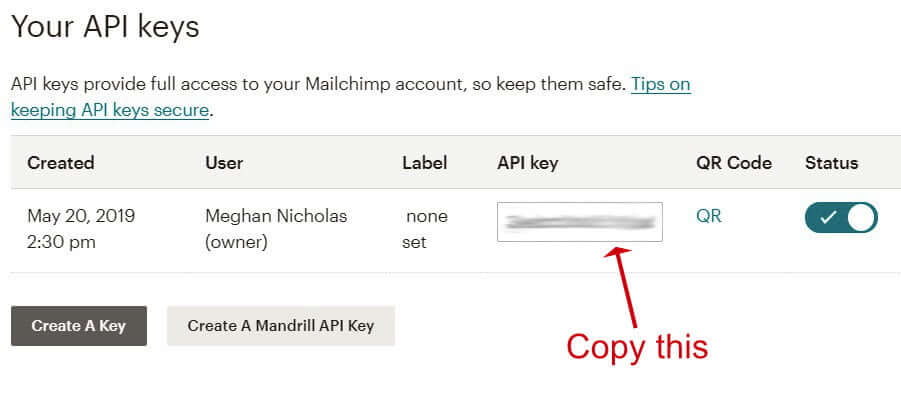
- Switch back to WordPress and paste the API key into the General Settings form.
- Click Save Changes.
- The plugin will then connect to MailChimp and should show a green Connected label and your MailChimp Audience list should appear below.
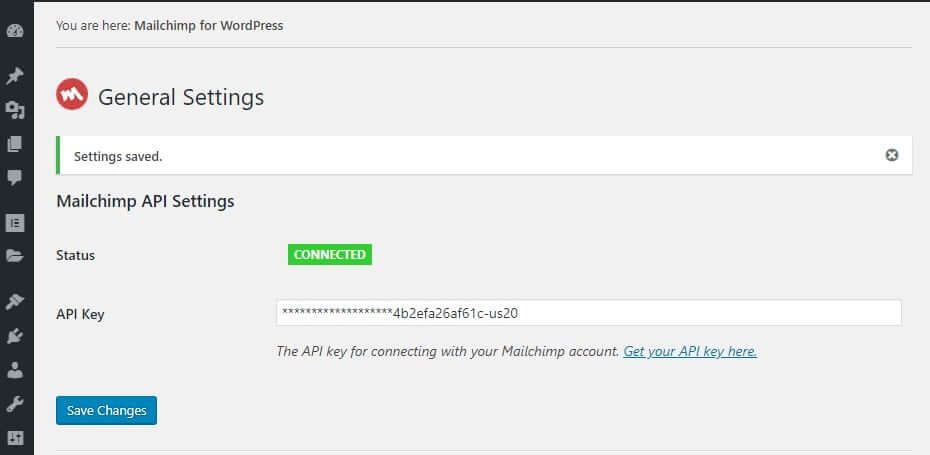
- That’s it! Your MailChimp account is now connected to WordPress.
How to create a MailChimp sign-up form
If you haven’t done so already, create your MailChimp account, and set-up the MailChimp for WordPress plugin.
- Go to Mailchimp for WP->Form
- Type in the name of your form (this is just for your reference) and select the audience list you wish to use if you have more than one.
- Click the Fields tab and from there you can view the signup form that has been created, where you can add or remove additional fields
- If you have some groups set up in MailChimp use the Interest Categories button to add a particular group to the form as a hidden field. This means that anyone who signs up with the form will be assigned to that group
- If you wanted to add some additional text such as ‘get a free checklist …….’ to encourage your users to sign up you would add a snippet like this to the Form Code box.
- There are additional tabs for editing the messages and appearance, where you can change the message text, and pick a theme for your sign-up form.
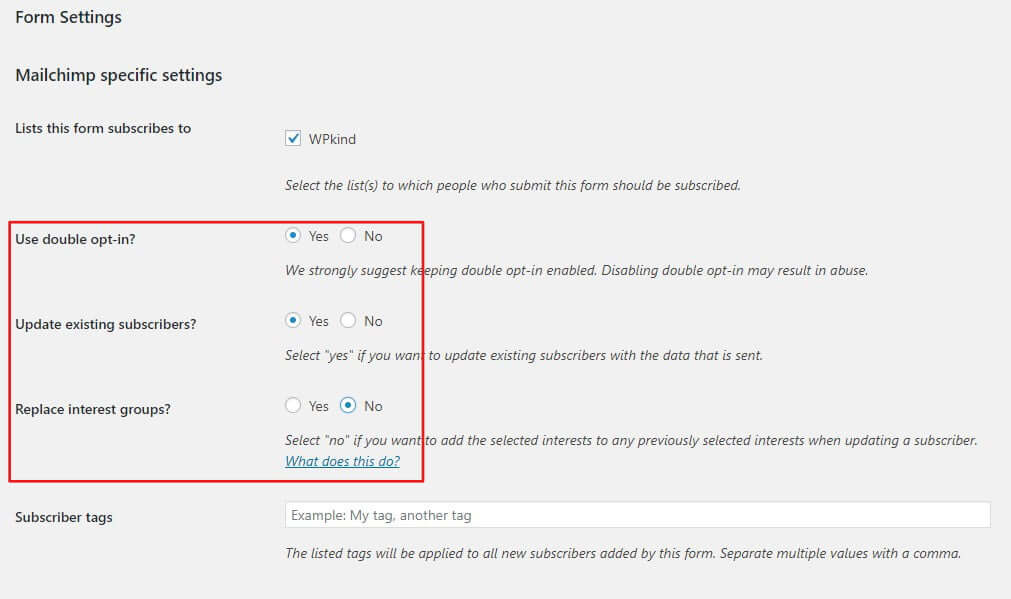
- Use the settings tab to specify double/single opt-in. Double opt-in means people who opt-in have to confirm their email address via email, which stops spam and also helps to comply with GDPR.
- Under the settings tab, you can also opt to update subscribers, useful if you have a new opt-in lead magnet that existing subscribers may also want to sign up to.
- Additionally, it is worth setting the option not to replace interest groups, so you don’t lose track of the groups that the subscriber is already in when their subscription updates.
- When you have your form created and set-up the way you want it, click Save.
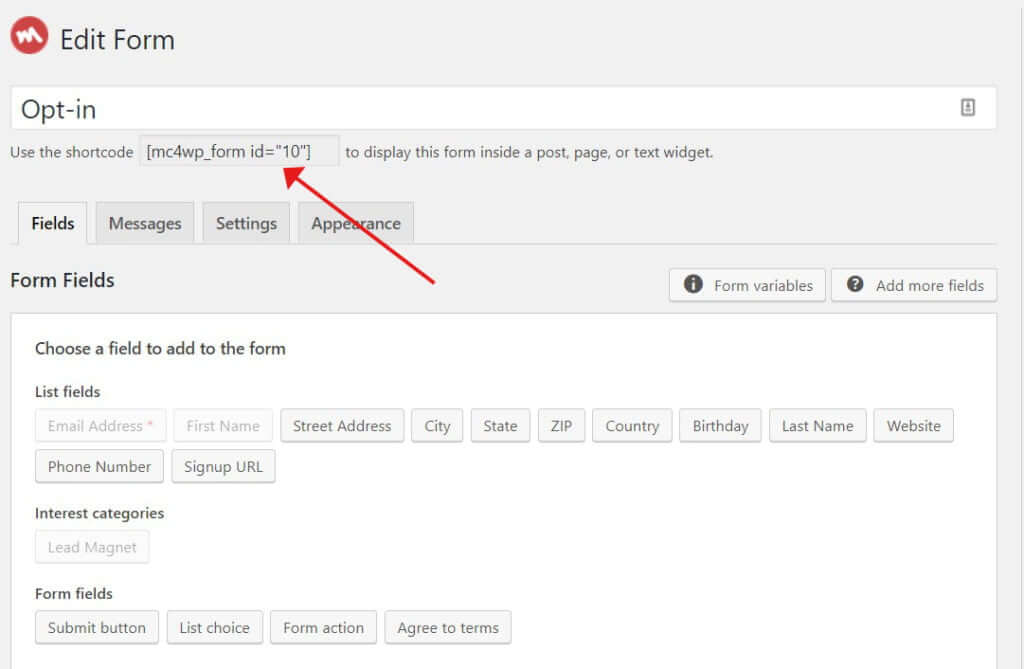
- Finally, copy the shortcode which will be something like this:
[mc4wp_form id="123"]
- The shortcode can be used anywhere in your posts, sidebar or footer where you want the opt-in to appear.
- If you don’t want to use a shortcode, you can add the form via the MailChimp for WordPress widget and then select the form you have just created in the list that comes up.
How to install the MailChimp for WordPress plugin
If you wanted to make your sign-up form pop a bit more and get your readers to notice, you could add an image.
The best way to do this is to:
- start writing a new post
- add an image to that post
- select Edit as HTML from the more options menu (three vertical dots)
- copy the HTML
Go back to Mailchimp for WP->Forms and paste the HTML into the form code at the point you want the image to appear, usually before the form fields.
You can then discard the new post that you started writing.
How to create multiple MailChimp sign-up forms
The free plugin allows you to create one form. You can use that one form a multiple of times throughout your site, but if you need to create another form design (say for a different opt-in lead magnet) then you will need to purchase the premium version of the plugin.
If you were happy with letting your subscribers pick from a list of groups instead, then you could get away with having only one form.
Let’s say you have multiple groups set up in MailChimp, and each group is for a particular lead magnet, then you will want to have different sign-up forms, one for each group.
The premium plugin is exactly the same as the free plugin, apart from the fact that you can set-up multiple forms. Each form has a different shortcode.
Using the MailChimp for WordPress shortcode
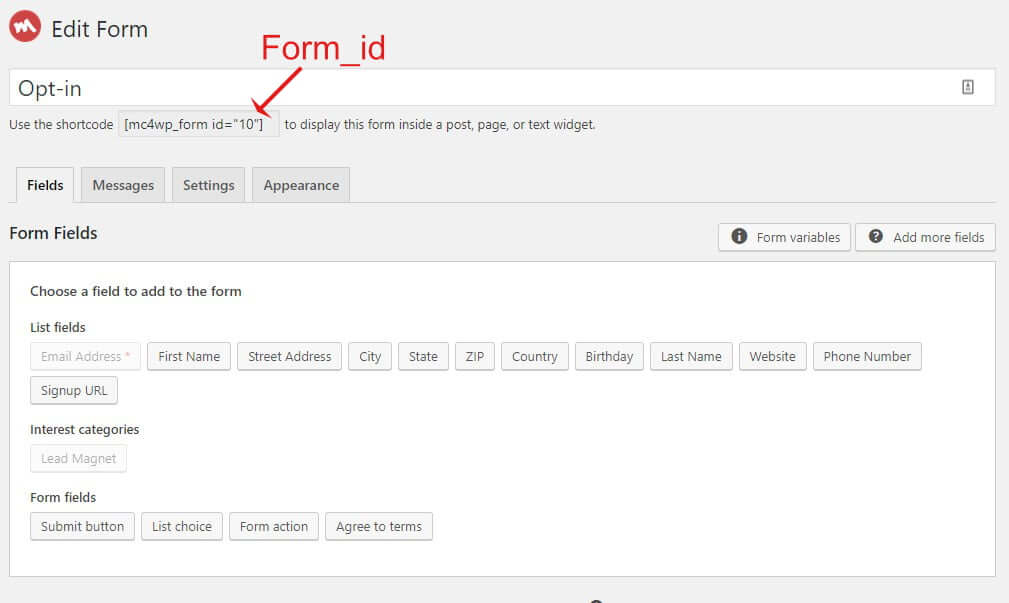
When you create a MailChimp sign-up form with the MailChimp for WordPress plugin, a shortcode is created for you.
The shortcode is displayed at the top of the Edit Form screen.
Copy the shortcode e.g.
[mc4wp_form id="123"]
Then you can paste it anywhere in your site, e.g. within a post, or on a sidebar, footer or page hero.
There is also a widget which you can drag into widgetized areas, such as the sidebar.
Putting the MailChimp signup form at the bottom of each post
Adding a sign-up form to the bottom of each post is a great way to get your readers onto your list, especially if your lead magnet is related to the post that they have just read.
Do do this easily you need the premium version of the MailChimp for WordPress plugin, but if you don’t want to purchase it, I will show you another way in the next section, so don’t worry about that.
When you have the premium version installed:
- Go to Mailchimp for WP->Forms
- Select the form that you wish to put at the bottom of posts
- Click the Settings tab
- Scroll down to Append to all posts
- Select Yes and then optionally select a post category, or leave blank for all posts
How to set up the MailChimp for WordPress plugin
Normally to do this you would need to edit your theme’s functions.php file, but another way is to use a free plugin and I recommend the free Code Snippets plugin for this.
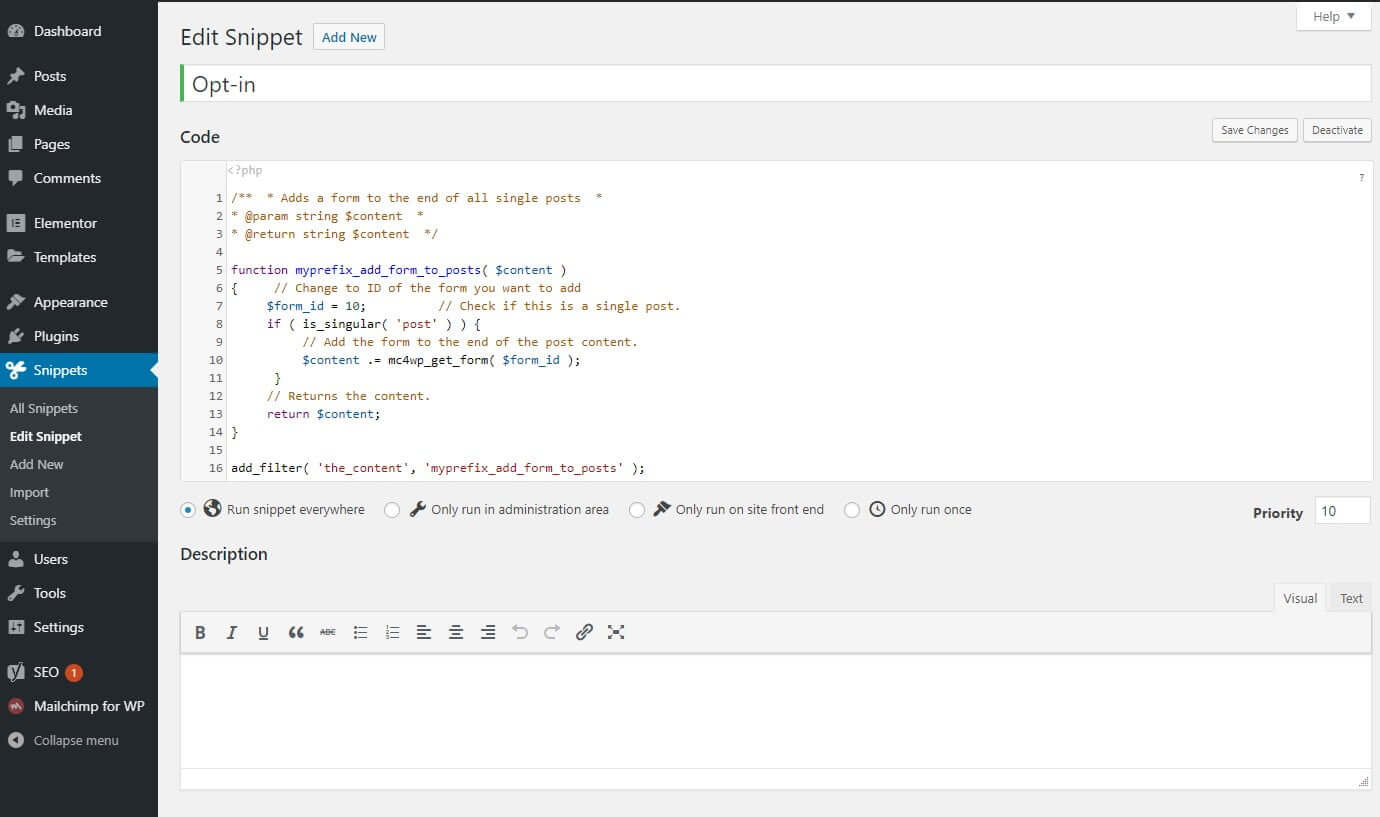
When you have installed and activated the Code Snippets plugin, add a new Snippet (Snippets-<Add New) and then place the code below into the code box.
add_filter( 'the_content', function ( $content )
{ // Change to ID of the form you want to add $form_id = 10; // Check if this is a single post.  if ( is_singular( 'post' ) ) { // Add the form to the end of the post content. $content .= mc4wp_get_form( $form_id ); } // Returns the content.  return $content;
} );
Make sure you update the value of $form_id to the id of your sign-up form. The id is part of the shortcode shown at the top of the setting screen.
Make sure that the new code snippet is activated in the snippet list.
Your sign-up form will then appear at the bottom of all your posts.
Putting the MailChimp opt-in form in a popup

Putting your sign-up form in a popup is a proven way to get more sign-ups to your list, and you can do this with the free Lead Generation plugin by Icegram.
The Icegram plugin allows you to put the signup form shortcode (created with MailChimp for WordPress plugin) on a popup, a welcome mat, an action bar at the top of your page, or a slide-in. It’s a fantastic plugin, and it partners perfectly with the MailChimp for WordPress plugin.
Icegram comes with some ready-made designs that you can use as a basis, changing the text to suit.
To create a new popup, install and activate the plugin, then:
- Go to Icegram->Add New Campaign
- Select a popup style
- Edit the new campaign you have created.
- Replace the ig_form shortcode with your MailChimp shortcode, e.g. mc4wp_form id=”10″
- Select the seconds after page load that you would like the popup to display in the Show After box.
- Go to the Display Rules tab and set where you want the popup to display and how often the popup should re-display after sign-up or dismissal.
The Icegram plugin does much more than popups. You can use it to create welcome mats, slide-ins, action bars.
MailChimp opt-in forms and GDPR compliance

If you are in an EU country or you serve readers from an EU country, you need to comply with GDPR. Obtaining consent to store cookies is one area that you need to comply with.
You should also design your opt-in form to be GDPR friendly too.
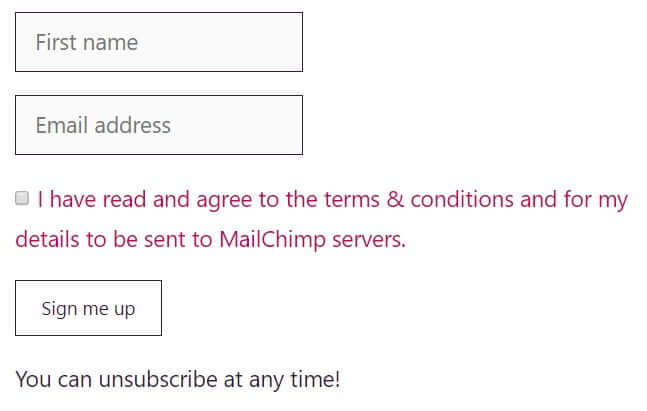
Becoming GDPR compliant would include adding a link to your terms and conditions page and asking subscribers to click a checkbox to agree to the terms and for their data to be transferred to MailChimp before they can sign-up.
Fortunately, the MailChimp for WordPress plugin makes this very easy to achieve by adding an Agree to Terms field to the sign up form.
- Go to MailChimp for WP->Form
- Click the Fields tab
- Go over to the Form Code box and position your cursor just above the submit button, or wherever you would like the checkbox to appear.
- Click on Agree to Terms button to add a new field.
- Edit the Field label to suit and enter a link to your terms and conditions page underneath.
You would need to edit the field label to say that by checking the box that they also consent to their data being sent to MailChimp. Or you could add the text directly in the Form code box just above the new Agree to Terms box.
Here is the form I created:
How to create a MailChimp sign-up form without a plugin
Don’t want to use yet another plugin? If you aren’t using MailChimp groups, then you can simply copy and paste the MailChimp sign-up HTML code directly from the MailChimp site and paste it into a text widget.
For precise details on how to do this, head over to my post – How to Add a MailChimp Email Signup Form to Your WordPress Sidebar – Without a Plugin.
Wrapping up
In this post I have shown you the best plugin for MailChimp integration with WordPress, and how to create sign-up forms on your site.
I have also shown you the best way to show your opt-ins in a popup for maximum conversion rate.
Let me know how much better (or worse) your conversion rate is after using a popup, I would love to hear!


