Having a great logo for your blog can be the finishing touch to making it look professional. Conversely, it can be the seed for your whole blog design.
When I designed this blog I started with a logo design using some colours that I found pleasing and seemed to go well together.
I like my logo for the time being. However, my husband hates it! I’ve had some good feedback about it from readers, and that is the important thing!

There are many approaches you can take when designing a logo for your blog.
I took the DIY option, but if you are not confident making your own logo, there are plenty of online logo designing sites that will do it for you based on your likes and dislikes.
The ultimate option, of course, is to employ a professional designer, but that is only possible if you have the budget.
Moving down from that you could try some freelancing sites like Fiverr or Upwork for example, I explain more about those options further down.
Logo image formats
Before we start, let’s take a look at the image formats that logos can come in, and which is best to use on your WordPress blog.
When you use the logo on your website it should be in one of two formats, PNG or SVG.
- PNG is a binary format that includes a transparency layer. This allows you to place it on a background of any colour.
- SVG is a vector format that can be used directly in the HTML. SVG files describe the image instead, for example, draw a line from point A to point B. This means that SVGs can be scaled up or down without becoming fuzzy like a PNG can.
Heads up: Avoid JPG format for logos. They don’t have a transparency layer so are not flexible enough for all uses. JPGs are best used for your featured images.
If you get your logo designed professionally you should receive it in vector format, such as Photoshop PSD or Illustrator AI. If you don’t get the vector file, do ask for it. Without it, you won’t be able to edit it later, or make more logos for different resolutions.
Let’s have a look at the options for creating a logo.
How to make a WordPress blog logo
Logo image formats
This is the option I took. If you are able to use a design tool like Photoshop, Illustrator or Affinity (this is the one I use), and you have an eye for design, and some time to spare, this could be a good option.
There is also a very good free graphic tool called Inkscape. There is a learning curve, but I have been able to get some great results with it in the past.
Another option is to use an online design tool. Online graphic software apps are Canva, PicMonkey, LogoMakr. Canva and PicMonkey have wizards to get you over the daunting blank page stage.
If you are thinking of making your own, here are some design tips to keep in mind:
- Keep it simple. You may want to use your logo in a number of different places at different resolutions. If it is too complicated it won’t look good when reduced in size.
- Stick to one or two colours. Again simplicity is key. You can get help choosing colours from these sites, https://color.adobe.com, https://coolors.co .
- Think about your target audience. What would they like? This is why I ignored my husband, he is nowhere near my target audience!
- Don’t overthink! It took me maybe half to one hour to make my logo. I figured the longer I spent the worse the end result would be. Go with your gut and design for that.
The logo I made for this blog was very simply done. I just wrote my blog name, fiddled around with font sizes and colours and added the tagline underneath.
How to make a WordPress blog logo
You can commission someone to design a logo for you using a freelancing site such as Fiverr or Upwork.
I have tried both of these sites, but it can be a bit hit and miss. The cheap prices are enticing, but you may not get the quality along with that.
The best plan is to get a recommendation. A good place to ask for advice is in Facebook groups for bloggers. If you aren’t in any Facebook groups yet I thoroughly recommend joining some.
How to upload a WordPress blog logo
Uploading your logo to your WordPress site will be different depending on what theme you use.
Most good themes now make use of the WordPress customiser for theme modification.
The customiser is a great tool because it allows you to see changes in realtime as you tweak the options.
I have a whole post here on how to customise a WordPress theme – How To Customise a WordPress Theme.
If you have picked a great theme you should find customisation a straightforward affair, and if not, support from the developer should be easy to access.
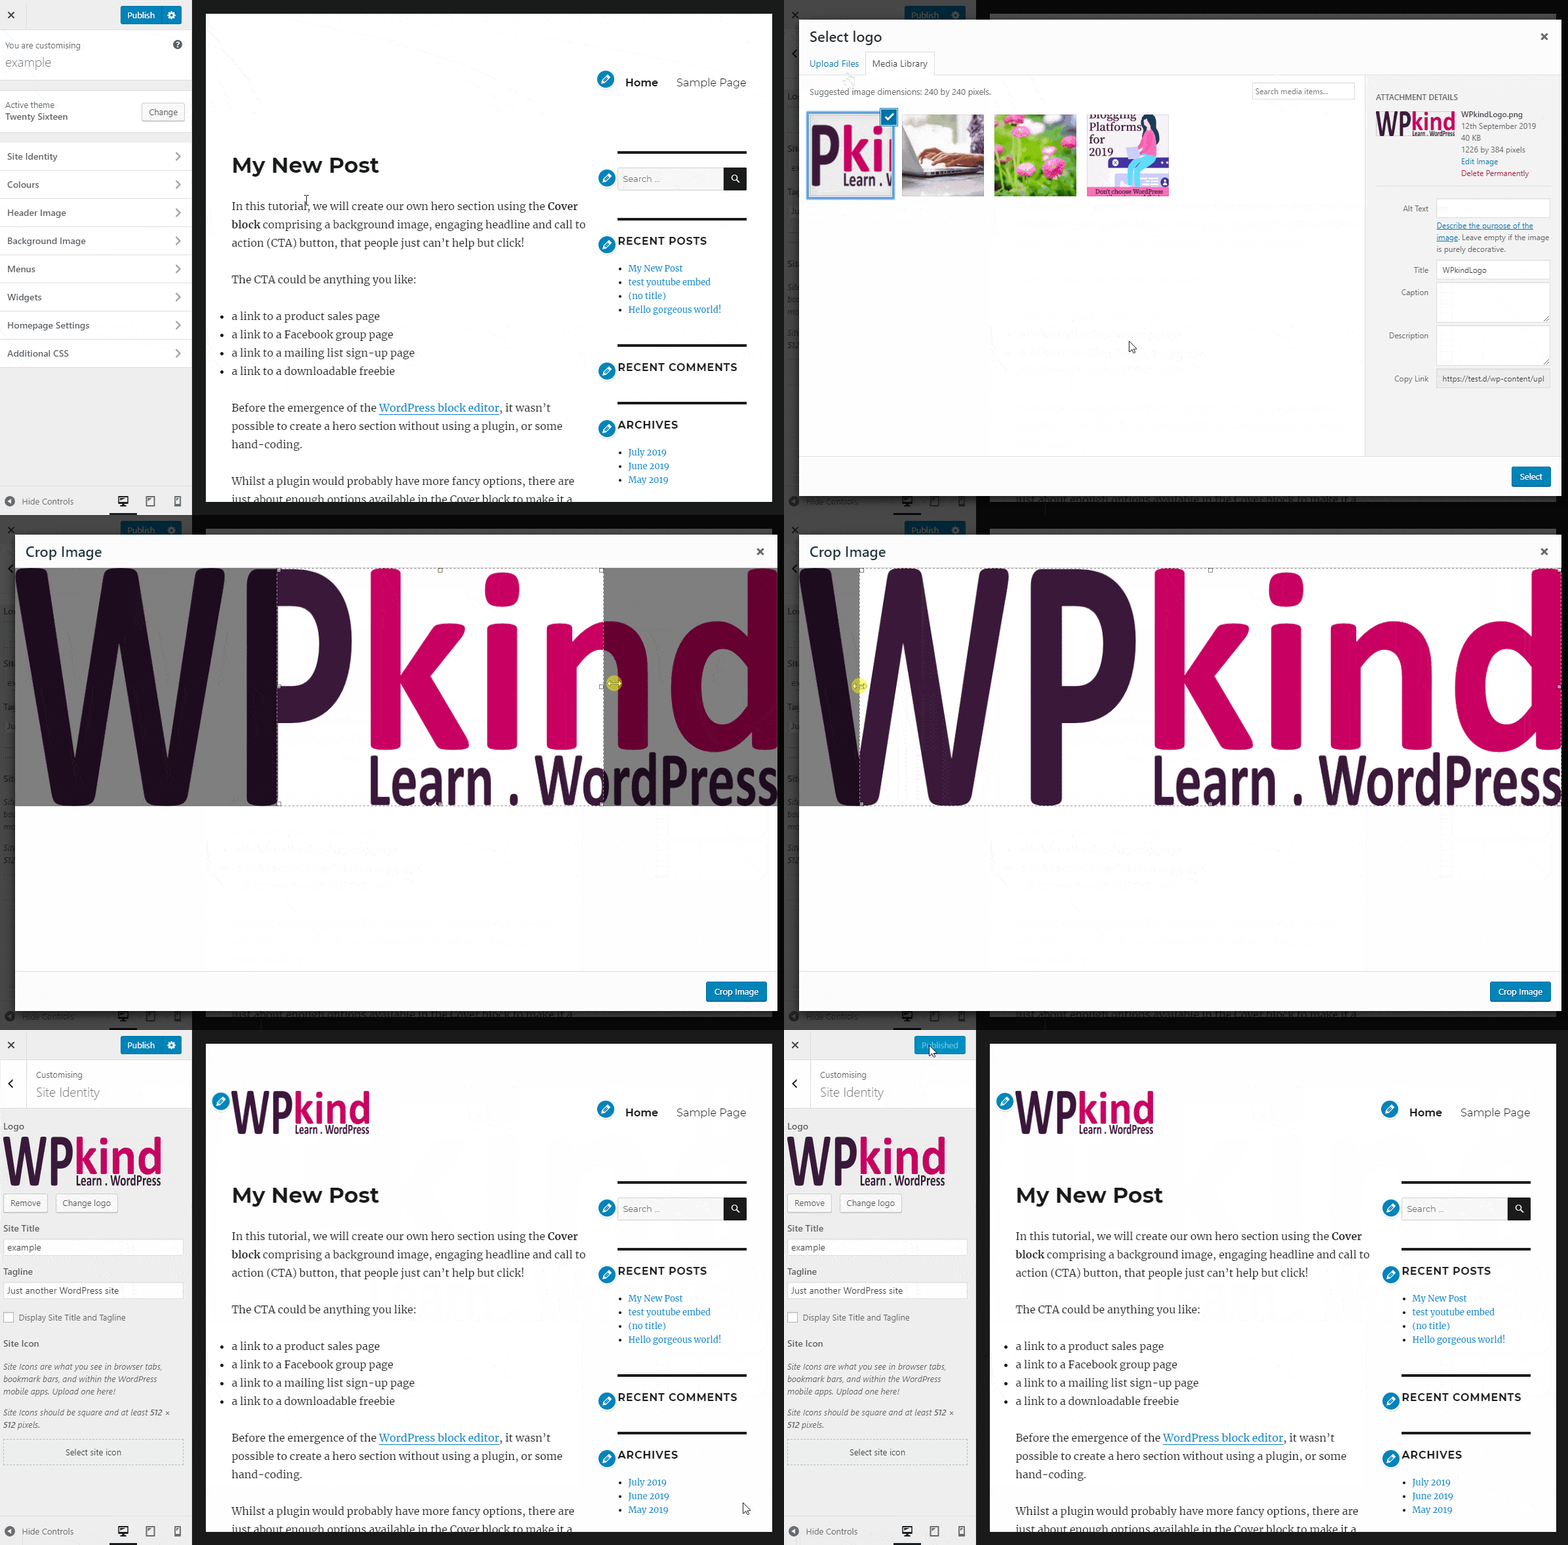
To upload your new logo:
- Go to Appearance->Customise
- Click Site Identity
- Click Select Logo
- Select your logo from the media library or upload it
- In the next screen crop the logo if necessary
- You should see the logo appear in your header

Your theme may allow you to change the position of the logo within the header. Often this is in the Layout section of the customizer when available.
How to tweak your WordPress blog logo with CSS
You may find that once you have your logo uploaded that it is too big or too small. Some themes allow you to change the size of the logo within the options, but if not you will need to to add some CSS code instead.
CSS stands for Cascaded Style Sheet. It is the language that web pages use to style the web page’s content.
If your logo is in PNG format and it is too small, the best option is to make it larger using a photo editor from the original artwork file, or the online app you used to make it and then re-upload. That way it won’t be blurry when you upsize.
Some themes support only specific dimensions for the logo, so do consult the documentation.
If the logo is too small you can tweak it with some CSS to make it the desired width and height.
Do note that these instructions may not work with your particular theme. If the header had been designed to incorporate a logo of a specific width and height you may not be able to achieve the look you want. You may find that the logo will no longer fit on the header layout. The best option is always to ask for advice from the theme developer.
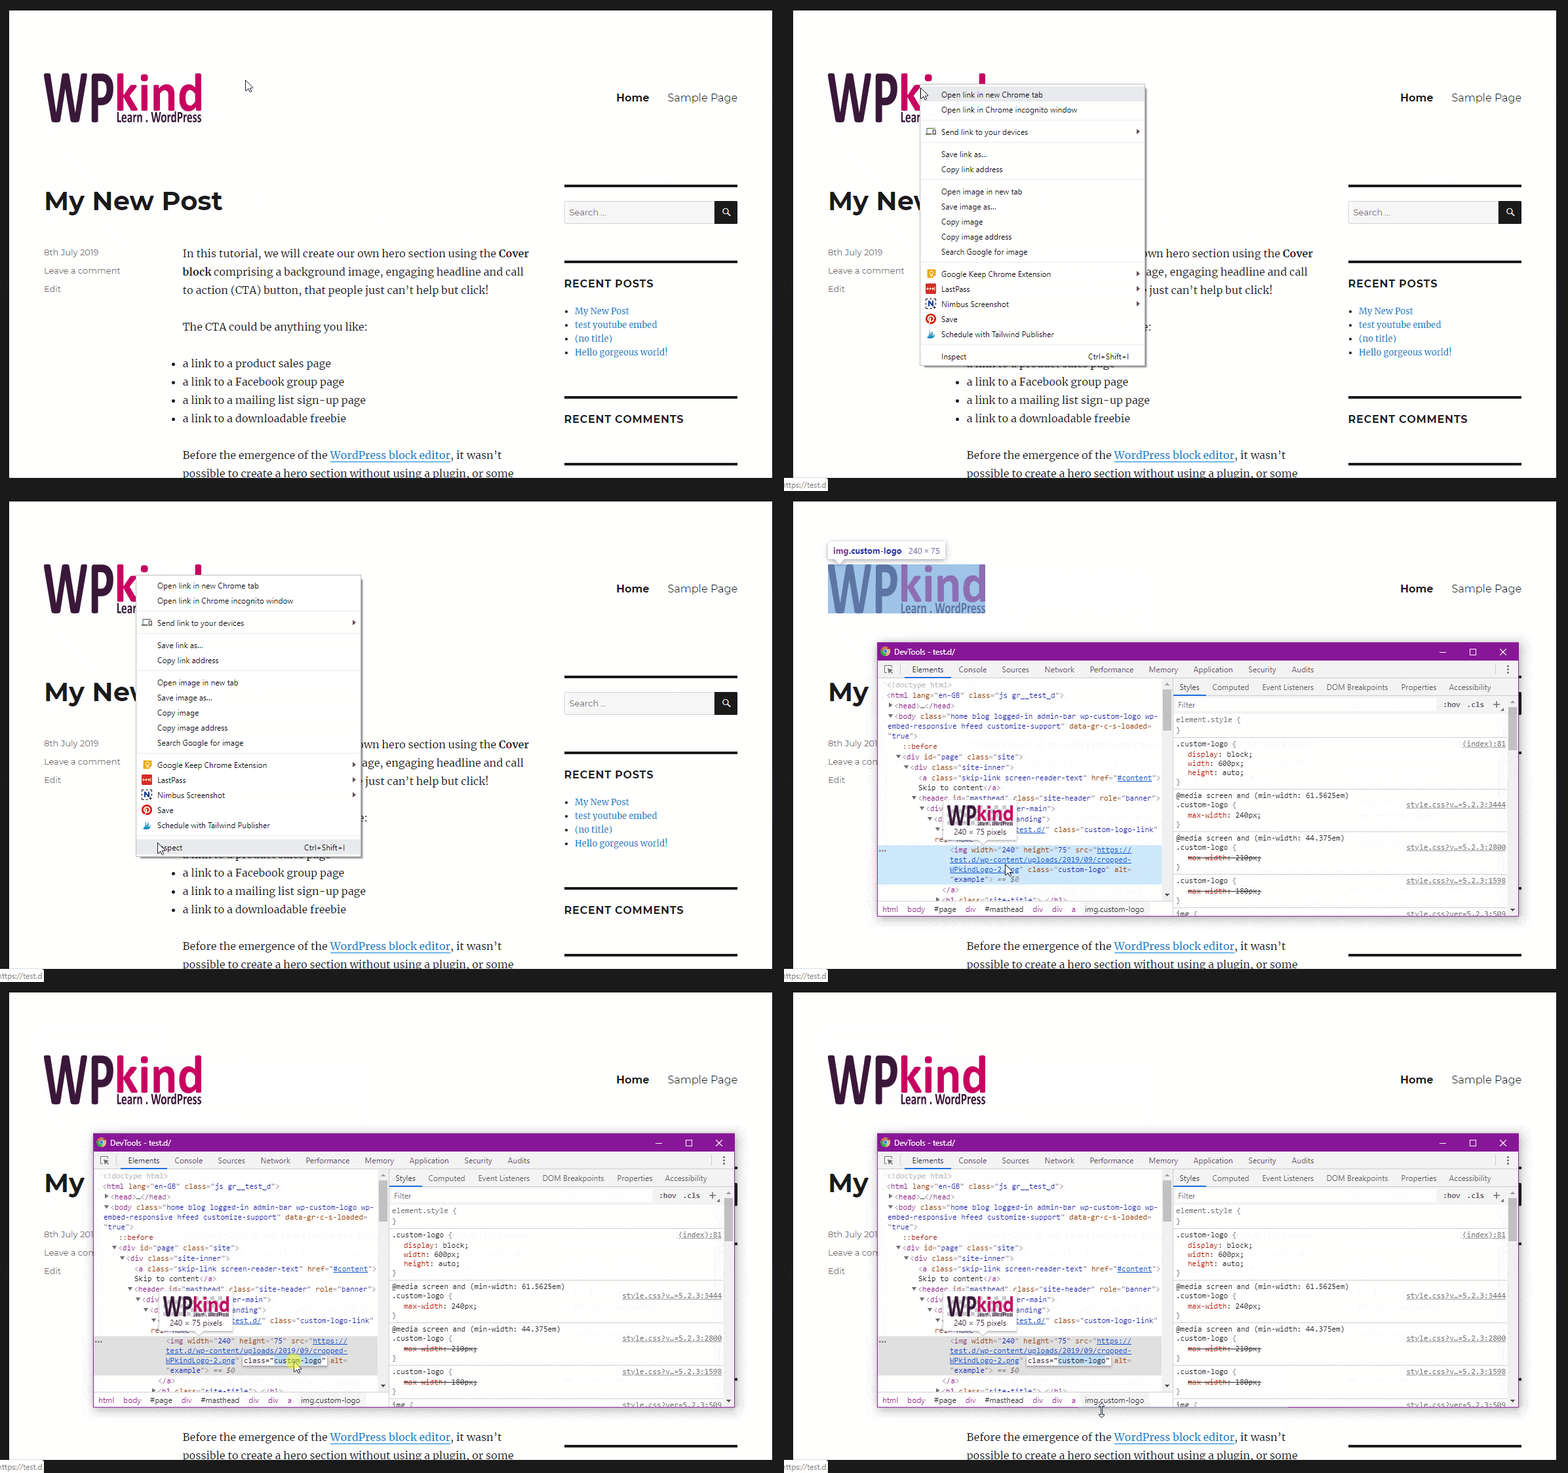
Here’s how to do it. I recommend you use the Google Chrome browser for this because it has some very good developer tools.
The first step is to work out the class name of the logo element, so you can target that name in your CSS styling.
- Open up your website in the Chrome browser
- Put your mouse on the logo and right-click, then select Inspect in the context menu
- In the Elements panel you will see the HTML. The currently highlighted element is for the logo, usually <IMG>.
- If it has a class attribute copy the class name, if not look for a class attribute in the parent element (here it is <A>) and copy that instead.

- In this example, we have a class name of custom-logo for the IMG element
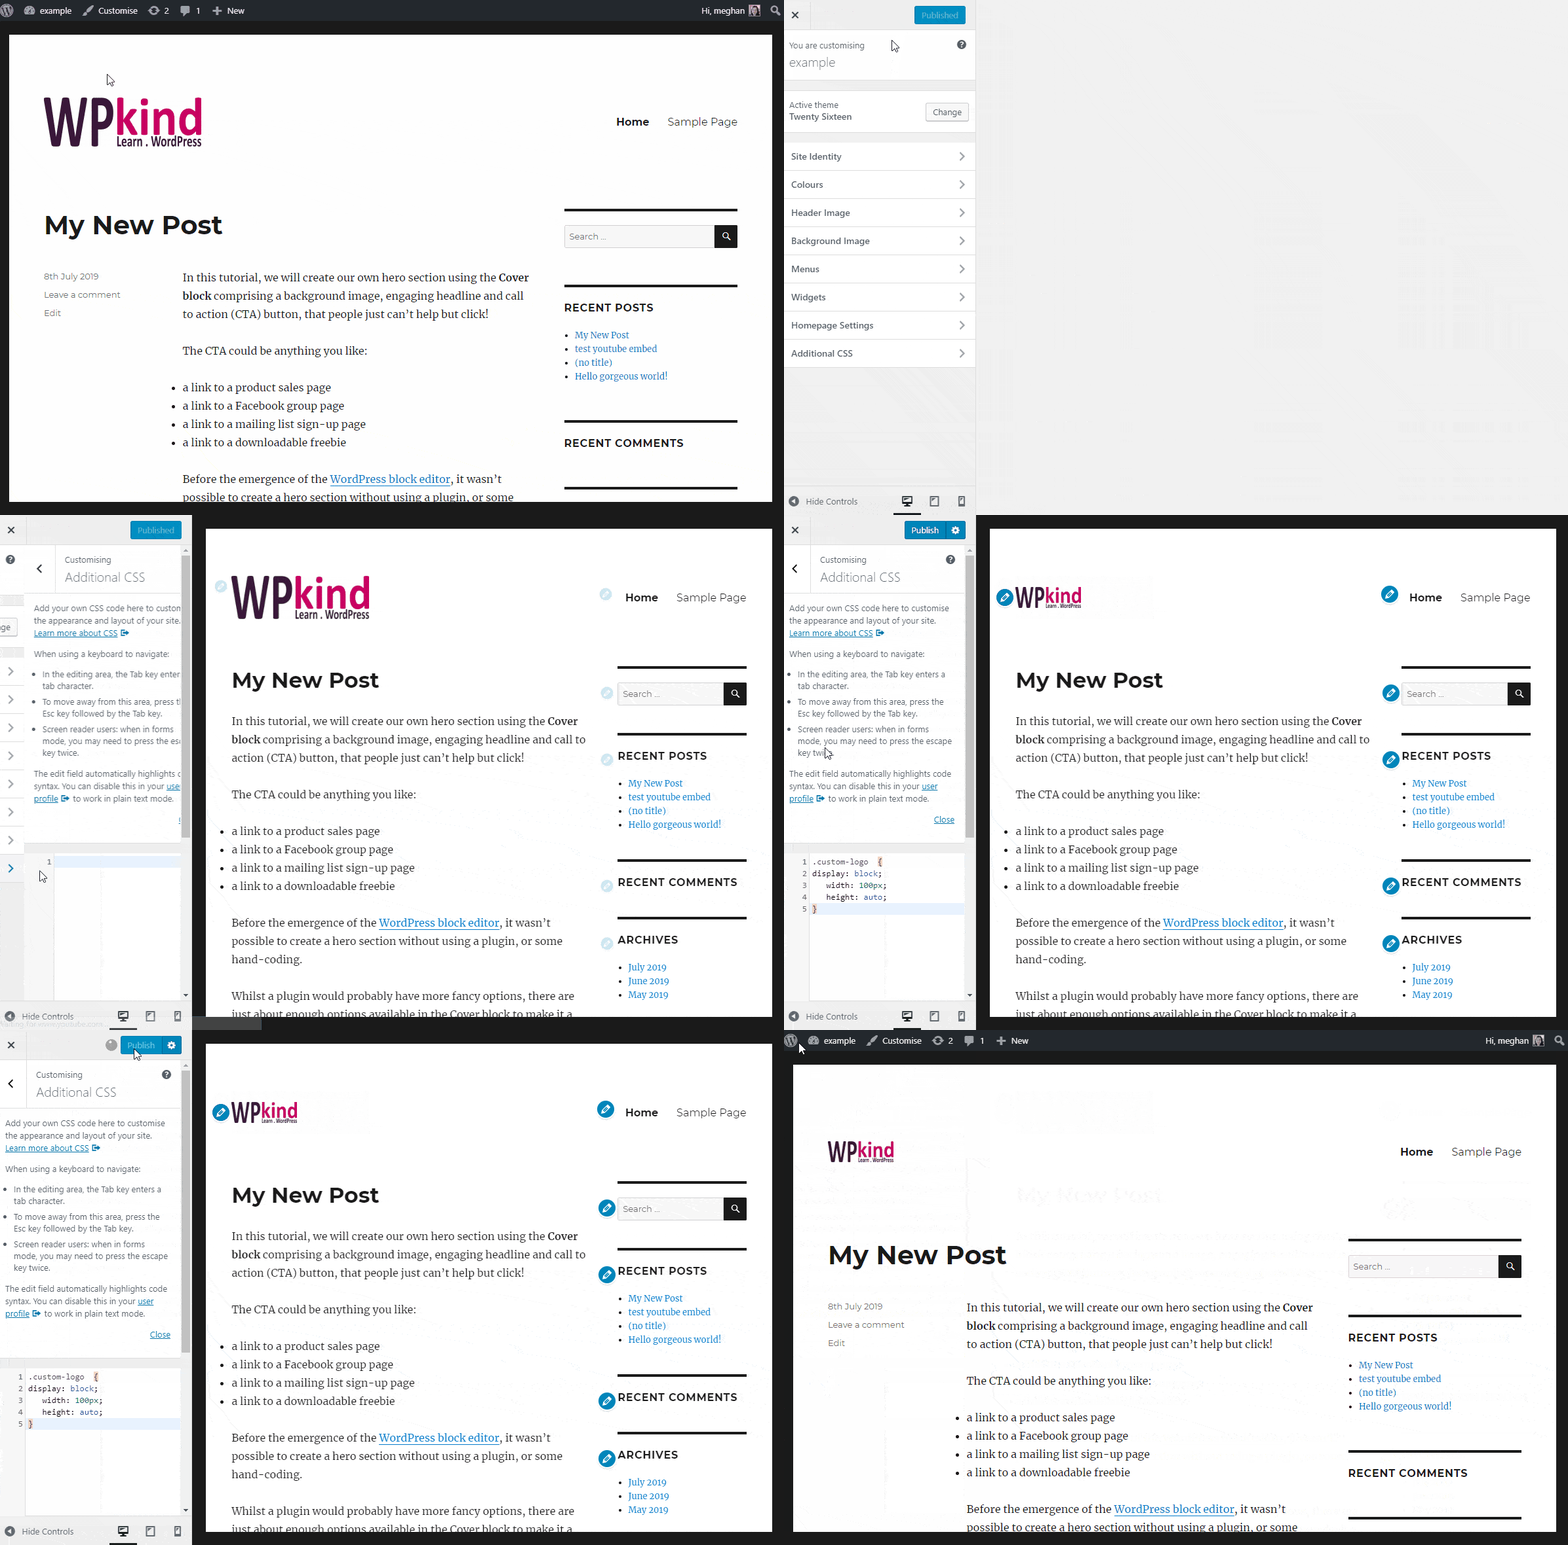
The next step is to write some CSS.
- Open the WordPress customiser (Appearance->Customise) and click Additional CSS.
- Paste in the following code, replacing the class name (custom-logo with the name that you copied),
- Replace the width value with the desired width in pixels.
- If you need a specific height, change the second line to height:XXXpx instead of height:auto.
 .custom-logo { display: block; width: 100px !important; height: auto;
} 
WordPress blog logo CSS tweak
Due to the various ways that themes write the HTML and CSS for logos, this HTML may not work. In this example, I made the logo smaller. A larger logo would not have fit on the layout.
Finishing up
In this tutorial, I have taken you through the various ways that you can make a logo for your WordPress blog.
I have shown you how to upload your logo and then tweak it with some CSS.
I always recommend that you pick a good theme from the start. Here are my top picks – Three of the Best Free WordPress Themes for Blogs.
All of my recommended themes allow you to modify the header very precisely, uploading your logo and changing the position and size are all a breeze. Plus, the level of support is very good so you can always get some help when you need it.


