A question I often get asked is how to change the size of the featured image in WordPress posts.
You would think that setting the WordPress featured image size is a straightforward task, and usually, it is, but there are several gotchas that can leave you scratching your head!
Before we begin, let us be sure what we are talking about when we use the phrase ‘featured image’.
A blog post can contain many images within the content, but as well as that it can also have a ‘featured’ image. This is the image that will appear in post archives, in social shares, and in RSS feeds.
Where the featured image is located within the post depends on which theme you are using, but it is usually found prominently at the top of the post and in archive listings.
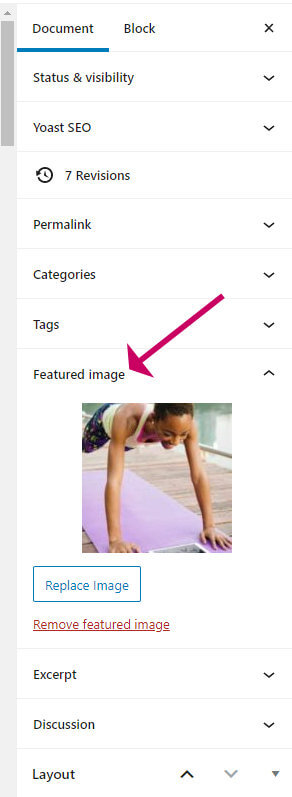
You can set the featured image in the post settings in the Document tab under the Featured image section.
If you prefer an actual demonstration, then I have you covered! In the video, I show you how to change the featured image size in WordPress using my favourite WordPress theme GeneratePress. If you don’t have that theme, it is still useful, so please do have a watch.
How to change the WordPress featured image size
Different themes will display featured images in different locations and in differing sizes.
Here is how to check what image size is in use along with tips on how to change it.
Step 1 – Find out what WordPress featured image size is currently used by your theme.
Here is a method to check which WordPress featured image size is in use. This should work whichever theme you are using, but if it doesn’t, try looking through your theme’s documentation or contacting the developer.
- Open a post containing a featured image using Google Chrome Browser.
- Right-click the image and choose Inspect.
- Check the HTML code for the <IMG> tag as shown below.
- Look for the class attribute in the <img> tag.
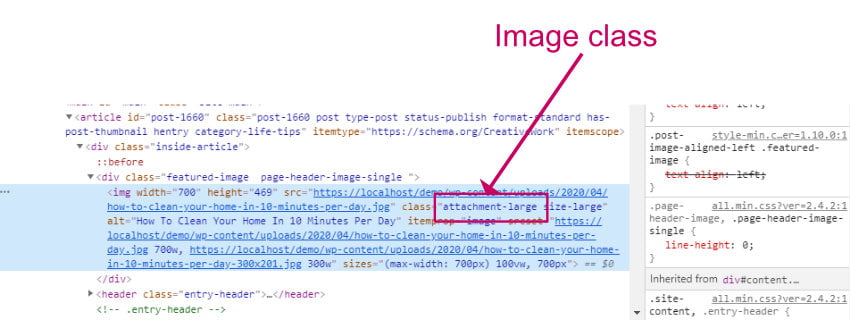
Here we can see that the class is attachment-large which means that the large version of the image is being used. If the medium version was in use, we would find the class attachment-medium instead.
You could also check the image size shown in an archive page such in the blog page or in a category archive using the same method.
If the theme is using a proprietary WordPress featured image size in posts and/or in archive pages, we might find something different, for example, attachment-single, or attachment-blog.
You can find out the precise dimensions of a proprietary image size using the Regenerate Thumbnails plugin.
- Install and activate the Regenerate Thumbnails plugin
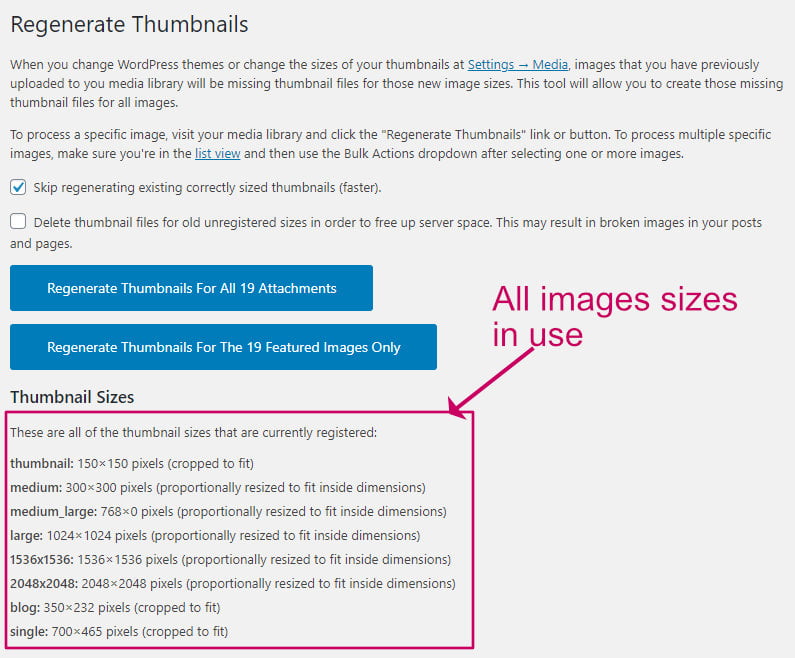
- Go to Tools->Regenerate Thumbnails, and you should see all the sizes in use.
- Here we see two extra sizes, blog and single and the dimensions for each.
Step 2 – Edit the WordPress featured image dimensions
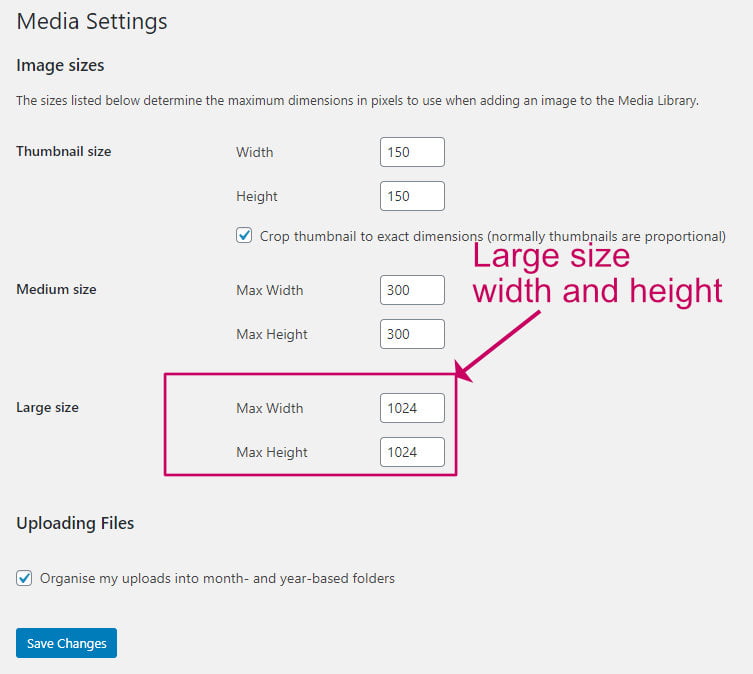
If you found in step one that your theme is using large, medium or thumbnail image sizes, you can change the corresponding settings over at Settings->Media to your preferred setting.
If you found that a proprietary image size is in use, rather than the standard thumbnail, medium or large sizes:
- Check the theme customizer, is there a setting to change the blog image sizes?
- If there isn’t an option in the customizer you could add some code instead.
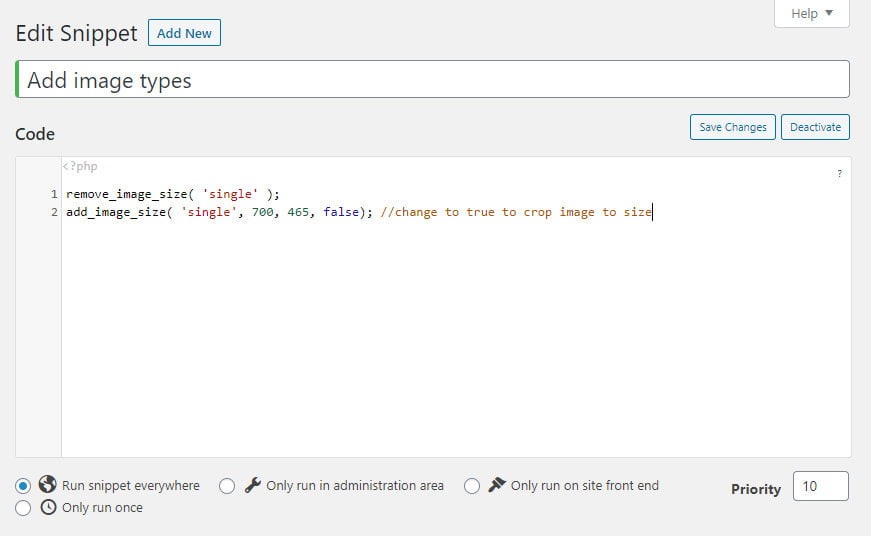
Try adding this code to your theme’s functions.php file specifying the new image dimensions that you need. Here we update the ‘single’ image to 700px wide by 465px high. We set the cropping parameter to false, but change it to true if you need the image size to be cropped to size automatically.
remove_image_size( 'single' );
add_image_size( 'single', 700, 465, false); //change to true to crop image to size
Editing your theme’s functions.php file is not a good idea because when you come to update the theme, your changes will be overwritten. Make a child theme and edit that instead.
If you don’t want to create a child theme you could use the Code Snippets plugin and add the above code into a new snippet.
Step 3 – Regenerate WordPress featured image sizes
After making changes to the image sizes, the next step is to resize all the featured images for all your posts so that that they appear at the right size in your posts.
If your images don’t look the right size, they might have been resized up via the HTML code, in which case they might appear blurred. Or, they have been resized down, which means the image file size could be too big for what is required, and that might increase the page loading time.
The solution to this is to create the new sizes required by your new theme, and you can do that with the Regenerate Thumbnails plugin.
How to resize images in bulk after a theme switch or after updating image sizes.
Here’s how to regenerate your new image sizes:
- Install and activate the Regenerate Thumbnails plugin
- Go to Tools->Regenerate Thumbnails
- Click Regenerate Thumbnails For The XXX Featured Images Only.
- If you have a caching plugin installed, clear the cache
- View your website and check your featured images have resized as expected.
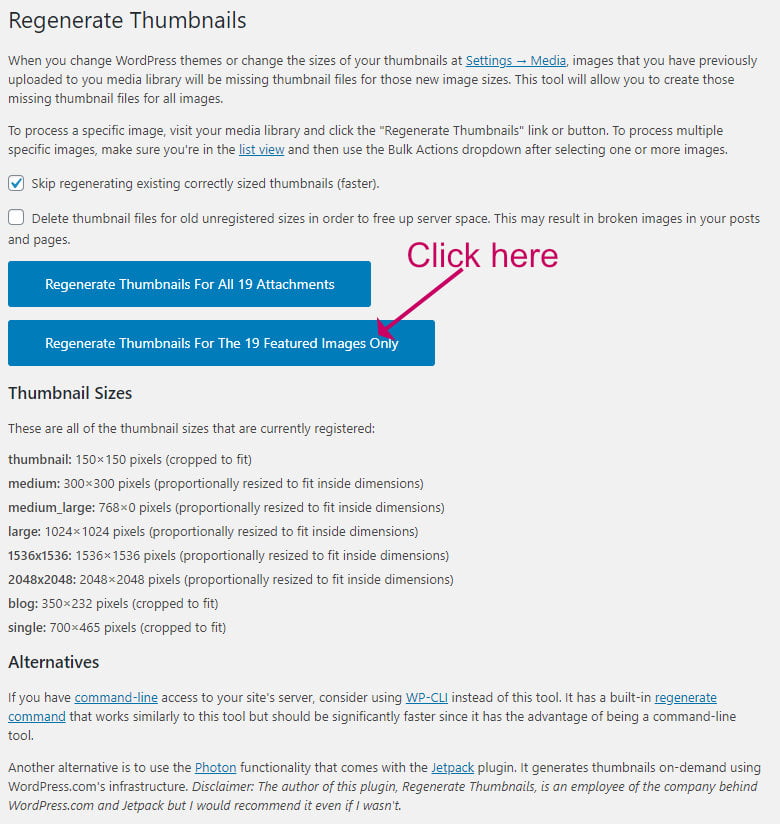
It is not a good idea to tick Delete thumbnail files for old unregistered sizes …, because as the message says any post that has markup in it for a specific image dimension will break and you will have a blank space where the image should be.
How to set the WordPress featured image size for Facebook
The recommended image size for Facebook sharing images is 1200px X 630px. For better social sharing, it is a good idea to set an image for each post that has those dimensions.
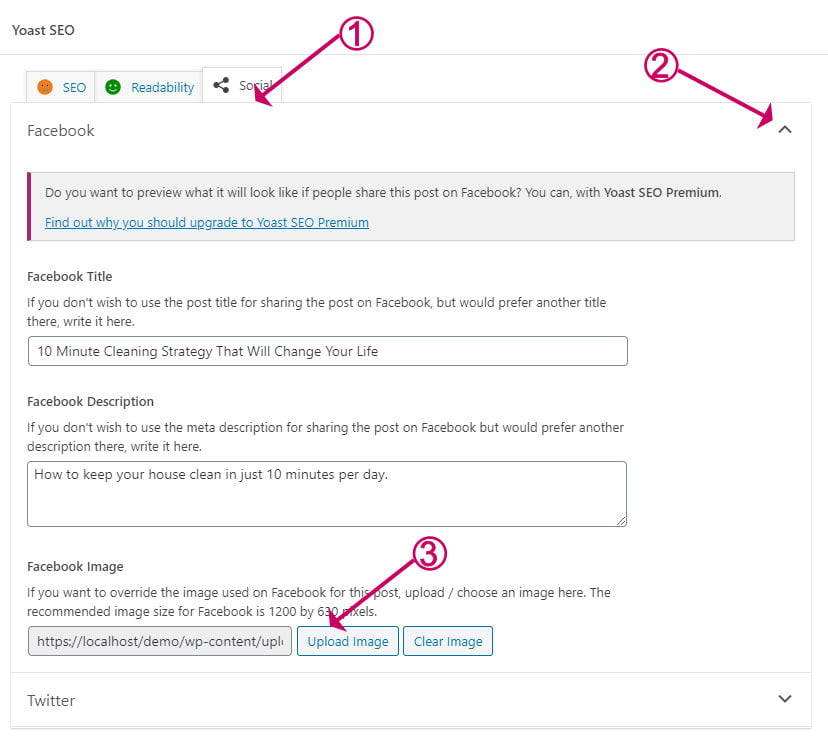
Using the Yoast plugin, you can upload a separate image for Facebook. Here’s how to do that:
- If you don’t already have the Yoast Plugin installed go to Plugins->Add New then search for Yoast SEO. Click Install, then Activate.
- Open the post that you wish to set the Facebook image for, then scroll down to the bottom of the post.
- Click the Social tab then expand the Facebook panel.
- You can then enter a title, description and image for Facebook sharing.
Frequently asked questions
How to fix a WordPress featured image size that is too big or too small?
If your featured image size appears too big or too small, here are a few things to check:
- Check what image size is being shown by your theme as per the directions in this post.
- If your theme is showing the large or medium version of the image, go to Settings->Media. Edit the medium or large image as necessary
- Check your theme settings, go to Appearance->Customize, is there a setting to change the blog image sizes?
- You may have uploaded a featured image that is of different proportions to the theme’s settings. Try uploading one that is the same.
How to crop the WordPress featured image size?
If you need to crop your featured image, your first option is to crop it before you upload it, making sure that it has the same dimensions expected by your theme. You can check what dimensions are in using the directions in step 1 above.
If you would like images to crop automatically to the desired dimensions when you upload them, then you would need to check how your theme is handling featured images.
Cropping of a featured image will only be done automatically during upload if your theme has added a proprietary image size, along with the cropping flag.
Here is an example of a new image size called ‘custom-size’ with the crop parameter set to true:
add_image_size( 'custom-size', 700, 465, true )Find out more about the add_image_size function here.
If your theme does not crop the featured image, you can use this code to remove the image size and then re-add it with the cropping flag:
remove_image_size( 'custom_size' );
add_image_size( 'custom-size', 700, 465, true);
It is recommended that you add the above code to the functions.php of a child theme.
After doing that you will want to rebuild all your featured images. Follow the directions in step 3 above to bulk resize the images.
What is the best WordPress featured image size?
If you don’t want to make separate image sizes for Facebook, it is a good idea to set your featured image to Facebook’s recommended proportions which are 1200px X 630px. Check the directions in step two to help you set your featured image size.
My theme uses the ‘full’ image size for featured images, what can I do to change that?
If after inspecting the HTML of the featured image <IMG> tag, you find that it has a class of attachment-full, then your theme is using the full-sized version of the featured image.
There isn’t much you can do in this instance other than make sure that you upload a correctly sized image for each post.
You could also contact the developer and ask why they have chosen to use the full-sized image in posts, and if there is an option you can change or some code you can add to change it.
I set my WordPress featured image size to a rectangle, but it appears in the post as a square, what should I do?
When you upload a new image, WordPress will do it’s best to resize the image to your chosen dimensions as set in Settings->Media or within the theme code.
In cases where the image proportions differ, it is not possible to achieve the chosen dimension without cropping the image. WordPress will not crop the medium and large image sizes.
For example, if you were to set your large image dimensions in Settings->Media to 1200px x 630px and then proceed to upload a square image of 2000px x 2000px, it is not possible to achieve the desired proportion without chopping out some of the image’s height. In this case, WordPress will provide you with a square image instead of 630px x 630px. You would then find that your post shows a square featured image instead of the wide size that you were expecting.
To resolve the issue, you should upload an image that already has the same proportions as your desired featured image. So you could provide an image of 2400px X 1260px, and that would be resized perfectly.
For the same reason, it is not recommended to set your large and medium image sizes to different proportions. If you want 1200px x 630px for the large size, the medium size could be set to 600px x 315px because the ratio of width to height is the same.
Final thoughts on how to set the WordPress featured image size
I hope that I have cleared up some of the confusion that can arise with featured image sizes.
What you should try to avoid at all costs is having your WordPress grab the full-sized image because it is unable to find a suitably sized image.
Using the full-sized image can result in slow paging loading times, especially if you mistakenly upload a huge image. If you follow the advice in this post, you should avoid that happening.
If you have found that your theme is using the full-sized image by design, you might well find that switching themes to a more efficient light-weight theme will resolve the issue.
I have three recommendations here that are all extremely light-weight and efficiently coded. – Three of the Best Free WordPress Themes for Blogs.
To help you avoid the biggest image mistakes that I find on websites I recommend you take look at this post – 7 Mistakes You Are Probably Making With Images – And How To Fix Them


