I often help people speed up their websites. Along with slow hosting, WordPress image mistakes are the most common contributor to a slow site.
Get your images right, and you are on the path to blogging success in more than one area:
- Better SEO
- Better loading times
- Better user experience (no waiting for a slow site to load)
- Better accessibility
- Reduced bandwidth
- Less disk usage on your hosting account
I once had a client who complained of slow loading times, especially on mobiles. The lady had a huge image on her home page header, which slowed down everything.
Just that one fix made a big difference.
Here is my guide to the most common image mistakes I find on blogs.
Mistake #1: Using PNGs instead of JPGs
PNGs and JPGs are the most common types of image on websites.
PNG images are similar to JPGs, but they are capable of containing a transparent layer allowing the colour underneath to show through.
The transparency layer makes PNGs perfect for logos, but not necessarily suitable for use in blog posts.
Because of the extra transparency information, a PNG image is usually much larger than a similar JPG. In the example below the JPG image is approximately 70% smaller than the PNG image, but the quality is pretty much identical.
I have much more information about images in my post – All About Images in WordPress.
Here is a PNG (size 124kb). Notice that it has no border because the background of a PNG image may be transparent.

Here is the same image as a JPG (size 39kb). The background is white because transparency isn’t possible for a JPG image.

If you think you have a PNG image where it should be a JPG, the simplest way to check is to drag it from the webpage onto your desktop, then check the file extension. You can also check the size.
Another method is to put your cursor on the image and right-click, then click Open Image In New Tab. The file extension will be at the end of the URL.
Mistake #1: Using PNGs instead of JPGs
You can convert a PNG to JPG format using any free photo editing tool on your computer. On a Mac use the Preview App or the Paint app on Windows.
- Find the PNG file in your media library and copy its URL
- Open the URL in your browser and drag the image to your desktop
- Open the PNG file in your photo editor app
- Select File->Save As
- Select JPG image type
- Click Save
Once you have your new JPG file, re-upload it to the WordPress Media Library.
- Go to Media->Add New
- Drag your new JPG file into the Drop Files Here box or click the Select button and browse to your file
What you do next will depend on where you found the original PNG file.
If it was in a post, open up the post, find where you embedded the image and swap it out with the new JPG.
If the PNG is in the header, you will probably need to use the customiser to re-upload the image, or the theme options page under Appearance.
Mistake #2: Uploading images directly from a stock photography website
You should never upload an image from a stock photography site straight into your media library or post. Always resize it first.
When you download a free or premium image from an image website such as Shutterstock, Pexels, Unsplash (and many others) it will very often be a very high resolution which results in a huge file size, usually of three or more megabytes.
My rule of thumb is to keep image sizes to a minimum of one megabyte before uploading to WordPress.
Mistake #1: Using PNGs instead of JPGs
When you resize, the best plan is to make it no bigger than the biggest image size set within WordPress. You can check this by going to:
- Settings->Media
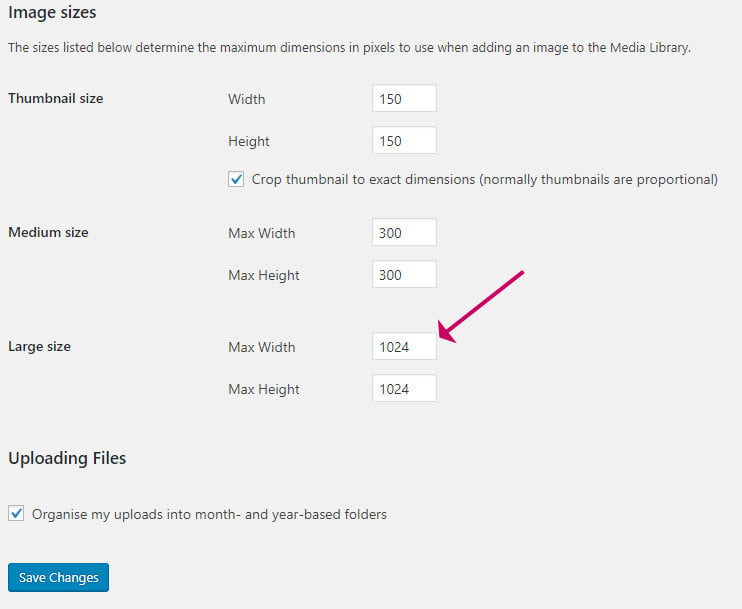
- On this website, the largest size is 1024px X 1024px, but yours may be different
Now, open the downloaded image in an image editor.
I like to use Affinity Photo for this, but you can also use Photoshop or a free photo editor such as Gimp, or the free apps that come with Macs or PCs, (Preview and Paint respectively).
On any photo editing tool, there is usually a resize button where you can specify a percentage reduction or a pixel dimension.
You can use both methods, but if you choose pixel, enter the largest pixel size that you found in the media settings, (e.g. 1024px).
If the image isn’t square, make sure you maintain the aspect ratio as you resize, there will usually be an option to tick.
Before you upload your newly resized image, you must also rename it, which leads me to the next mistake.
Mistake #3: Not renaming your images
When you download your image from somewhere like Shutterstock or Unsplash, it will retain the given name from the image site, which may be a random number or the name of the photographer, e.g. benjamin-raffetseder-ZVbXy8kXF5A-unsplash.jpg.
If you took the photograph yourself, it might be named something like img00567.jpg.
Always rename your image, preferably using some keywords for the blog post it will appear on, e.g. dining-table-six-seater-oak.jpg. Renaming the image with keywords makes it much more SEO friendly.
Mistake #1: Using PNGs instead of JPGs
You can rename your file using the file manager app of course, but to kill two birds, you could rename it as you resize.
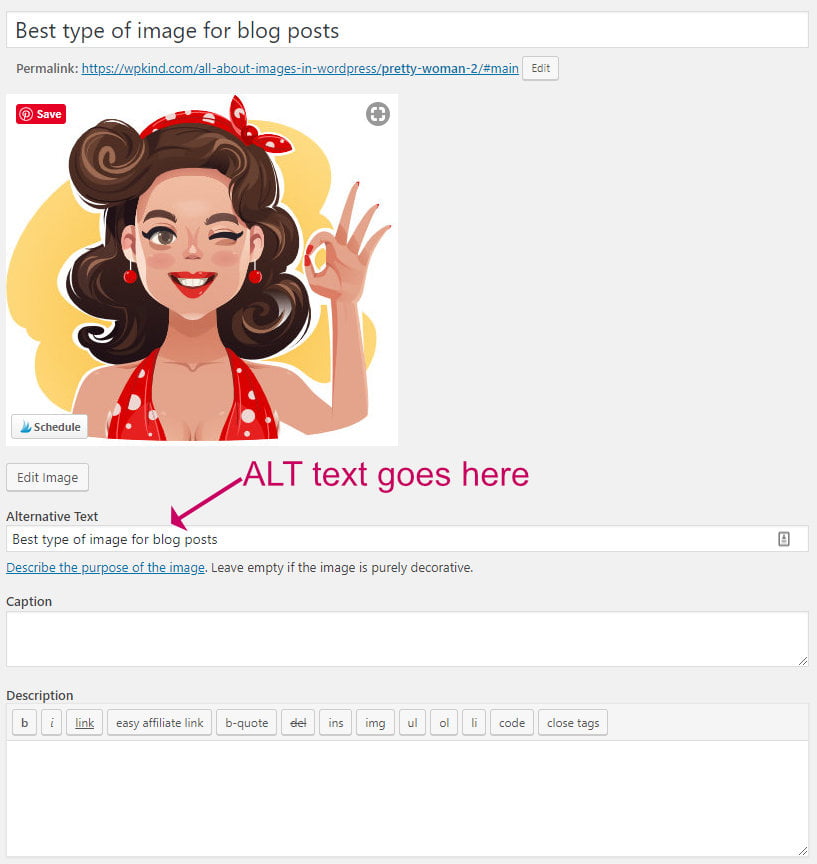
Mistake #4: Not giving your image an ALT text description
Search engines use the ALT attribute to understand further the image’s subject.
An image with a descriptive file name and ALT attribute can help it rank in image searches.
Mistake #1: Using PNGs instead of JPGs
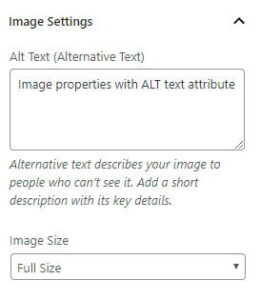
- You can give an image an ALT text description by editing its attributes in the media library
- You can also add ALT text in the block settings for the image
Mistake #5: Getting your images from a Google search
Never use images you found in a Google search on your website. It is actually unlawful to use someone else’s work without their permission.
The originators have ways of detecting unlicensed use of material, and they WILL get in touch! Usually with a bill, so be warned!
Mistake #1: Using PNGs instead of JPGs
Always use photographs you have taken yourself or purchased from a reputable stock image site, like iStockPhoto or Shutterstock.
For any image, you should always check the license, which leads me to the next mistake.
Mistake #6: Not obtaining a licence
All stock image sites have different prices, types of licences, and attribution policies. If the image is free, it may well come with caveats such as attributing the creator with a name and a link. If you get it wrong, you may well get in trouble later.
Mistake #1: Using PNGs instead of JPGs
Always check the license on any photographic site. If you aren’t able or willing to comply with the free license, then pay instead, or avoid!
The images may be offered free, but only for non-commercial usage. Or free for commercial use, but with optional attribution.
Unsplash is one such site that offers free photography for commercial use with optional attribution.
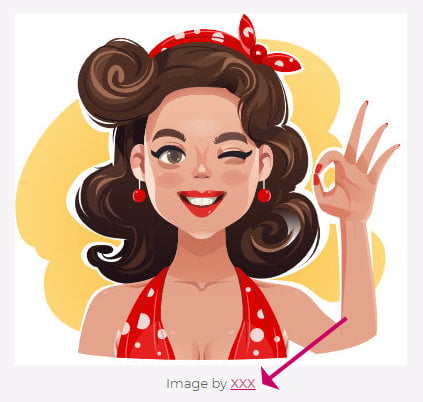
An excellent place to put an attribution is in the image’s caption attribute. Simply type it in underneath the image and add a link as you normally would with CTRL/CMD + K.
Mistake #7: Using the wrong size image
Always use the most appropriate image size according to context; this saves a lot of bandwidth and can make your site load faster.
For example:
- For images displayed as full-width, you will need to use the largest size.
- For images displayed as a thumbnail, you will need the smallest size.
Mistake #1: Using PNGs instead of JPGs
You can select the image size in the block settings:
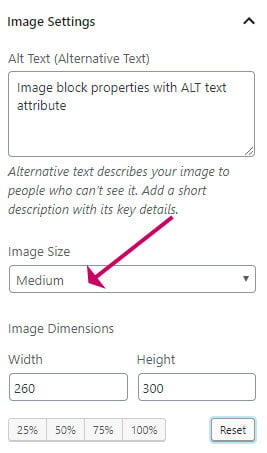
The common sizes are Thumbnail, Medium, and Large. Your theme may add some extra image sizes.
You can check the actual dimensions of each size in the media settings (Settings->Media).
Wrapping up
In this post, I have taken you through the seven major imaging mistakes that I find in blogs.
Get your images right, and you will be on the path to a super-fast, SEO optimised blog in no time.


