In this tutorial, I will be sharing how I added a MailChimp email list signup form to my sidebar, without using a plugin. This task is so easy to do manually, even for beginners, so why use a plugin if you don’t have to?! If you can copy and paste, then you can follow this tutorial no problem.
Before we start, let’s talk about mailing lists and MailChimp in particular.
Having a healthy mailing list of engaged readers is an essential part of growing your blog. A newsletter enables you to gently remind people to keep coming back to your site, via a medium that many people check every day. The success of a blog is often directly correlated with the size and quality of a mailing list.
MailChimp is a mailing service that allows you to send out newsletters to your list of e-mail subscribers. To get subscribers onto your list, you need a signup form somewhere on your blog.
You can use MailChimp to design a signup form, copy the form’s HMTL, and then paste it into a WordPress widget, which is what I will show you in this tutorial.
MailChimp has a forever free plan for up to two thousand subscribers, so it is an excellent choice if you are starting a new blog. If you are using something else, the process will be very similar.
Don’t have time to set up MailChimp yourself? Or perhaps it all seems too technical? Don’t worry! Let me help you out.

Here is what we are aiming for in this tutorial:

Embedding a signup form is preferable to linking to an external URL because it keeps readers on your site during the sign-up process and appears seamless. A great place to embed your signup form is in the sidebar, but you could also put it in the footer. Follow the same directions, but instead drag the WordPress widget to the footer, it’s that easy!
Step 1- Open a MailChimp account
If you don’t already have a MailChimp account, you can open one here.
Step 2 – Create a MailChimp signup form
When you first create your account, MailChimp also creates your first mailing list, which it calls an Audience. You can have multiple lists/audiences.
- Click on Audience from the top menu.
- Click on the Manage Audience button and then select Signup forms.
- Click Form Builder, and from there you can design your form specifying what fields you want to display. Usually, you would want Email Address and an optional First Name. You can click on each field and choose to delete or hide it. I like to hide the Birthday and the Last Name field. The least information you ask for the more likely your reader will sign up.
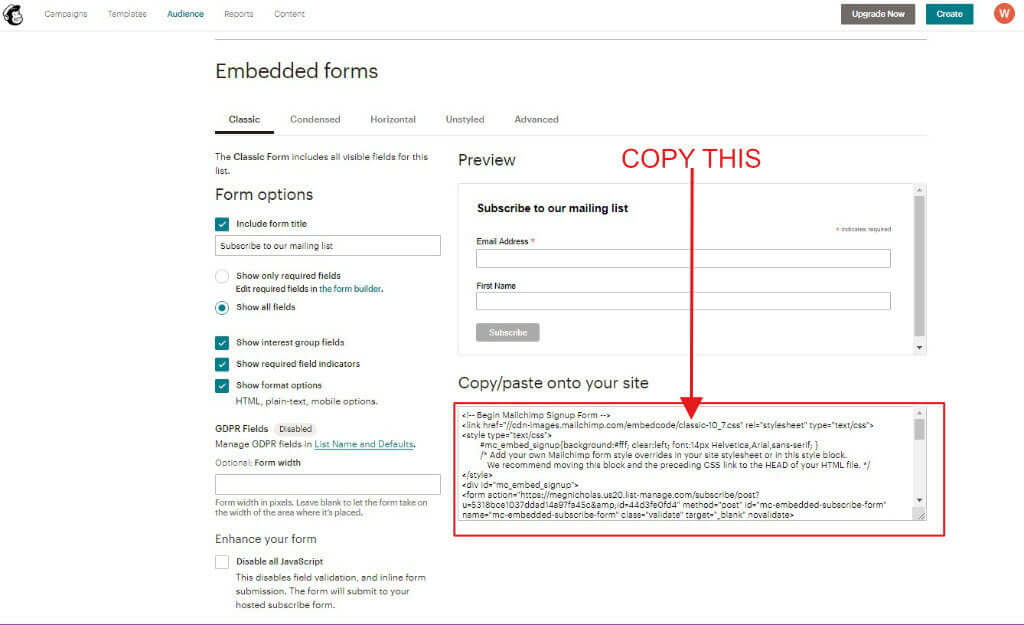
- When you are happy with your form click Signup forms again, and this time click on Embedded Forms.
- Go to the Copy/paste onto your site box, copy the HTML code that is displayed there and save to an editor like Notepad for Windows or Notes for MacOS.
Step 3 – Add the signup form to the WordPress sidebar
In this step, we head over to your WordPress blog to embed the signup form onto the sidebar.
- Go to Appearance->Widgets.
- From the Available Widgets section on the left, find a widget called Custom HTML.
- Drag the Custom HTML widget to your sidebar, or footer if you prefer to place it there instead.
- In the Title box type something like ‘Sign Up Here!’.
- Paste the HTML that you copied from MailChimp into the Content box.
- Click Save.
The signup form should now appear in your sidebar.
Step 4 – Style the signup form
Styling the signup form is an optional step because there is already some styling built in. However, I like to have my theme style the form, so I remove the embedded CSS, this means removing the following code after <–Begin Mailchimp Signup form –>
<link href="//cdn-images.mailchimp.com/embedcode/classic-10_7.css" rel="stylesheet" type="text/css">
<style type="text/css">
#mc_embed_signup{background:#fff; clear:left; font:14px Helvetica,Arial,sans-serif; }
/* Add your own Mailchimp form style overrides in your site stylesheet or in this style block.
We recommend moving this block and the preceding CSS link to the HEAD of your HTML file. */
</style>
I wanted a bit more spacing between the fields, so I added this CSS to the top:
<style>
#mce-EMAIL, #mce-FNAME { margin-bottom: 8px;
}
</style>
<!-- Begin Mailchimp Signup Form -->
..
Or you could use a plugin to add the extra CSS, the SiteOrigin CSS plugin is an excellent option.
How to Install a WordPress Plugin.
Step 5 – Testing
It is a very good idea to check the form is working. Test it with invalid data, such as a bad email address and see what happens, an error should be displayed.
Test it again with valid data and check that your email address appears on the mailing list.
Wrapping up
In this tutorial, we have added a MailChimp signup form to the sidebar, and we have done it all without a plugin!
You can use the same method to add a signup form to other widgetised areas such as the footer, or you could even embed a signup form within your post content with the new WordPress 5.0 editor.
[socialpug_tweet tweet=”You really don’t need yet another WordPress plugin to add a MailChimp opt in form. Here’s how.” display_tweet=”You really don’t need yet another WordPress plugin to add a MailChimp opt in form. Here’s how.” style=”2″]


