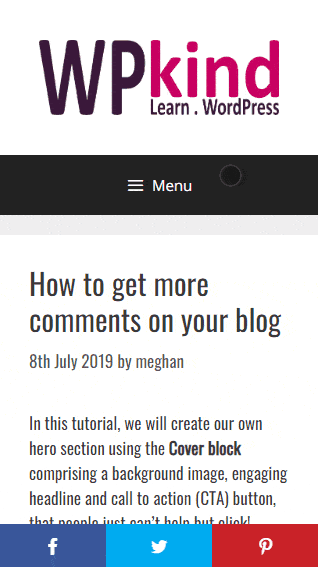
When I started this blog, I looked around for the best social sharing plugin. There are plenty of choices. In this post, I will tell you about the social sharing plugin I use: Social Pug, and how your blog can benefit from using it too.
When I began looking for a social sharing plugin, there were several essential things that I felt a sharing plugin should have:
- Share counts
- Fast loading ( many social sharing plugins slow down your blog a lot)
- Allows different sharing image sizes, for Facebook and Pinterest
- Allows you to add the sharing text for Twitter, Facebook and Pinterest
- Allows you to hide multiple Pinterest pins in the post without slowing down page load time
- Allows different designs for sharing icons
- Allows sharing icons to be shown in different positions
- Reasonably priced
- Easy to use
Let’s look at the Social Pug Plugin a bit more, what it does and how to use it to get lots of shares for your blog posts.
What can Social Pug do (now called Grow)?
Since I purchased Social Pug, it has been taken over by Mediavine, who then renamed it to ‘Grow’.
Mediavine says that they will be improving the loading speed of the plugin even further and positioning it as a more all-purpose marketing plugin.
Mediavine recommends that you purchase Social Pug premium sooner rather than later. They would do that, wouldn’t they? But … it sounds as if they are going to be increasing the price soon. They have said that they will honour the current pricing if you buy it now.
Social Pug is a sharing plugin that provides the following functions:
- Allows various types of buttons including, inline buttons within posts, floating buttons, sticky buttons, and popups
- Extracts the share counts from the various networks
- Displays the share counts next to the sharing buttons (optional)
- Allows you to change the design of the sharing icons
- Provides share count recovery from another URL, useful if you are rebranding or moving from HTTP to HTTPS.
- Provides link shortening (useful for Twitter sharing)
- Integrates with all the major social networks
- Provides follow buttons
- Provides various shortcodes for manual integration including a ‘click to tweet’ shortcode
- GDPR compliant
Social Pug is fast!
I won’t name names, but several social sharing plugins come with a significant speed overhead. Typically the slowest ones are those that you set up on a third-party app rather than within your blog.
Social Pug is fast because it doesn’t go to another server when it loads itself, plus it caches the share counts.
If you know me, you know I am big on speed, and I would not consider any plugin that results in a sluggish site.
It’s great news that Mediavine plans to prioritise on making this plugin load even faster.
Here is how the sharing buttons look on a post when you first install the plugin:

The sticky sharing buttons can work well on mobiles.
The plugin can add a Pinit button to all your images allowing people to pin them on Pinterest along with a link back to your blog.
You can have your sharing buttons appear in a popup like this:

A couple of widgets come with the plugin:
- If you switch the Follow Widget on there is a widget that you can add to your header, footer, or sidebar.
- There is also a Top Shared Posts Widget which is handy for showing off your most shared posts.
These things are great, but they aren’t why I purchased the plugin. There are several plugins that do the same thing.
Let me tell you the primary reason I bought Social Pug …
Why I recommend the pro version of Social Pug
Social Pug is available for free on WordPress.org. I have never used the free version because there are a couple of crucial elements missing that is essential if you want to use the plugin to grow traffic to your blog from social media.
What can Social Pug do (now called Grow)?
Here is what you see at the bottom of all your posts. These options allow you to enter specific image sizes and sharing text for social networks.

You may already know that Pinterest prefers tall images. Using this plugin, I can hide one or several tall images in one post.
Why don’t you share this post now and you will see what I mean?
I talk more about this element of the pro plugin in the sharing options section below if you wish to skip straight to it.
Why I recommend the pro version of Social Pug
With the pro version, we get some extra options in the media settings, including a specific Pinterest description and repin ID.
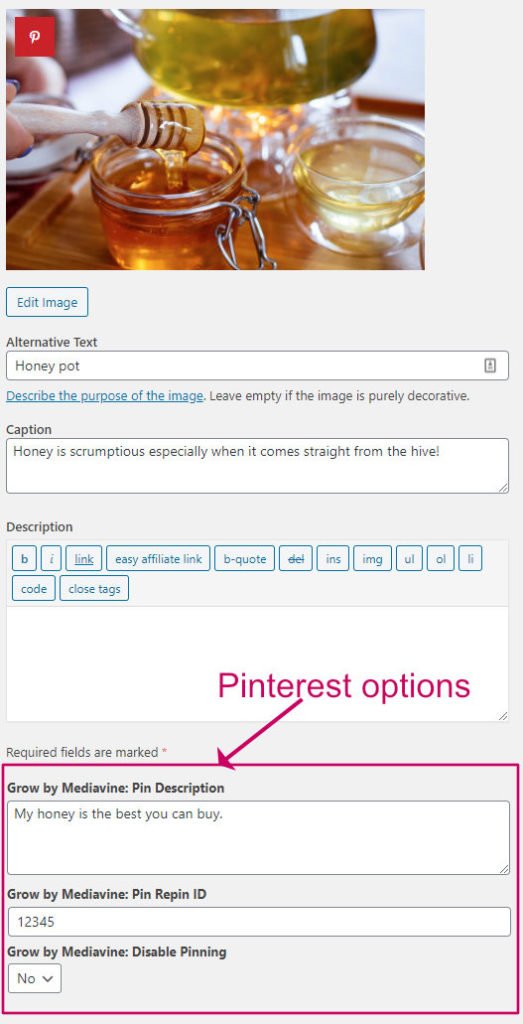
Without Social Pug pro, the ALT text of the image is used instead, which isn’t necessarily the best for Pinterest. ALT is best suited for Google search optimisation and for screen readers, not Pinterest.
If you have already shared the image to Pinterest and you prefer people to repin that, enter the existing Pin ID. The Pin ID is the long number at the end of the Pin’s URL:
https://www.pinterest.co.uk/pin/824440275522727085/If you don’t want people to share a particular image, you can disable pinning altogether.
There are more site-wide settings you can make in the general settings for the plugin at Grow->Settings->Pinterest Settings. I talk more about that further down.
Social Pug premium is currently very reasonably priced, and if you pick it up now, you avoid the price increase that Mediavine plans to make in the future.
The rest of this post is about how to install the plugin and set it up to look the way you want. If you don’t have time to do that now, please do pin for later ????.
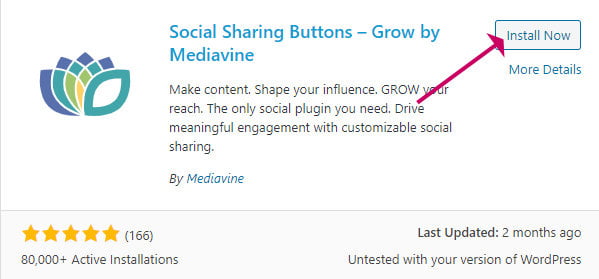
How to install Social Pug plugin
In this tutorial, I recommend you have the premium version because it has some essential functions that we need as bloggers. If you prefer to install the free version you can install it directly into your blog by going to:
- Plugins->Add New
- Search for social pug
- Click Install Now then click Activate
To install the premium version, head over to the Social Pug website and purchase if you haven’t already.
During purchase, you will create an account on the developer’s website.
You can download the plugin from the File Downloads tab in your account.
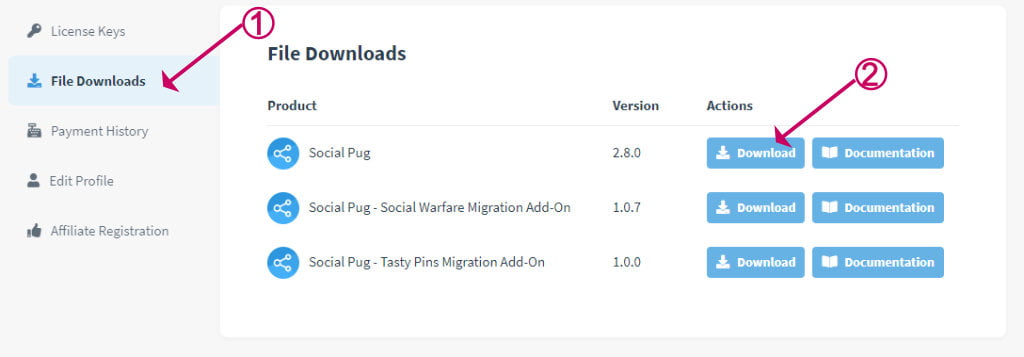
You will then have a ZIP file on your computer.
Before you go, grab the license key from the License Keys tab. You will need it to get automatic updates.
You are now ready to install the Social Pug plugin on your website.
Important: If you already have the free version installed, you must remove it before you can install the Social Pug premium:
- Go to Plugins
- Find for the Social Pug Plugin in the list
- Click Deactivate
- After the screen refreshes find the Social Pug plugin again
- Click Delete
Now let’s install Social Pug Pro!
- Go to Plugins->Add New
- Click Upload Plugin
- Click Choose File
- Then select the ZIP file you downloaded from the Social Pug website
- Click Install Now
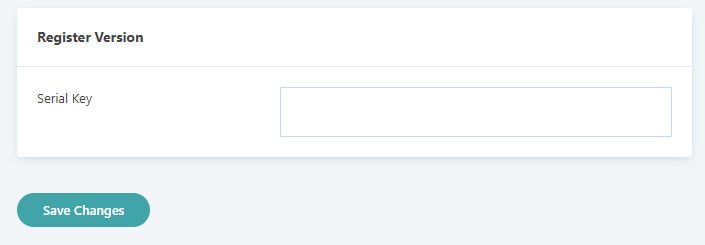
The last step is to enter your license key. If you don’t already have your license key, pop back to your account and grab it from the License Keys tab. Then go to Grow->Settings and scroll down to the bottom. Enter your key and click Save Changes to finish.
That’s it. We now have Social Pug installed and registered.
How to use Social Pug sharing plugin
When you first install the plugin, it makes some common settings automatically, which means that this plugin works out of the box. I love those kinds of plugins!
Go ahead and check one of your posts. You should find that sharing buttons magically appear.
You could leave it there, but if you have the time, you can tweak the style and position in the settings. I recommend you at least set up the share counts, which is the first thing I talk about in the next section.
Social Pug Settings
You can access the settings for Social Pug at Grow->Settings.
Here are the most most important settings:
How to install Social Pug plugin
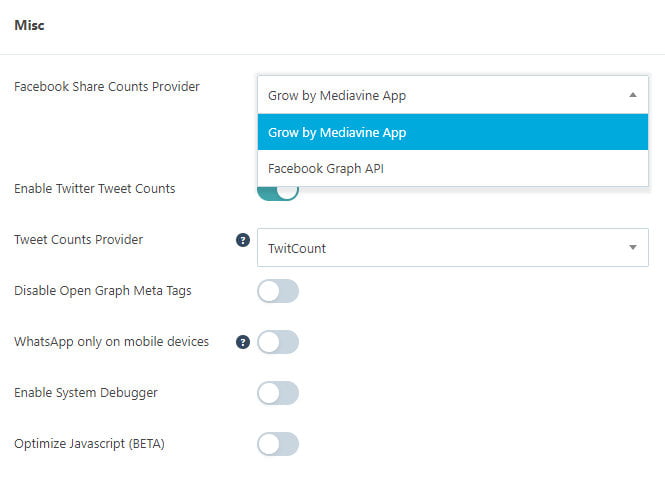
Go to Grow->Settings, click the General Settings tab, then scroll down to the Misc section.
The first thing we will set is the Facebook Share Counts Provider.
The most straightforward option is to use Grow’s own App by selecting Grow by Mediavine App, then click the Authorize Grow button.
If you prefer, you can use your own Facebook App. If you don’t yet have an app here is how to set one up. Then enter the App ID and Secret Key in the options below.
How to use Social Pug sharing plugin
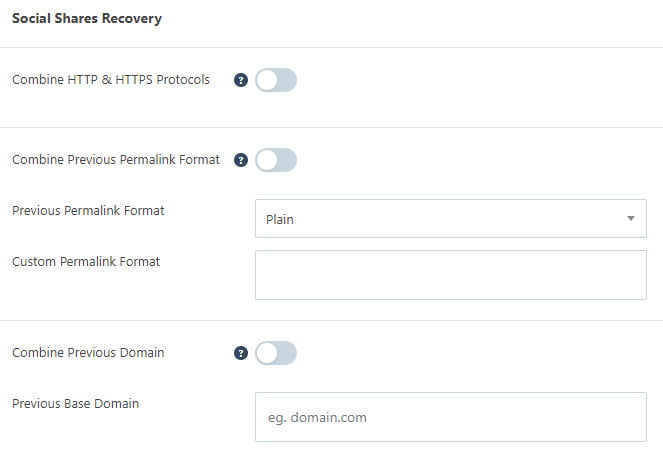
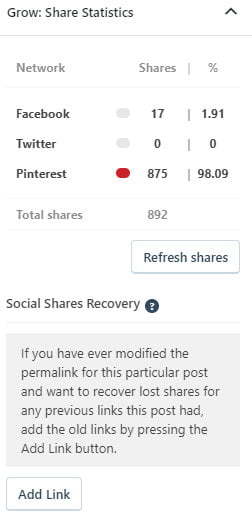
If you have recently changed your domain name or moved from HTTP to HTTPS, then you will want to include the share counts for the original domain. If you don’t do this, share counts will reset to zero.
Go to Grow->Settings then click the General Settings tab and scroll down to Social Shares Recovery. Here you can make settings depending on the previous URL.
Social Pug Settings
If you are going to be using the Follow Widget, then you need to add the links for your social networks.
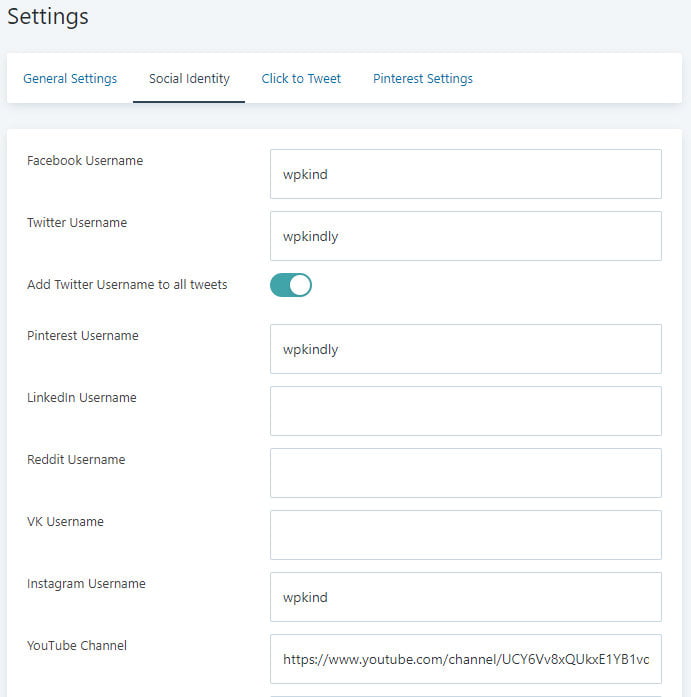
Go to Grow->Settings then click the Social Identity Tab
Here you can enter the username of all the social networks that you use.
How to change the sharing icons in Social Pug
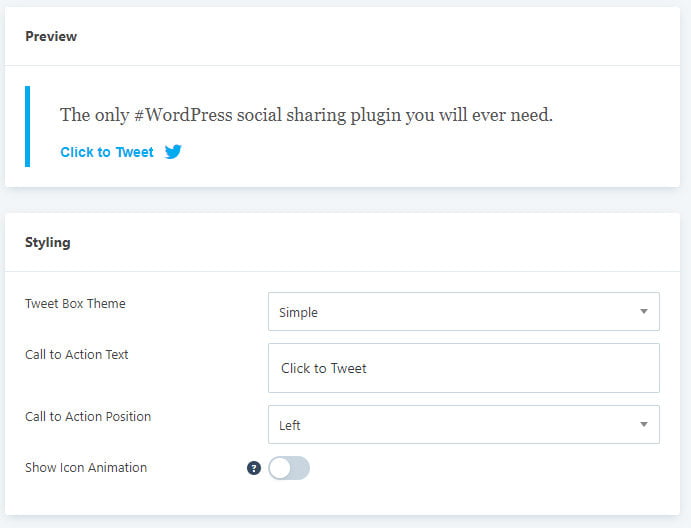
Social Pug gives you the option to insert tweet text within your posts using a shortcode like this.
[socialpug_tweet tweet="Create a hero section on your blog without a plugin with this super simple tutorial."]To set up how your click to tweet text is styled head over to Grow->Settings then click the Click to Tweet tab.
Social Pug Sharing options
Social Pug allows you to fine-tune Pinterest sharing. This is how I set this section up for this blog:
- Pin description source: Set this to Post custom Pinterest description so that the text you add in the sharing options box is used instead of the image’s ALT text or post title. This is important because the ALT text will not usually be best for Pinterest.
- Pinnable images: Can be set to either all images, images from the post’s content or just the Pinterest specific images set with the post’s Sharing Options. I set this to Images from the post’s content because then the Pinit icon appears on every image in the post. If you only want the Pinterest images that you set up for the post to be shared then choose Only the Pinterest images set for the post
- Pinterest button behaviour: This seems to show the same selection of images on either setting, so I leave this at the default setting
- Add post Pinterest image as hidden: Switch this on to hide the Pinterest image in the post until someone clicks the share button.
- Multiple Pinterest hidden images: If you want to add multiple Pinterest images to your post, then switch on this option.
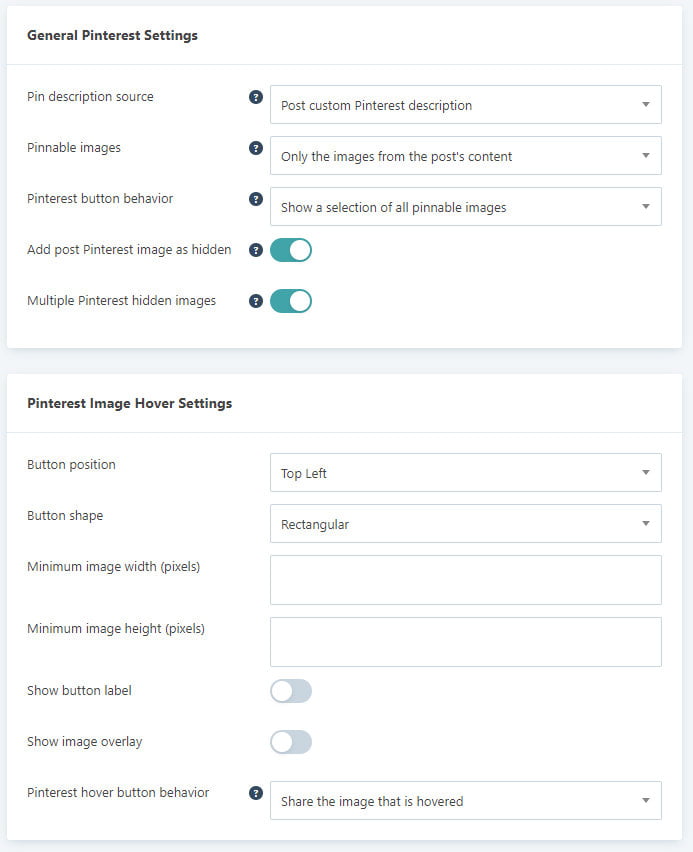
Use the Pinterest Image Hover Settings to change how the button looks when people mouse over an image to share it. Note that this button will only appear if you have selected All available images or Only images from the post’s content in the Pinnable Images Option above.
How to change the sharing icons in Social Pug
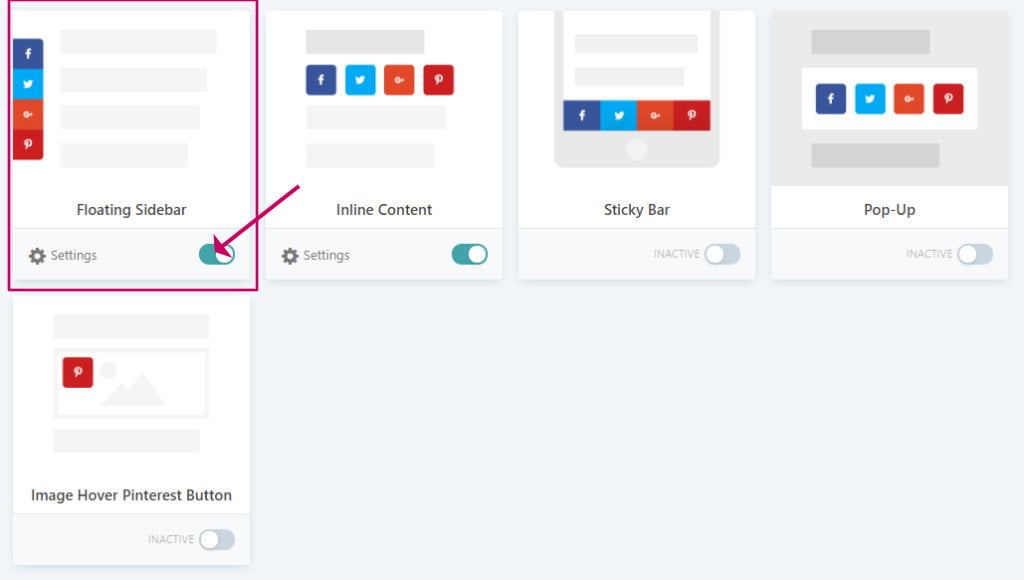
Go to Grow in the admin menu.
From there, you can select what types of sharing icons will display on your blog using the green switch.

Let’s have a look at each of these types of buttons.
Wrapping up
When you first install Social Pug sharing icons the floating sidebar is automatically enabled.
You can switch the floating sidebar on and off by going to Grow in the admin menu and clicking the green toggle button.
When you switch on floating sidebar, sharing icons will float on the left or right side of the screen. Unless you switch on the Show on mobile option, the buttons will only appear on desktops.
Floating social icons are always on show, even when your reader scrolls down the page.
On mobiles, these types of buttons could obstruct too much of the screen, so make sure you test it out on mobile.
You can make some changes to the style of these floating buttons by clicking the settings icon or selecting Grow->Floating Sidebar from the menu.
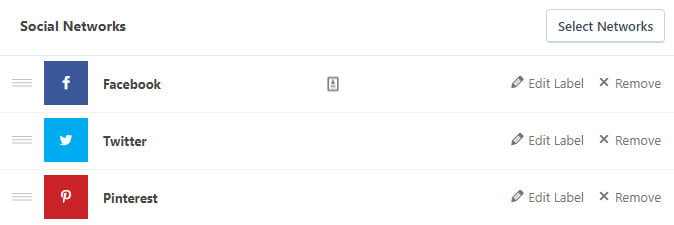
Choose your preferred social networks.
You can change the order by dragging the three-lined icon on the left. You can add more networks using the Select Networks button.
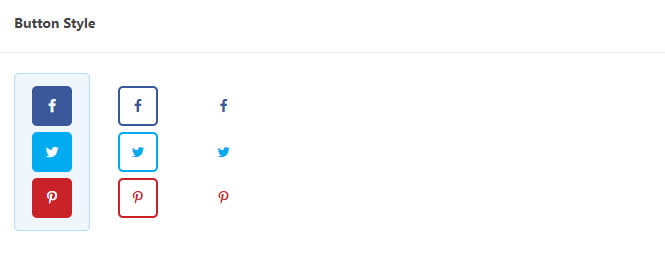
Next, you can change the style of the buttons from one of three options.
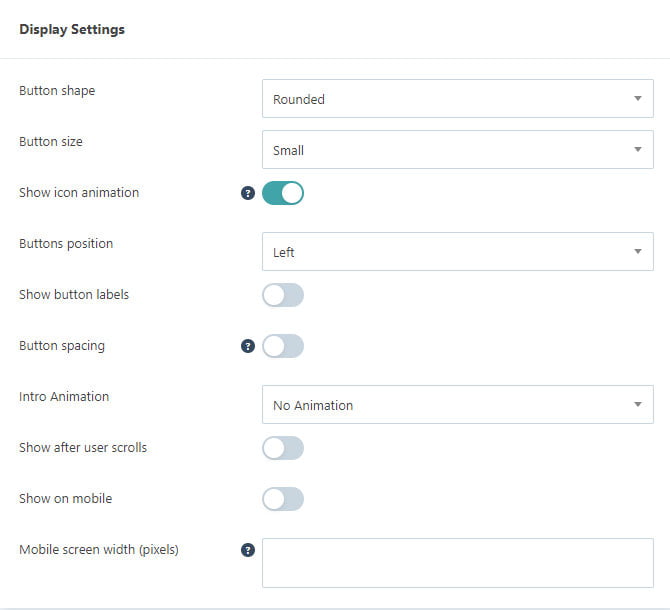
You can tweak the button style further in the Display Settings panel, including the button shape, size, and positions (left or right).
If you turn on Show on mobile I recommend you test your website on a mobile, it may well cover too much content and possibly annoy your readers.
Further down, you can tweak how the share counts display or turn them off.
Show share count will display individual share counts for each social network. Not all social networks can give you a count. For example, it’s not possible to get share counts for Twitter. That’s why I prefer to switch on the Show total share count instead.
If you enter a Minimum share count, the count won’t display until it reaches that threshold. Turn this on if you don’t want to reveal the actual count when it is still a small number.

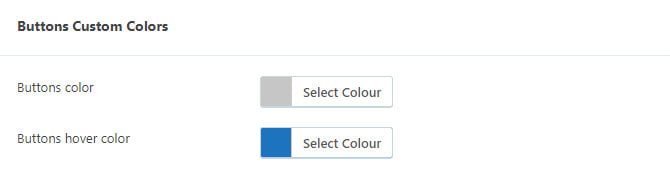
Use the custom colours panel to personalise the colours of the buttons.
You could set them to your theme colour. However, I would say that having them stand out (blue for Facebook and red for Pinterest), is a good thing.
The last thing you can change is where you want your floating sidebar to display. Usually, you would put sharing buttons only on posts, but you can also have them displayed on other post types too, such as pages.

1. The pro version of Social Pug lets you add different sharing images for social networks and metadata
Inline content sharing buttons appear within the content of your posts. The plugin enables these buttons automatically when you first install the plugin, but you can switch them off and access their settings by going to Grow from the admin menu.
If you switch Inline Content buttons off, you can add them back manually using the shortcode:
[socialpug_share]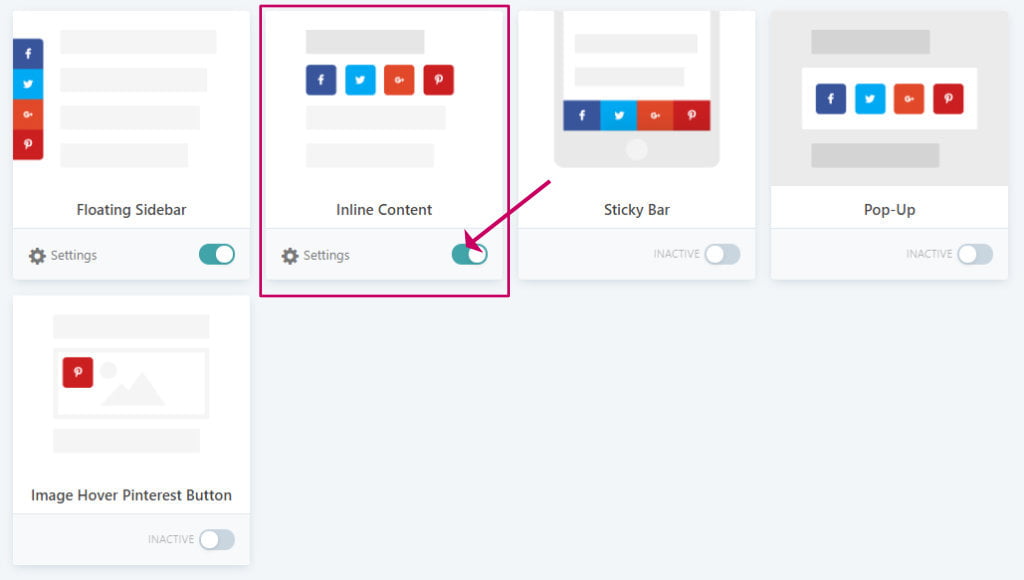
You can also access the settings by going to Grow->Inline Content.
Let’s have a look at the settings.
First, select your preferred social networks. I recommend you keep the list to a minimum. Too many choices could be overwhelming for your reader.
You can add more networks using the Select Networks button and change the order using the left-hand three-lined icon.
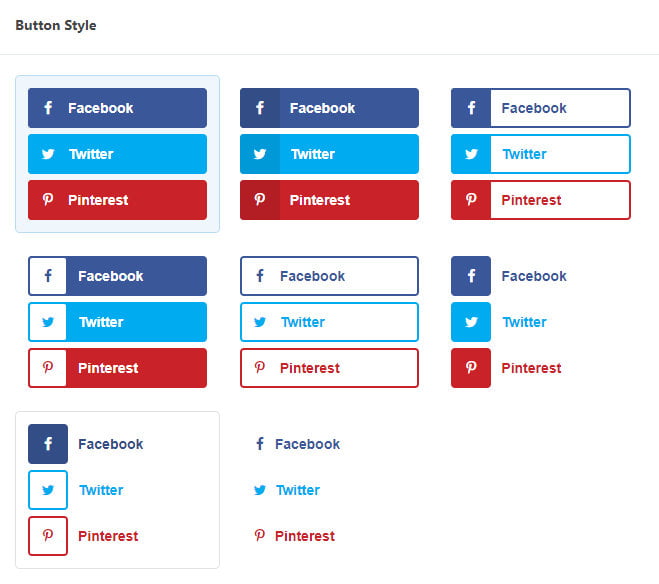
The next step is to choose the style of the buttons.
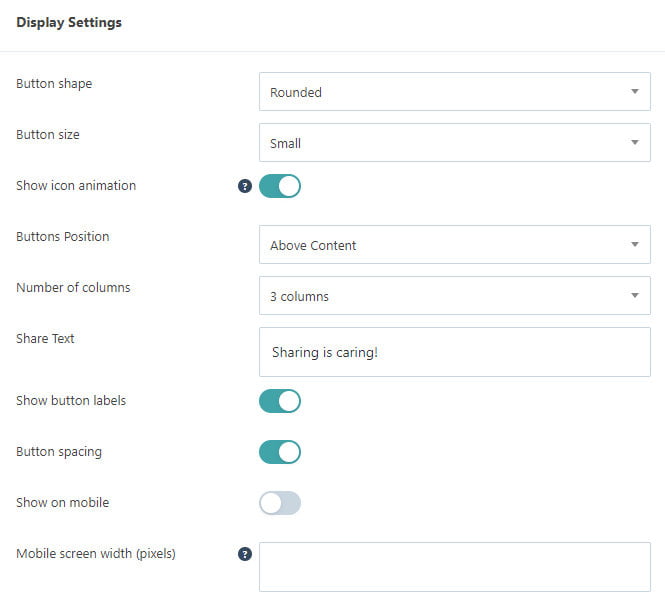
Further down the screen, we can make some changes to how the buttons display.
Use the Button shape and the Button size options to change the shape and size of the buttons.
The Buttons Position option allows you to change the location of the sharing icons. You can select Above Content to have the sharing icons appear below the post title, or you choose Below Content to have the sharing icons appear at the end of the post. You can also select both options.
The Number of columns option allows you to select how the icons stack. If you want the icons to appear on one line, select the same number of columns as you have buttons. To stack the buttons, select 1 column.
You can switch off the button labels using the Show button labels toggle.
The Show on mobile option is switched off by default, but you could switch it on here if you are not going to use sticky sharing buttons (buttons that stick to the top or bottom of the screen) for mobiles.
Further down, you can tweak how the share counts display or turn them off.
Show share count will display individual share counts for each social network. Not all social networks can give you a count. For example, it’s not possible to get share counts for Twitter. That’s why I prefer to switch on the Show total share count instead.
If you enter a Minimum share count, the count won’t display until it reaches that threshold.
Use the Custom Colours panel to personalise the colours of the buttons. Perhaps you want to use a theme colour? However, you do want your social icons to stand out and to be instantly recognisable, so I recommend you don’t change this option.
The last thing you can change is where you want your floating sidebar to display. Usually, you would put sharing buttons only on posts, but you can also have it show on other post types too, such as pages.
2. The pro version of Social Pug allows you to enter a Pinterest description, and a repin ID for images
To enable sharing buttons in a popup, select Grow from the admin menu and then switch it on using the toggle.
Click the settings icon or choose Grow->Pop-up.
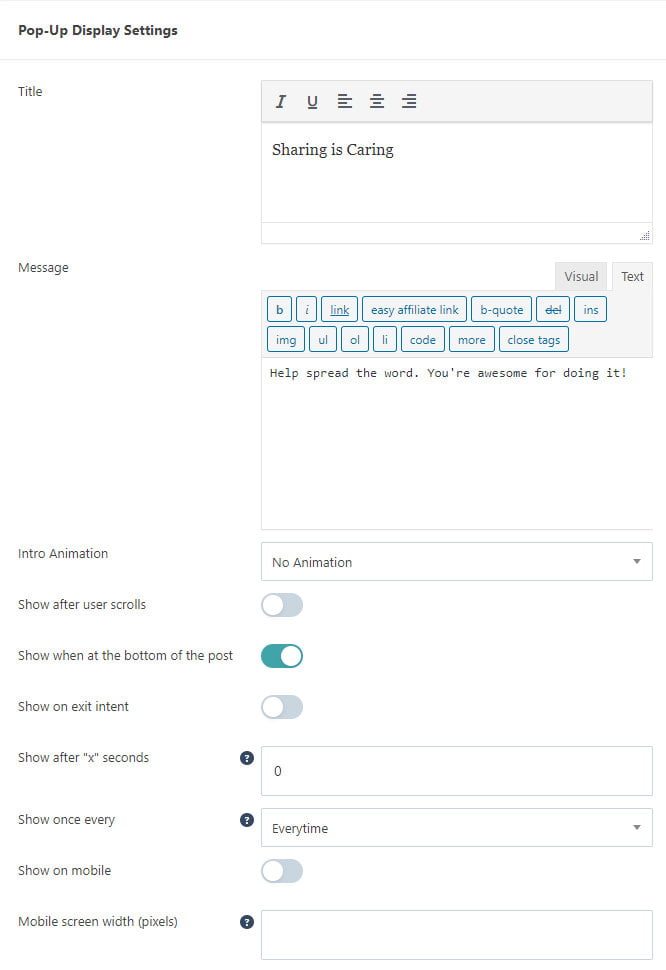
The settings are the same as for the inline sharing buttons apart from one extra box called Pop-up Display Settings where you can fine-tune how the pop-up appears and when.
Set up share counts for Facebook
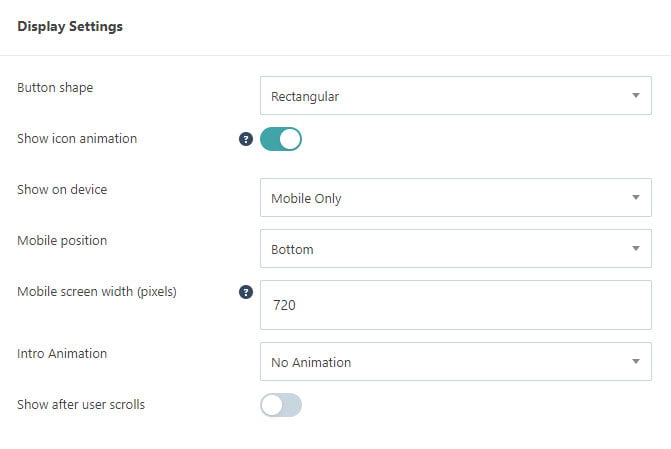
The Sticky Bar sharing icons are buttons you can stick to the top or bottom of the screen.
The advantage of sticky buttons is that they are always accessible, and it could mean that you get more shares.
However, be careful using these types of buttons because they can obscure your content or hide your ads, so do make sure you test on different screen sizes.
Click Grow from the menu, then use the toggle to switch them on and off.
Once you switch Sticky Bar on, the settings icon appears.
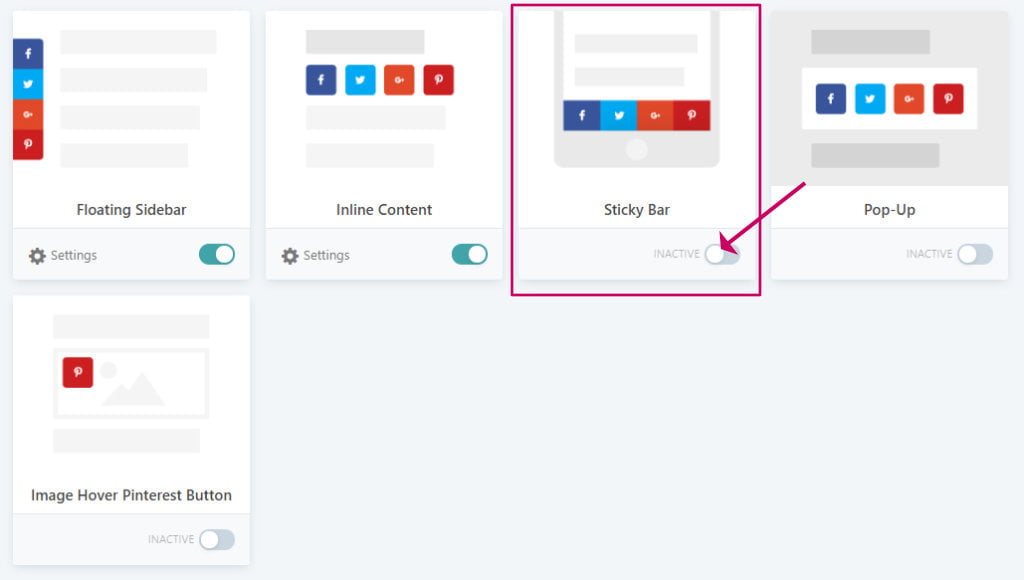
You can also access the Sticky Bar settings by going to Grow->Sticky Bar.
First, select your preferred social networks. Again, I recommend you keep the list to a minimum.
You can add more networks using the Select Networks button and change the order using the left-hand three-lined icon.
Further down the screen, we can make some changes to the button styles.
Use the Button shape and the Button size options to change the shape and size of the buttons.
You will probably only want to use these types of sharing buttons on mobiles. For show on device, Mobile Only is selected, but you can change this to desktop if you prefer or both.
The Position option allows you to change where on the screen you want them to display. Options are top or bottom.
You can delay showing the sticky buttons until the user scrolls the page using the option Show after user scrolls.
Further down, you can tweak how the share counts display or turn them off.
Show share count will display individual share counts for each social network. Not all social networks can give you a count. For example, it’s not possible to get share counts for twitter. That’s why I prefer to switch on the Show total share count instead.
If you enter a Minimum share count, the count won’t display until it reaches that threshold.
Use the Custom Colours panel to personalise the colours of the buttons. Perhaps you want to use a theme colour? However, you do want your social icons to stand out and to be instantly recognisable, so I recommend you don’t change this option.
The last thing you can change is where you want your floating sidebar to display. Usually, you would put sharing buttons only on posts, but you can also have it show on other post types too, such as pages.
Social shares recovery
Social Pug has a follow widget that you can add to your sidebar or footer and include in your posts.
Here is an example of how they can look:

When switched on you will see it as a new widget in Appearance->Widgets.
You can also show Social Pug follow icons using a shortcode:
[socialpug_follow]You can switch on the Follow Widget by clicking Grow from the menu, scroll down, then use the toggle to switch it on and off.
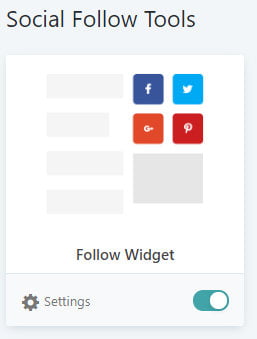
Once you switch the Follow Widget on, the settings icon appears.
You can also access the Follow Widget settings by going to Grow->Follow Widget.
If you haven’t already you should set the usernames for all your social networks under Grow->Settings then click the Social Identity tab.
First, select the social networks that you use.
You can add more networks using the Select Networks button and change the order using the left-hand three-lined icon.
The next step is to choose the style of the buttons.
Further down the screen, we can make some changes to how the buttons display.
Use the Button shape and the Button size options to change the shape and size of the buttons.
If you want the buttons to stack choose the number of columns to display in the Number of columns option.
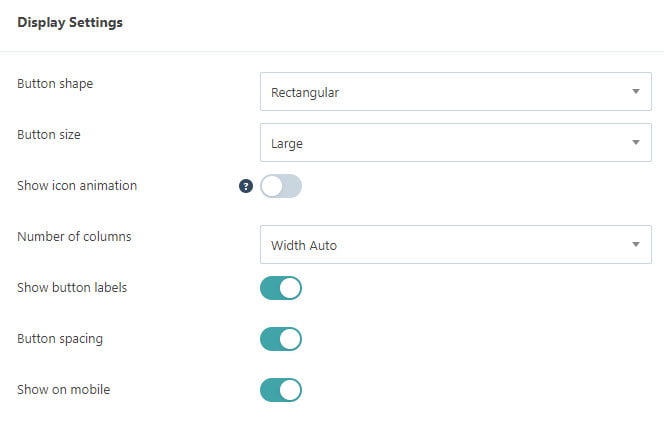
Use the Custom Colours panel to personalise the colours of the buttons.
Social Pug Sharing options
Here, this is where Social Pug comes into its own!
At the bottom of each post, you will find the share options where you can set images for different social sharing networks and the text that appears along with it.
For Pinterest sharing these options are gold because not only can you set a separate tall image for Pinterest sharing, you can also hide several other images in the post too. Having multiple Pinterest images means your readers have a choice on which to share.
These additional Pinterest images don’t slow down your blog because they don’t load up unless someone hits the share button.
You can complete each of the titles and the descriptions using the exact text that you want sharers to use when they share your post to Facebook, Twitter and Pinterest. The text could include keywords and hashtags, especially for Pinterest sharing so you can get the most exposure for your pins.
In your post’s Document Settings, you will find a panel for the share statistics for the individual networks. You can also add an alternative URL if you have changed it and want to retain the original share counts.
Wrapping up
In this post, I have taken you through how to use Social Pug (renamed Social Pro by Grow) to allow your readers to easily share your content on social media and follow you on social networks.
I don’t often recommend going straight to the premium version of a plugin. But in this case, I do, because the pro version of Social Pug gives you the ability to set specific sharing text and images for the main social networks. This is essential for blogs.
Social Pug is the most lightweight and functional social sharing plugin that I have come across so far. I am excited to see how the new owners, Mediavine, will develop it further.


