Today I’m going to talk about ways to speed up your WordPress website.
Speeding up a blog is something that even WordPress beginners can do, so I’m going to be a really good teacher here and say that there is no excuse for not doing it!
Why WordPress speed matters a lot
- If you want higher Google ranking, you must have a fast site. Google absolutely loves fast sites, and now uses speed as a ranking factor.
- If you want more traffic you need a fast site. A slow loading site will send your readers away when they can’t be bothered to wait for your site to display; this also has the effect of elevating your bounce rate.
- A high bounce rate will negatively affect your Google ranking.
Most of the improvements can be achieved by installing a plugin, so if you can do that, you can follow this post!
If you suspect your site is slow to load, here is how to check it for sure.
How to check WordPress speed
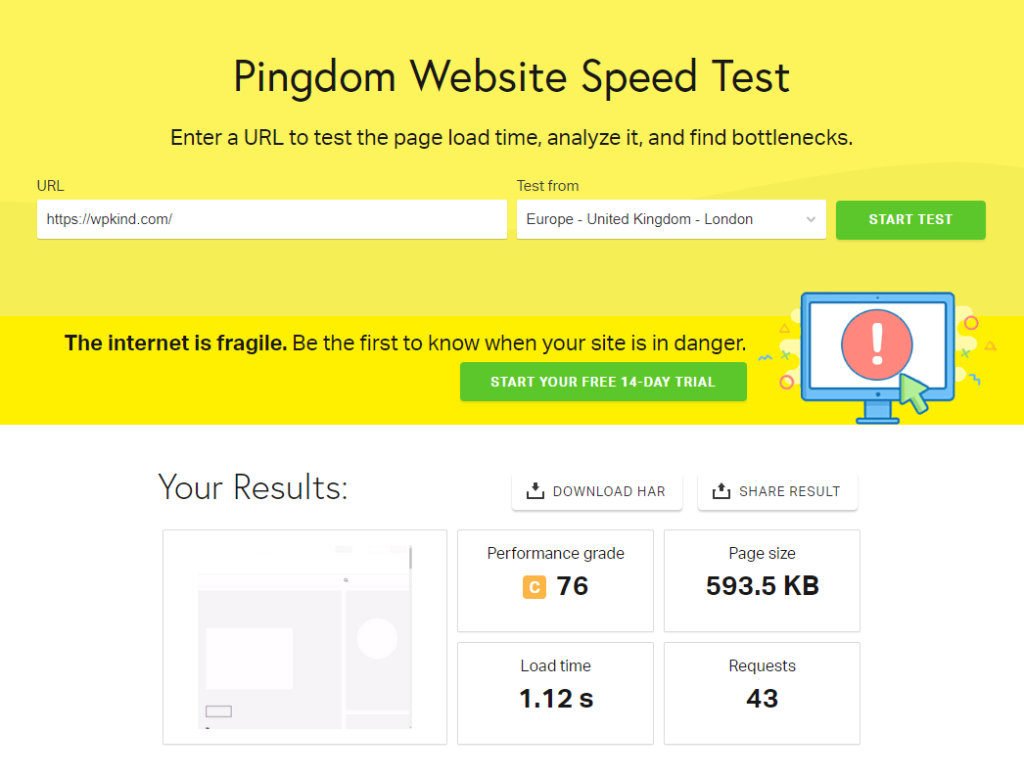
My favourite way to check site speed is with the free Pingdom tool. Enter your website URL and you can run the test from various locations around the world.
Whichever location you choose, anything under 2 seconds loading time is acceptable.
Primary causes of a slow site
Slow loading times are typically caused by the following issues:
- Slow hosting
- Lots of high-resolution images and video
- Not using a caching plugin
- Not using a CDN (content delivery network)
- A slow database
- Too many plugins
So, what can we do to speed up WordPress? Here are 15 things you can do right now!
1. Get good WordPress hosting, or upgrade your hosting plan
If you want a fast site then good hosting is a must. My recommendations are Kualo (my hosting provider) and SiteGround. Both of these hosts offer inbuilt caching on their higher plans, which means you don’t have to install a separate caching plugin.
Super cheap hosting can have a detrimental effect on your website speed because you share the same server with sometimes hundreds of other websites. Any of those websites could cause problems for your site performance by consuming more server resource than they should.
Generally, a higher cost gives you better performance. It is worth reviewing the plans offered by your current host to save the bother of having to re-host.
Related reading:
2. Use the latest PHP version
WordPress is written in a code language called PHP. PHP is available in a range of versions available from version 5 up to the latest, 7.2.
Performance improves with each PHP version, the higher the better, and I recommend you go for at least version 7 if you can.
Good hosting plans will allow you to select a PHP version inside the hosting control panel. If not, raise a support ticket and ask them to enable a higher version for you.
It’s worth checking your hosting control panel. Many hosts use cPanel. If your host has allowed you to select a PHP version, there will be an icon in the Software section as shown here:
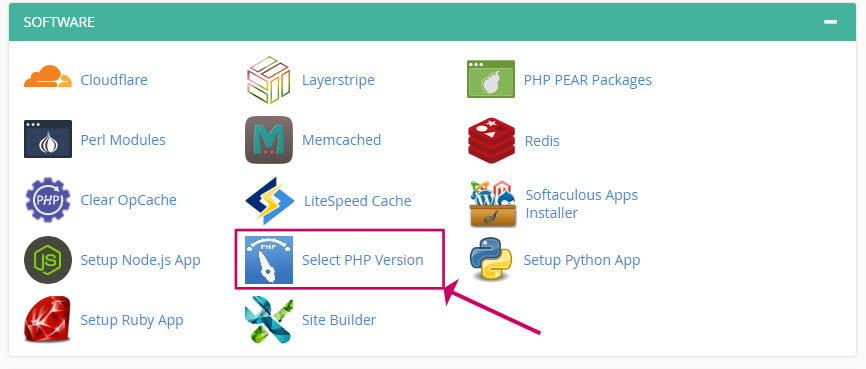
The software apps you have available will depend on your hosting provider and your hosting plan, so don’t worry if you don’t have the same apps showing.
3. Use a caching plugin
Need a fast blog but don’t have time to figure out what you need to do? Or perhaps it all seems too technical? Don’t worry! Let us help you out.
If you have chosen a host that does not supply in-built caching, the next best option to speed up WordPress is to install a caching plugin. I recommend WP Rocket.
Caching plugins create static HTML copies of each web page when accessed for the first time. Subsequent page requests are served the static HTML version of the page without having to access WordPress code; this makes it much faster for your readers to access your site.
WP Rocket plugin is super easy to set up and configure. Besides page caching it does much more including browser caching and lazy loading, so you don’t need a separate plugin to do that as you would with WP Super Cache.
I have an in-depth tutorial on using WP Rocket for your WordPress blog here.
WP Super Cache is another an excellent free option by the creators of WordPress, Automattic. It is well maintained, and I have found it to be reliable too.
4. Optimize your images

Well-optimised images have a significant effect on loading speed, especially for mobile users.
Media downloaded from stock image sites like Unsplash or Pexels can be huge, so it essential that you resize images before uploading to WordPress. Doing so saves a lot of space on the hosting server. My rule of thumb is never to upload images greater than 1meg in size, but ideally, all images should be smaller than that.
You can resize images using the free Preview App on a Mac or the Paint app on Windows. I am a big fan of Affinity Photo, which does a great job of resizing and optimising images at the same time. When you go to resize, Affinity also estimates the eventual file size which is a handy gauge.
Once your image arrives in WordPress, the various sizes needed for posts and archives are created automatically for you, but you can optimise these images even further by using a plugin.
My plugin of choice for this is the Smush Image Compression and Optimisation plugin, and it is one of the essential plugins that I have installed on this site. Once installed, it silently does it’s job behind the scenes, without any need for intervention, so it’s my kind of plugin!
5. Check for large images
Check your home page for large images. The biggest culprits are banners and opt-in adverts.
A large image in a banner or an opt-in can impact loading time on every page of your blog. Just one tweak can have a huge effect on your site speed across the board.
You can check for large images with the Chrome browser.
Here’s how to do it:
If you don’t have Google Chrome browser download it here.
- View your home page using your Google Chrome Browser app.
- Right-click and choose Inspect from the context menu to bring up the developer tools window.
- Click the Network tab and refresh the page (CTRL/CMD+R)
- Click the Img tab and then sort the Size column in descending order
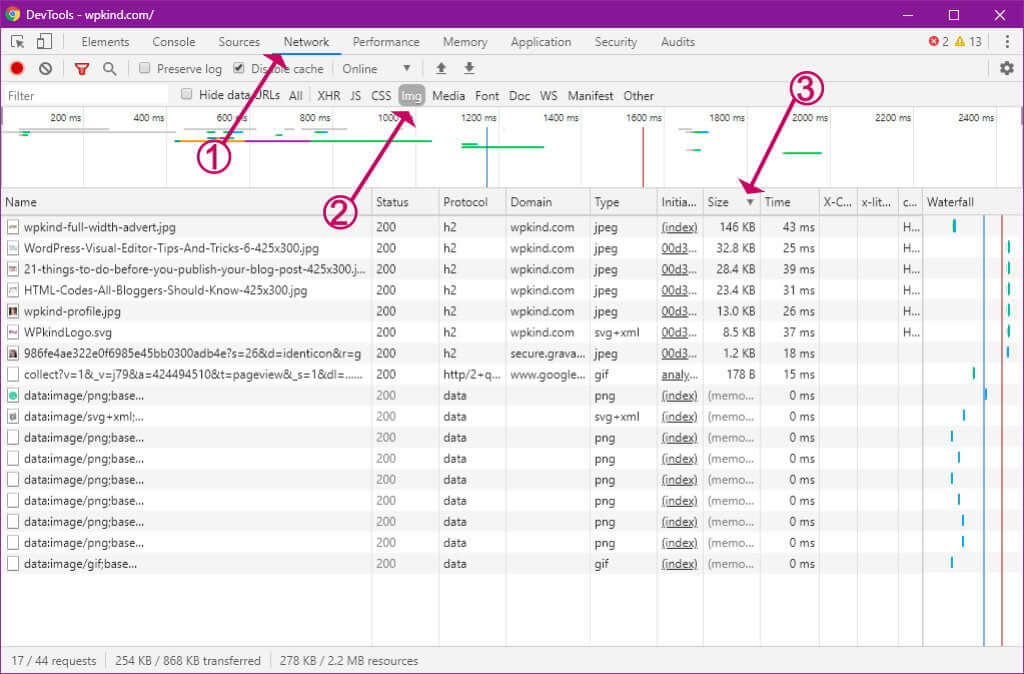
- Notice the images that appear at the top of the list. If they are large in size (circa 300px) and up, they probably need replacing with something smaller.
- Click on the image name in the left column to see a preview, this will help you find the location of the image on your web page.
- Right-click the image and choose Copy->Copy link address to get the source URL of the image, so you can download it to your computer.
If the image appears in a banner, you may need to go to your theme’s settings and upload a new image, or if it was a plugin, such as a slider plugin, go there and re-upload a smaller image.
If the image appears in an opt-in you created externally in another app, such as ConvertKit, pop over there and use a smaller image for the opt-in form design.
1. Get good WordPress hosting, or upgrade your hosting plan
You can resize an image using Photoshop, or if you don’t have that, any free image manipulation app such as Preview on Mac or Paint on Windows. There is also a very good free photo editing tool called GIMP.
I use Affinity Photo, which in my view is as good as Photoshop, but much cheaper!
To get an idea of the image size you need, you will need the Google Chrome Browser app again to find the width and height of the image when it is displayed on your web site.
- Browse to your blog in Chrome
- Right-click on the image and choose Inspect from the menu
- Note down the width and height dimensions. In this example, the width is 200px and the height is 200px
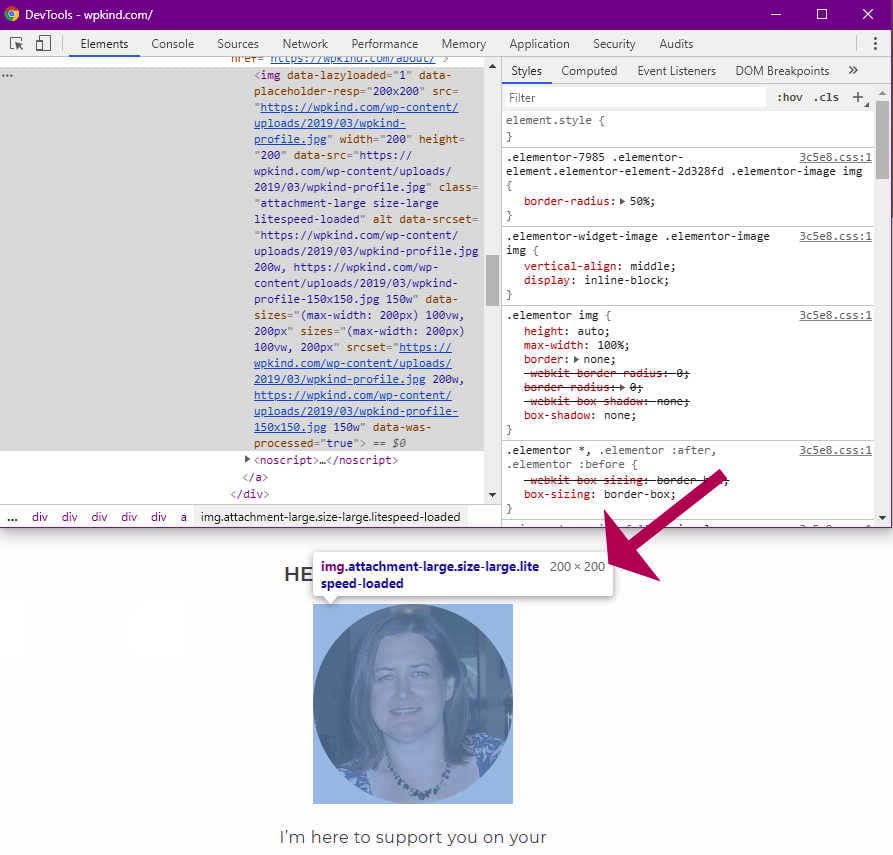
An important point to understand is that the above exercise allowed us to know what dimension the image is displayed in, which is different from the actual size of the image.
Even though the image in the example above is displayed as 200X 200px, the actual stored image may be much bigger.
- Once you have the dimensions you need, resize the image to those dimensions in your Photo app of choice. The method will vary depending on what app you use.
- Re-upload the image to WordPress or your email app.
6. Use a CDN (Content Delivery Network)
A content delivery network (CDN) enables you to temporarily store and serve copies of your content from another server close to where your users are located.
Typically CDNs will serve static content such as, images CSS and JS files.
A CDN will deliver content to your user directly from a server close to them instead of from your own hosting server; this means that a user in the UK might be served content from a London server, even though your website originates on a server in New York.
Using a CDN has two main advantages:
- Takes the pressure off your site. Using the CDN bandwidth instead of yours.
- Speeds up content delivery, because there is less distance between your user and the static asset.
The great thing about a CDN is you don’t have to upload anything to the CDN server, because it will retrieve whatever it needs and serve it to your site visitors automatically.
Once you set it up you don’t have to worry about it again, apart from perhaps clearing the cache from time to time.

My preferred CDN is CloudFlare. Once you set up your website with Cloudflare, there is zero configuration, Cloudflare will automatically cache static files, such as images, CSS and JS files for you, and it is completely free.
How To Setup Cloudflare CDN For WordPress.
7. Optimize your database
WordPress stores all your post content and WordPress settings in a database. Over time the database can become less efficient, causing access times to be slower.
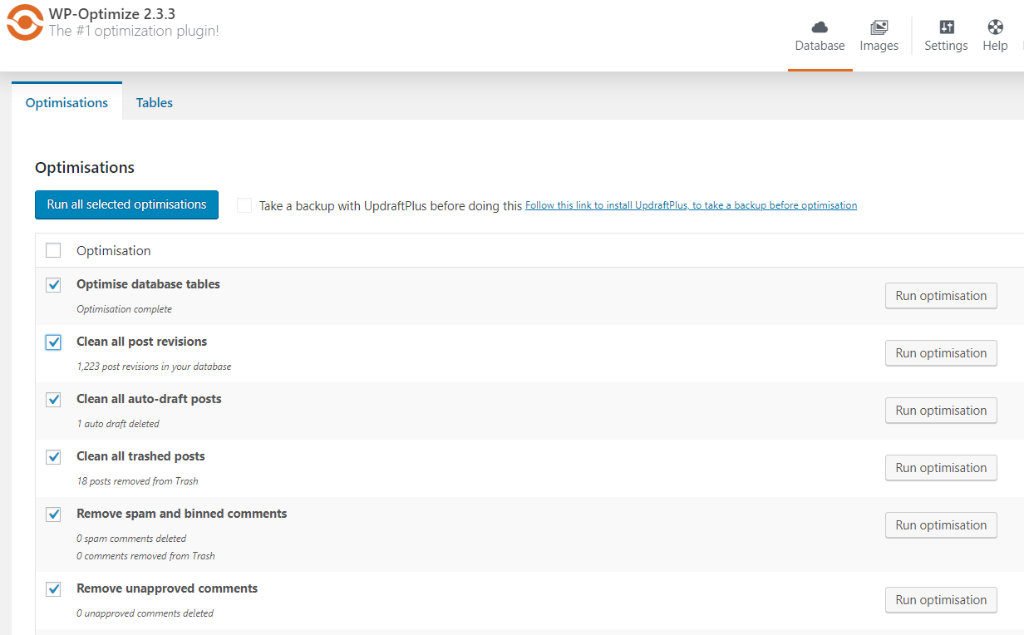
From time to time I like to optimize the database so that access is a quick as it can possibly be. The good news is that all this can be done easily with a plugin called WP-Optimize.
Once installed, the Database tab allows you to perform the optimisation. Make sure you take a backup first.
WP-Optimize plugin has been much improved from when I first started using it.
One nifty new feature is allowing you to remove tables created by old plugins . You can also schedule the optimisations, making it another set and forget plugin, I love those!
8. Don’t use a Google font, or at least reduce the number of fonts used
Many themes (especially premium ones) allow you to select a Google font. Every Google font that you select has to be downloaded to your site visitor’s browser when they access your blog, which adds to the overall loading time.
Instead of a Google Font, you can opt to use a system font that most browsers have installed internally, therefore reducing overhead time. However, you may not be able to find a good system font to suit you.
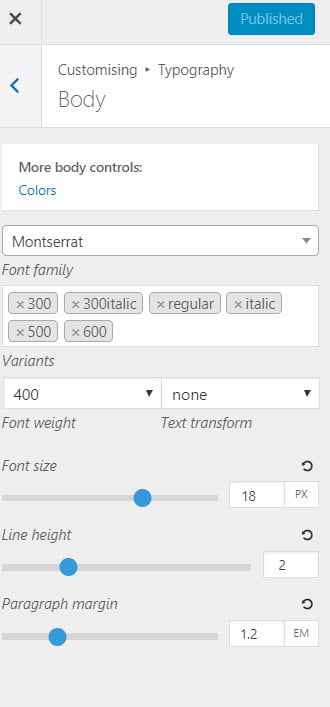
The next best thing is to ensure that you are only loading the weights and styles that you are going to be using in your blog; this is because for each variation a separate font file has to be downloaded.
My favourite theme, GeneratePress, allows you to select a system font OR a Google font. It also allows you to choose the number of font weights too, the less you choose, the quicker the fonts will load.
If your theme allows you to do this too, make sure you remove any font weights that you won’t be using. The higher the number, the thicker the font. If you are not sure, try removing some and see what effect it has.
9. Choose a lightweight theme
The theme that you choose for your blog can have a considerable effect on page load time. The leaner the theme the better the performance, so it is important to take this into account when you select a theme for your blog.
This blog uses the GeneratePress theme, and I have reviewed it in depth here.
GeneratePress is so lightweight, it is only 25Kb in size, which is incredibly small and is the number one reason why I selected it. Despite being lightweight, it is also supremely flexible. There are so many options to customise it, that you really can get your site looking unique without too much effort.
10. Delete plugins you don’t need
The more plugins you have activated on your blog, the slower your site will load. Take a look through the plugins you have and then deactivate and delete any plugins you are not using.
11. Delete themes you aren’t using
You only need one theme installed, and that is the theme you have activated. It is always a good idea to have one other theme installed, such as the latest one from WordPress (currently Twenty Nineteen) in the event you need to troubleshoot issues with theme/plugin conflicts.
12. Change the reading settings to show excerpts and reduce the number of posts shown
If you have your blog set-up to show your latest posts on your home page, make sure you are not showing more posts than you need.
I would recommend showing no more than 10 posts.
If you have more than 10 posts on your blog, your theme should show navigation buttons at the bottom of the page so your readers can click through to see older posts.
You can set the max posts to display on blog pages on the Settings->Reading tab.
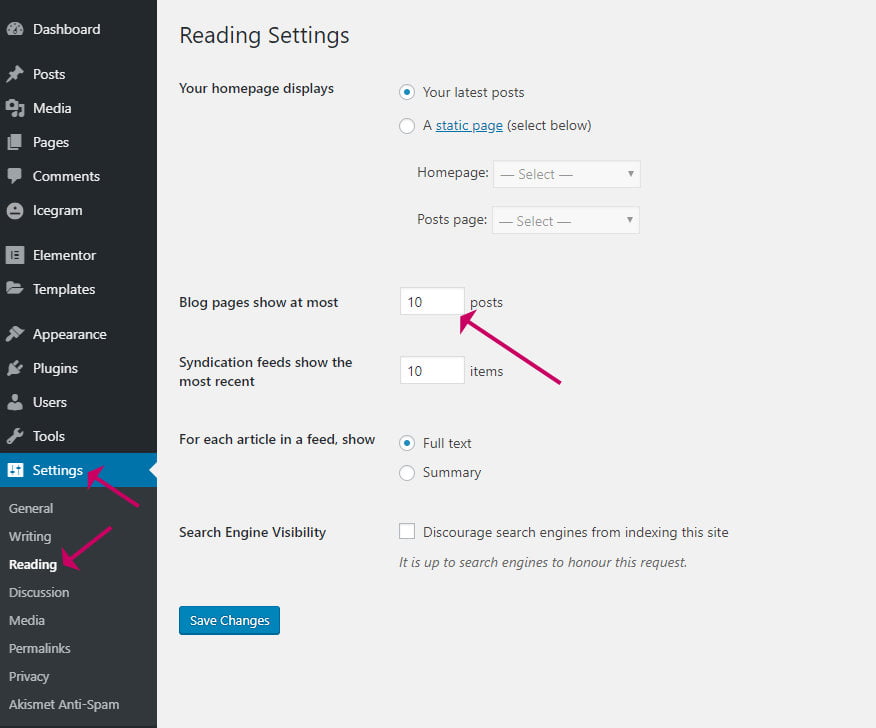
If your theme allows it, make sure that you are showing post excerpts, usually the first 50 or so words, rather than the whole post content.
13. Limit the number of allowed post revisions
Each time you edit a post, WordPress stores a new revision in the database. Revisions allow you to revert to a previous version of your post content.
Too many revisions can weigh down your database, causing slower database access times.
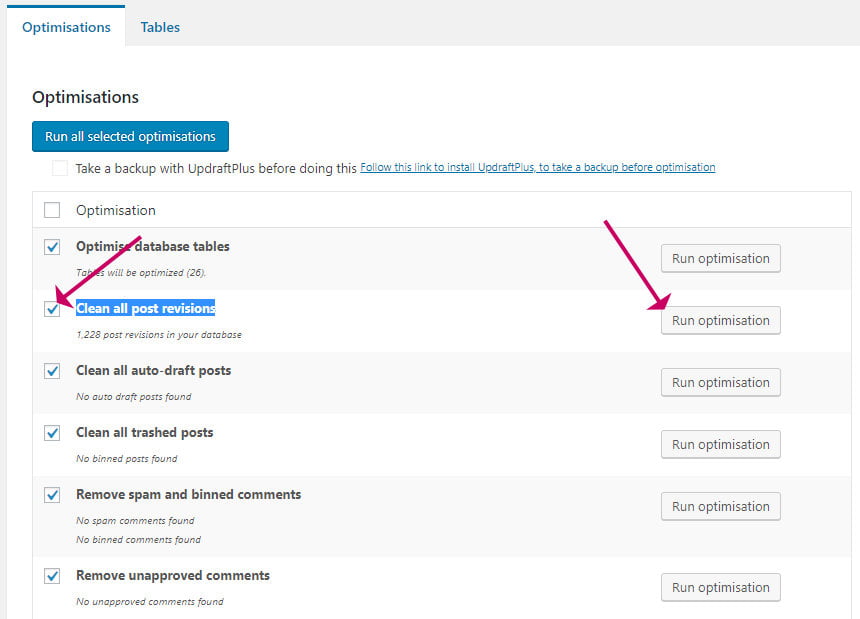
You can remove post revisions in your database with the WP-Optimize plugin.
Once you have installed and activated the WP-Optimize plugin, head over to WP-Optimize->Database.
Ensure that the Clean all post revisions box is checked, then click the Run Optimisation button.
You can reduce the number of revisions stored by WordPress permanently by editing the WordPress configuration file.
Heads up: You should be very careful editing WordPress code files directly as doing so can cause your whole WordPress site to break, so only do this if you have confidence with code.
Open wp-config.php for editing. You can do this in your hosting account’s File Manager app.
Add the following code, before the line: /* That’s all, stop editing! Happy blogging. */. The number after the comma is the number of revisions you want to retain per post, so edit that to suit.
define('WP_POST_REVISIONS', 3);To disable post revisions altogether replace the number with false .e.g
define('WP_POST_REVISIONS', false);This is an example of how the new line would look in your editor:

14. Enable lazy loading
Lazy loading is a neat way of only loading the parts of your site that are immediately visible when the web page is first loaded.
As the page is scrolled and more things come into view, such as images they are loaded up into the browser.
This method means that your pages are much smaller when first loaded. If you have a lot of images and videos on your post, then lazy loading is a must.
There are several plugins that you can use to enable lazy loading.
If you have the WP Rocket. plugin, there is an option that you can enable in the dashboard.

If you don’t have WP Rocket, then there is a free plugin by the same developers called Lazy Load by WP Rocket that you can use instead.
15. Enable browser caching
Browser caching is a way of allowing the user’s browser to store static parts of your site on their computer, so they don’t need to be downloaded every time your website is accessed; this can speed up WordPress considerably.
Static parts of your site, include images, like your site logo, and CSS/JS used to style your website and give it functionality. These files are not likely to change very much. Browser caching allows the browser to store them, and retrieve them again only after the specified expiry date.
There are various ways you can enable browser caching. If you have the WP Rocket. plugin, it is done automatically for you when you install the plugin.
If you don’t have that plugin, a free alternative is the Leverage Browser Caching plugin.
To install:
- Go to Plugins->Add New
- Search for Leverage Browser Caching
- Click Install and then Activate
- That’s it! Browser caching should now be enabled
Note that the above plugin will only work if you are running the Apache webserver. If you are not sure which web server you are running, the best thing to do is open a ticket with your web host.
Final thoughts
In this post, I have explained the importance of a fast site, both in terms of Google ranking and reader engagement, which are both vital for a successful blog.
I always recommend that you limit the number of plugins you have installed. Too many can a) weigh down your whole site and b) cause a maintenance nightmare.
So I always look for plugins that can solve more than one problem and for this reason, I thoroughly recommend WP Rocket. As well as being an excellent caching solution, it also gives you browser caching and lazy loading of images, saving you the bother of having to install separate plugins.
I hope this has been a useful guide but if you don’t have time to go through everything and you need help I have the perfect solution in my latest product – Speed up your website’s loading time. I do it all for you, all you have to do is wait for your fast site.


