Ever wondered who is reading your blog? In this post, I will take you through how to add Google Analytics tracking to your WordPress blog.
Google Analytics opens up a wealth of information about your site visitors’ behaviour.
How to sign up for Google Analytics
- What type of people visit, i.e. age, gender, location, device used
- What people do on your website
- What social platforms your readers are coming from
- How long readers spend on your blog, and how many pages they visited
- What topics are popular
The information helps you to make critical decisions about what posts to write, and how to improve your blog, to better serve your readership.
And the big one … it’s free!
In WordPress, there is always more than one way to do anything! I will take you through the various options available to help you choose the best route for you to add Google Analytics tracking to your blog.
We will find out how to filter out your IP from tracking, so we don’t track what you do on your site, only your true traffic.
We will also check you haven’t installed Google Analytics twice! This has been a ‘gotcha’ for so many people and can be very disheartening when you realise it’s happened to you, and your traffic is actually half of what you thought it was.
Don’t have time to set up Google Analytics yourself? Or perhaps it all seems too technical? Don’t worry! Let us help you out.
How to sign up for Google Analytics
- Go to google.com/analytics and sign-in to your Google Analytics account or click start for free if you don’t have an account yet
When you have created an account or signed in, the next step is to set up your website with Google. Google calls this a Property.
- Click on the Admin cog icon at the bottom of the screen
- Click Create Property
- Select Web and click Continue
- Give your property a name and enter the URL of your website
- Make sure you select https
- Select an industry and timezone
- Click Create
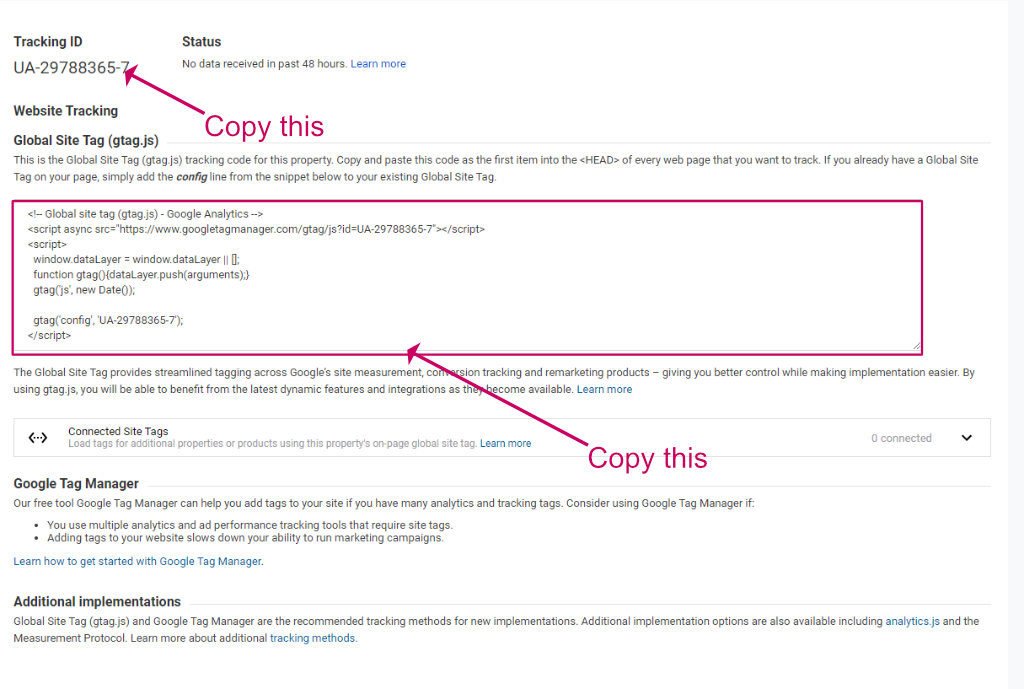
- You should then be taken straight to the Tracking code screen, but if not the route to it is Admin (cog at the bottom of the screen)->Tracking Info->Tracking Code
- Copy the Tracking ID code at the top e.g. US-297883650-7
- Copy the Global Site Tag text from the big box and copy it to Notepad or Notes app. We will be using it later.

How to add the Google Analytics Tracking code to WordPress
There are a few options for doing it.
How to add the Google Analytics Tracking code to WordPress
Some themes integrate with Google Analytics by allowing you to enter the Google Tag ID into the theme’s settings. If your theme has that, it should be a simple task of entering your Google Tag ID into the theme’s settings.
You will need the Tag ID you copied from the Google Analytics site, e.g. US-297883650-7.
All themes are different, you might need to add the whole tracking code snippet rather than just the ID.
If you have problems finding where to enter the settings, contact the developer or use one of the alternative methods below.
If you’re running the GeneratePress premium theme, you can use the Elements module that comes with it to add the code, as detailed in option 2 below.
Be very careful you don’t add Google Analytics twice!
If you have the GeneratePress theme, the premium version has a module called Elements which allows you to enter code into your blog’s head section.
If you don’t run GeneratePress, skip this bit, there are other options for you.
Here’s a quick guide to doing it:
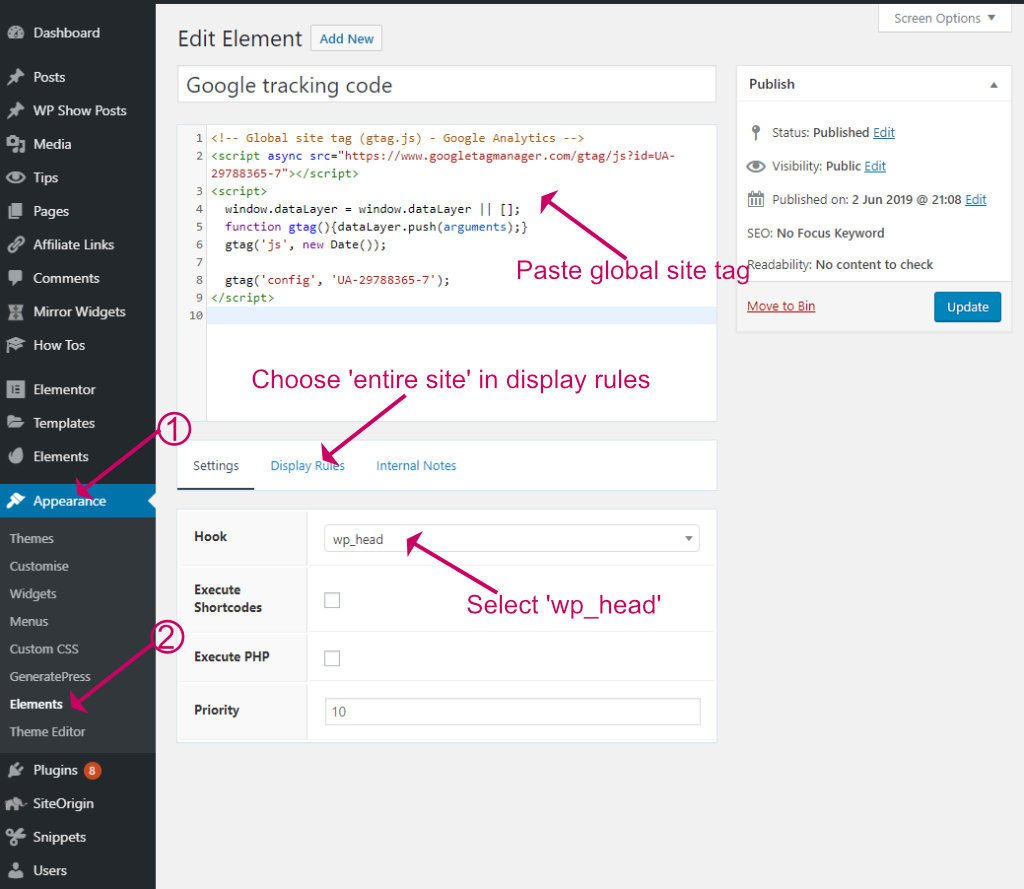
- Make sure you have the Elements module activated (Appearance->GeneratePress)
- Go to Appearance->Elements
- Click Add New and choose the Hook element type from the drop-down list
- In the Settings section make sure you have wp_head selected
- In the Display Rules section select Entire Site for the Location setting
- In the top box paste in the Global Site Tag you copied from Google Analytics
- Click Publish
- That’s it! Google is now tracking your blog.

How to stop tracking yourself on Google Analytics
The code snippets plugin allows you to inject PHP code into WordPress, and you can use it to enter the Google Tracking code.
The advantage of choosing this method is that it is lightweight, and you can use the same plugin for adding more code in the future.
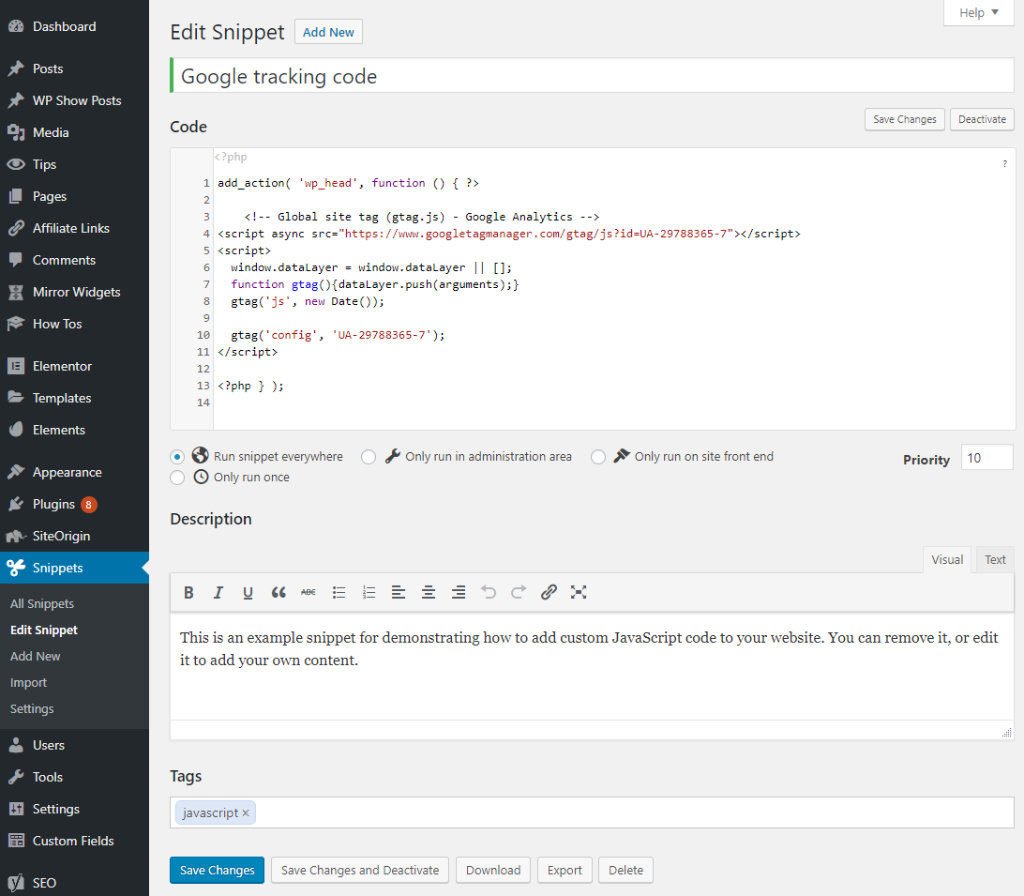
- Install and activate the Code Snippets Plugin
- Go to Snippets->Add New
- Paste the following code, entering the tracking code you copied from Google Analytics where shown.
add_action( 'wp_head', function () { ?> /* paste tracking code */
<?php } );- Select Run Snippet Everywhere
- Click Save Changes and Activate

Wrapping up
If you don’t have GeneratePress or any theme that allows you to enter the Tracking ID or the tracking code, another option is to use a plugin.
The advantage of using a plugin is that you also get access to the stats which you can view from within WordPress rather than having to visit Google.
There are a few plugins you can use for this, here are the most popular ones:
- Google Analytics Dashboard for WP by ExactMetrics
- Google Analytics Dashboard Plugin for WordPress by MonsterInsights
- Google Analytics Dashboard Plugin for WordPress by Analytify
- WP Google Analytics Events
Here is how to set up Google Analytics Dashboard for WP by ExactMetrics.
- Install and activate the plugin
- Click Google Analytics from the admin menu on the left
- Click Authorise Plugin
- Click the red Get Access Code link
- Sign in to your Google Account
- Click the blue Allow button to allow the plugin to read your stats.
- Copy the code you see and paste it into the Access Code box back in WordPress
- Click Save Access Code
If you want to use this plugin to view the stats without added the tracking code (maybe you have already added it?), pop over to Google Analytics->Tracking Code and set the Tracking Type to Disabled.
You can now view your stats from the WordPress Dashboard.
Be very careful you don’t add Google Analytics twice!
I have seen several few forum posts recently from people who found Google Analytics installed twice on their blog, meaning that traffic was actually half what they previously thought.
It is easy to forget what plugins you already have active when you go for that shiny new Analytics plugin someone recommended on a blog post you read.
The news that traffic is actually half than previously thought can be very discouraging, especially for new bloggers. Don’t let it happen to you!
Usually, the problem manifests with a very low bounce rate. If you have that, then you too could have it twice!
Here’s how to check for double Google Analytics.
- Browse to your blog
- Right-click and select View Source
- Enter Ctl+F or CMD+F to begin a search
- Enter your Tracking ID, e.g. UA-29788365-7
You should find two instances of the tracking ID, but in different forms, e.g.
gtag('config','UA-29788365-4')You will probably find the code again as part of a URL like this:
<script async src="https://www.googletagmanager.com/gtag/js?id=UA-29788365-4"></script> If you find the same block of code twice with your tracking ID in it, you have double analytics installed, sorry!
What can Google Analytics tell you?
There are a few things to check:
- Do you have two analytics plugins installed? If so, remove one of them.
- Did you enter a tracking code into the theme settings as well as install a plugin? In that case, remove the plugin or the theme setting.
- Did you have your theme professionally written? The developer might have added the tracking code within the code. If they did and you also installed a tracking plugin, remove it.
How to stop tracking yourself on Google Analytics
I like to filter out my own visits from Google tracking. When your blog is new, it can obscure the real stats.
We can do this by filtering out our IP from Google Analytics.
For this to work, you need to know your IP address. If you don’t know what it is, type ‘whats my ip‘ into Google, and it should come up with the IP.
Or visit whatismyip.com.
When you have your IP, here is how to exclude your IP address from Google Analytics.
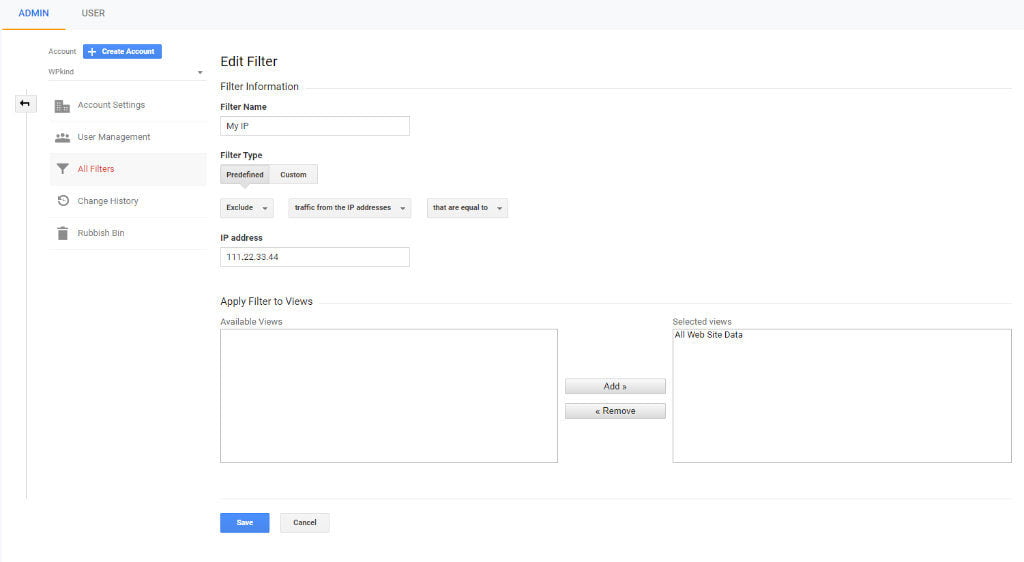
- Open up your Google Analytics Account page
- Click Admin at the bottom of the screen
- Click All Filters->Add Filter
- Enter a name for your filter. I use MY IP
- Select Predefined filter type and then Exclude, traffic from the IP addresses, that are equal to from the other drop-downs respectively
- Enter your IP address
- Select from the Available Views on the left and add to the Selected Views on the right
- Click Save

There will be a delay before your stats change; it was about an hour for me.
Wrapping up
In this post, I have taken you through how to add Google Analytics to your WordPress blog.
If you think you might have Google Analytics installed more than once on your blog, don’t forget to run through the check to find out. It’s better to know now rather than later!


