Today I’m going to share with you the six things I do to every blog post. I regard these six tasks as absolutely vital to the success of a post, and now I do them all without thinking. For me, missing out any of them means leaving traffic on the table and ultimately revenue too.
When I first started blogging, I would write my post, hit publish and then wonder why no traffic arrived! Now I know that if I want to ensure a post’s success, I need to do much more than just write and publish.
Let’s find out what those six things are.
#1 Proofread
I have noticed several comments on Facebook groups recently about how off-putting poor spelling and grammar can be, and I admit I find it a bit of a turn off too. I am willing to forgive the odd slip-up, we are all human after all, but much more than that and I might click away quickly.
We can all do with some help; grammar has never been my strong point. If you can get your post proofread by a professional copywriter, then that is brilliant. If you don’t have the budget for a proofreader, in my view, the Grammarly app is the next best thing to a human.
Grammarly is a free tool you install as a browser extension. When active, it will check everything you write into any text box on the internet, including webmail, social posts, and most usefully for us, WordPress posts.
The free version of Grammarly will flag up misspellings, and offer corrections, plus some basic grammar checks, such as the correct use of commas.
The premium version provides more features, including checking for the use of the passive voice, checking for repetitive words, and prompting you to use better words and phrases.
Since the Gutenberg editor came out in version 5.0, Grammarly hasn’t worked so well in WordPress. I found I had to hack it a bit to make it work. Hopefully, the problems will get sorted soon, and we can all have a better experience.
Check out my post on proofreading WordPress posts with Grammarly, including the workaround I use to get it to play ball with the block editor.
How To Use Grammarly With WordPress
#2 Create shareable images
When you get to the point where you need to share your posts on Facebook, Pinterest and Twitter, you will need some suitable images!
At the very least, your blog post should have a featured image. You can set one up in the Document Settings panel under the Featured Image tab.
If you stop there, your featured image will be the primary image for social sharing. I recommend you create additional different sized images for Facebook and Pinterest sharing. Facebook prefers short wide images, and Pinterest prefers tall thin ones.
Here are the dimensions you need:
- Facebook/Twitter 1200px X 630px
- Pinterest 800px X 1200px
For Pinterest, I have found 800px X 1400px and 800px X 1600px to work well when there is more text to fit it.
You may be wondering how to make these different sized images? Well, you have several options. I use Affinity Photo, and I absolutely love it, it’s a fantastic (and much cheaper) alternative to Photoshop. If you don’t have a photo editor such as Photoshop or Affinity, there are some online editors you can use instead.
If you prefer online editors, here are some to check out:
These new images should have some text on them to encourage people to click through to your post. All the above editors allow you to add text with various kinds of fonts.
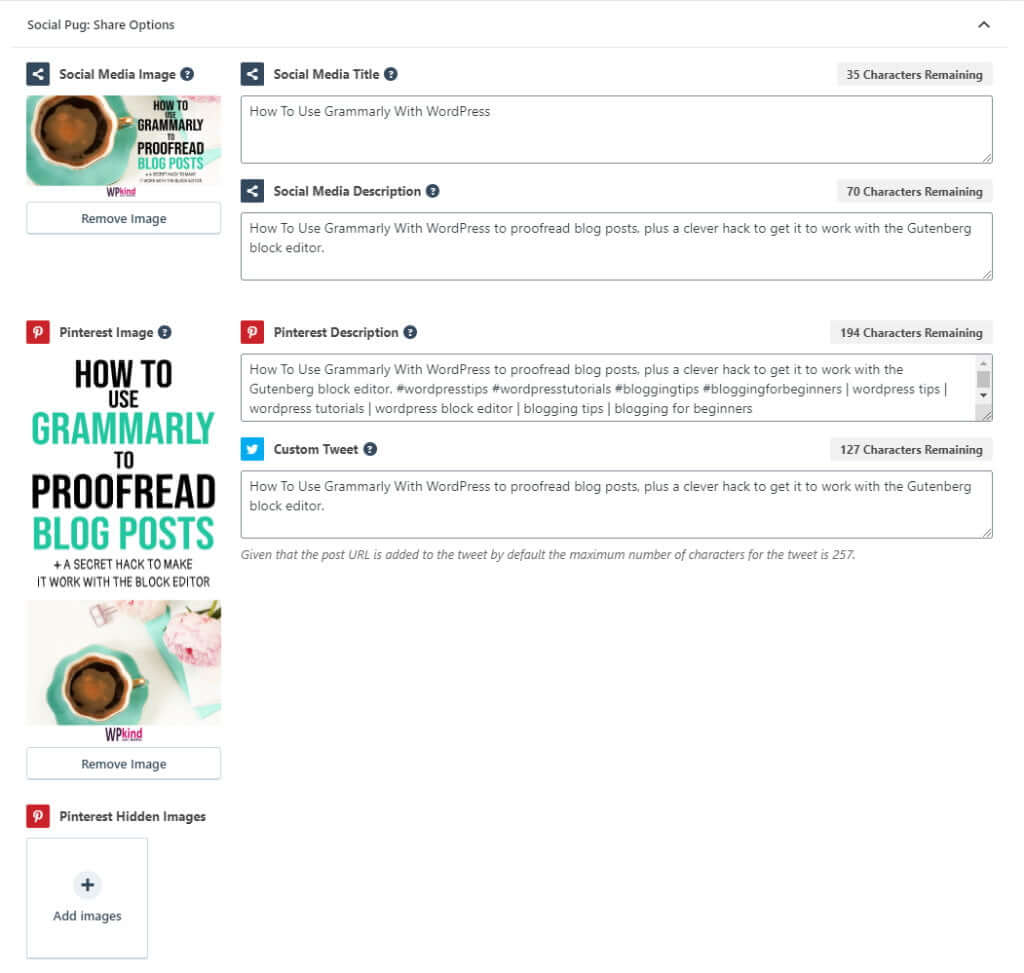
Once you have your new shareable images, you will need somewhere to put them. I thoroughly recommend Social Pug plugin (now called ‘Grow’). As well as provide sharing and follow icons for your blog, Social Pug allows you to add a Facebook image and multiple Pinterest pin images to each post. You can also enter sharing titles and text for the three main networks.
Here is an example of a post where I have added images and descriptions in the Social Pug options:
Related reading:
- All About Images in WordPress
- 7 Mistakes You Are Probably Making With Images – And How To Fix Them
- 5 Ways To Add Images to a Blog Post in WordPress
#3 Check SEO with Yoast
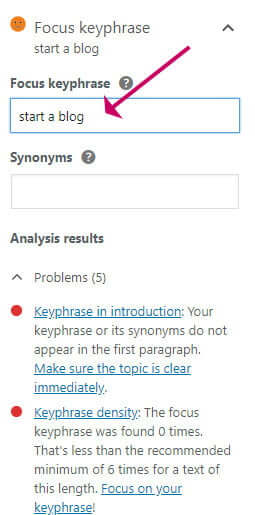
Before you start writing, you should have a keyword or keyphrase in mind that your post will be based around. The Yoast plugin allows you to optimize your writing around the keyphrase and will prompt you if you haven’t used it in key areas, such as the post title, and the first paragraph.
If you haven’t already installed the Yoast SEO plugin on your blog, I recommend doing so. For me, Yoast is essential; you don’t need the premium version, free is just fine.
After installing and activating the Yoast Plugin, head over to the Yoast settings and enter your keyphrase. Yoast will then analyse your blog post and make suggestions for improvements.
#4 Add a call to action (CTA)
Remember your blog is a business. Every post should have a purpose. If you want to make money with your blog, every post you write must contribute in some way to that goal.
An obvious call-to-action is to have an affiliate link or a plug for the product you might sell. But CTAs can be more subtle too. Even if you don’t mention your product, just linking to a post that includes it can bolster the importance of that post in the eyes of Google, plus it keeps readers on your blog.
Here are some example calls to action:
- Newsletter opt-in: Purpose: Get more email subscribers.
- Advert for a product you sell. Purpose: sell your product.
- Link to an affiliate product/service. Purpose: earn affiliate income.
- Link to a related post on your blog. Purpose: keep people on your blog for longer and reduce bounce rate.
You can, of course, include more than one call to action. For example, I have a signup form on every blog post, and some of my posts also contain affiliate links.
Related reading:
#5 Make it legal
You may have noticed that at the top of this post I have a disclosure that the post contains affiliate links. It is a legal obligation to be open and transparent about how you advertise on your blog.
Here is the disclosure text again:
It is straightforward to make your own disclosure section with a WordPress reusable block, and then include that block at the top of any post containing affiliate links.
I show you how to create a reusable disclosure section in my post here: How to Use Reusable Blocks in WordPress Block Editor.
As well as a disclosure, there are other pages that you need on your blog to make it legal.
Related reading: Three Legal Pages You Need On Your Blog and How To Make Them
#6 Add a compelling title
If people aren’t attracted to click through to your blog post, it doesn’t matter how good the content is; people just won’t visit!
Remember that your blog post title should at least include your keyword/keyphrase; otherwise, it is unlikely to rank as highly in search engine results.
Here are my top tips for a click-worthy title:
- Keep it short and snappy
- Include keywords
- Don’t mislead for the sake of a click
- Where it makes sense, include some power words
Related reading: 60 Powerful Blog Post Titles Any Blogger Can Use
Wrapping up
There you have it, six things I do to every blog post. If you can do those six things too, your blog posts will be SEO optimized, shareable and grammatically correct every time.
Don’t forget the beauty of blogging is that everything is editable. If all this is new, you may want to go back to old posts and re-launch them. I still have posts waiting for this six-point treatment, but I’m getting there, and that is the crucial thing!
Want more? I have an in-depth post here with 21 separate tasks you can do to optimize posts even further.


