In today’s post, we will be talking about WordPress images, their importance, the various types of image formats, where to use them and what dangers to avoid.
First off let me say that – every WordPress blog needs some imagery!
Every blog post you publish should have at least one image in it. The most important is the featured image or thumbnail that is shown at the top of the post (depending on what theme you have running), and a smaller version in the post archive.
On this post, you will notice it has an image at the top. Have a look at an archive here. Each post has a smaller version of the same image along with an excerpt of the post content and a link to the full post.
Wondering how the smaller images are made?
When you upload an image, WordPress automatically creates additional sizes for archives plus any others depending on what your theme defines. You don’t have to fiddle around creating differently sized images. It is all done for you!
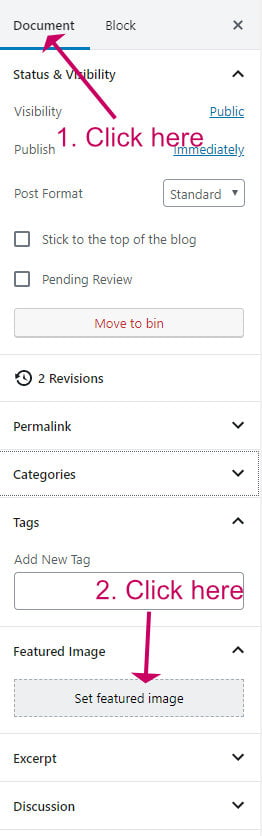
How to set the featured image in WordPress
For every post that you write, one of the most important tasks before publishing is to give it a featured image.
- Pop over to the right panel and make sure Document is selected. Then click on Set Featured Image.
- You can then upload your new image, or select an existing one from the media library.
Related reading: 21 Things To Do Before You Publish Your Blog Post
The different types of images and where to use them
There are several image formats that may be used on a website. Here is a rundown of each of the popular ones and where to use them on your blog.
How to set the featured image in WordPress
This is the most common type of image and it the one you will use for your featured image plus any other images embedded in your post.
Images downloaded from free and premium image sites are most commonly in JPG format so there is no need to convert them.
Where to use: as featured images and within posts
The different types of images and where to use them
PNG images are similar to JPGs but they are capable of containing a transparent layer allowing the colour underneath to show through.
Because of the extra transparency information, a png image is usually larger than a similar JPG. In my example below the JPG is approximately 70% smaller than the PNG.
If you want to use an image that is in PNG format and you don’t need transparency you can convert it to JPG using any free photo editing tool on your computer. On a Mac there is the Preview App or the Paint app on Windows.
Here is a png (size 124kb). Notice that it has no border because the background of the image is actually transparent.

Here is the same image as a JPG (size 39kb). The background is white because transparency isn’t possible for a JPG image.

Where to use PNGs: typically used for logos, home page and landing page header, and slider elements.
Where to get images for your WordPress blog
Gifs are similar to JPG, but they can be animated to create video snippets. Gifs have become very popular in messaging and in post content because they draw the eye in and add interest and a sense of fun.

Where to use a GIF: In your post content to add some cheeky interest!
Size is important!
PDFs are usually used for things like posters, infographics and printables. They are quite large in terms of file size.
You can create a PDF from any document such as Word by using the Print to PDF option on your computer. It is much better to distribute your documents as PDF rather than in the original DOCX format because a PDF cannot be easily edited by the reader.
Where to use PDFs: For downloadable printables, checklists, cheat sheets and infographics made using software such as Word or Photoshop.
Image names are important!
SVGs are a relatively new image format. Rather than contain the binary data, SVGS describe a picture instead. For example: draw a line from point A to point B.
Because SVGs do not store binary data, they can be much smaller in size than a JPG or PNG.
SVGs can be resized either way without losing quality, which is great for ensuring that the image looks good on all types of device, from large 4K screens to smartphones.
Here is an example of an SVG graphic:

Notice that when you resize this page the image does not become fuzzy.
When to use SVG: For logos, home page or landing page headers. Note that WordPress does not natively allow SVGS to be uploaded. You will need to install the SafeSVG plugin.
Where to get images for your WordPress blog
There are lots and lots of places to get images, both free and premium.
My favourite place for free images are:
For premium images:
Premium images are always better than free if you can afford it. You are less likely to find the same image repeated used across the internet.
To get an idea of how widely used an image is, a neat trick is to search Google for it.
- Visit https://images.google.com
- Click the camera icon
- Paste an image URL or upload an image from your computer
- Google shows a list of matching or similar images.
Size is important!
The more images you have on a blog post, the slower it takes to load. If each of those images is bigger than it needs to be, then load time will be slower still, plus you fill up your hosting account needlessly.
A very good habit to get into is to resize your images before you upload them.
We know that WordPress creates smaller sizes for you automatically when you upload. But did you know it also stores a copy of the original image?
If that image is a huge 6meg, a) it fills up your hosting server, and b) makes your post pretty much unresponsive if you make the mistake of selecting ‘full-size image’ when you embed it in your post. Believe me, I have made that mistake!
Large images are a key contributor to slow sites. Here is my post on speeding up WordPress where I give you tips on getting your site loading fast, including what to do with your images to optimise them.
My rule of thumb is never to upload an image greater than 1meg in size. Which is plenty big enough.
You can resize images using the free Preview App on a Mac or the Paint app on Windows. I am a big fan of Affinity Photo, which does a great job of resizing and optimising images at the same time.
You can also install an image compression plugin. My plugin of choice for this is the Smush Image Compression and Optimisation plugin, and it is one of the essential plugins that I have installed on this site. Once installed, it silently does it’s job behind the scenes, without any need for intervention, so it’s my kind of plugin!
Image names are important!
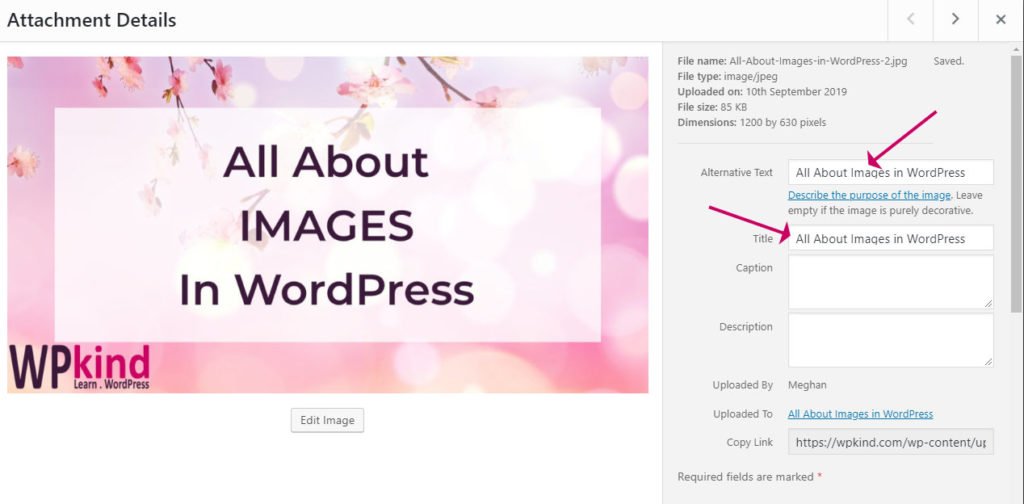
Don’t forget to rename every image you upload to your blog with something that describes what it is about.
Something like IMG_076.JPG is no good at all because a) it does not describe the subject for screen readers, and b) google cannot index it.
If you want to use the image as a featured blog post image try to use some keywords in the image name, for example:
21_ways_to_entertain_toddlers.jpg
To help even more with SEO and accessibility, make sure you give your images some ALT text too. You can do this in the image properties.
Legal issues using images on your blog
A rule of thumb is never to download and use someone else’s image. The original owner, WILL contact you and send you a bill for usage. It is a false economy to use someone else’s image without a license to do so.
Always get your images from legitimate image sites, such as the ones I linked to further up this post.
Always check the license for any image you download.
Some free image sites sometimes specify that you must attribute the original creator underneath the image and sometimes add a link. If you don’t want to do this, then don’t use the image on your blog.
One last thing, don’t hotlink another person’s image.
Hotlinking is where you copy the URL of the image from someone else’s site and use that URL in your post rather than upload the image to your media library. Each time your page loads with their image link in it, you use their bandwidth to serve the image which isn’t very friendly!
Wrapping up
Images are very important for the aesthetics of your blog. In this post, I have gone through the different types of images and where you would use them on your WordPress blog. I have given you tips on how to ensure large images don’t slow down your site, and where to get great images.


