In today’s tutorial, we will be making a new homepage for our WordPress blog.
You may already know that there are two configuration options for the home page in WordPress. Here’s a reminder:
- As an archive for blog posts. This is the default setting for WordPress. Usually, the first 10 recent posts are listed out along with an excerpt and a read more link.
- As a static page. The home page is set to a particular page on your blog which can be in any kind of format. This static page could also list out your recent posts, but you have much more control of the layout. The blog archive is shown on a different static page, usually something like https://example.blog/blog
In this tutorial, we want to use the second option.
I will show you how to set up your blog so that it has a static home page with a custom layout and a separate page for the blog archive.
For the custom layout, we will be using a fantastic page builder plugin called Elementor.
Since the advent of the Gutenberg block editor, WordPress is now capable of much more in terms of a custom page layout. However, there is still a way to go with it. It doesn’t have a posts grid for example.
There isn’t much you can’t do with Elementor. It has a front-end, editor. There is no switching back and forth to see what your changes look like. What you see in the editor is what you get.
You will see from this tutorial how quick and easy it is to make a custom page layout in no time at all. But if you are really stuck for time or don’t have the creative juices to make your own, there are lots of templates to get you started.
If you don’t already have Elementor Pro you can buy it here Buy Elementor Pro.
If you want your blog to look more professional with a custom layout it is an absolute must in my view. It works with most themes and if you have trouble getting it to work with your theme there is a 30-day refund policy, no questions asked.
There is also a free version of the plugin here which you could try out to get a feel for what it can do first. Unfortunately, the free version is missing the Posts Widget, which we will need to use in this tutorial.
My regular readers will know how fond I am of GeneratePress, and Elementor works a treat with it.
In this tutorial I will take you through the following:
- Installing the Elementor Pro Plugin
- Setting up some default colours and styles
- Building a new home page with Elementor
- Creating a new blog archive
- Updating the WordPress settings to use the new home page and blog page
- Updating the WordPress menu with a link to the new blog page
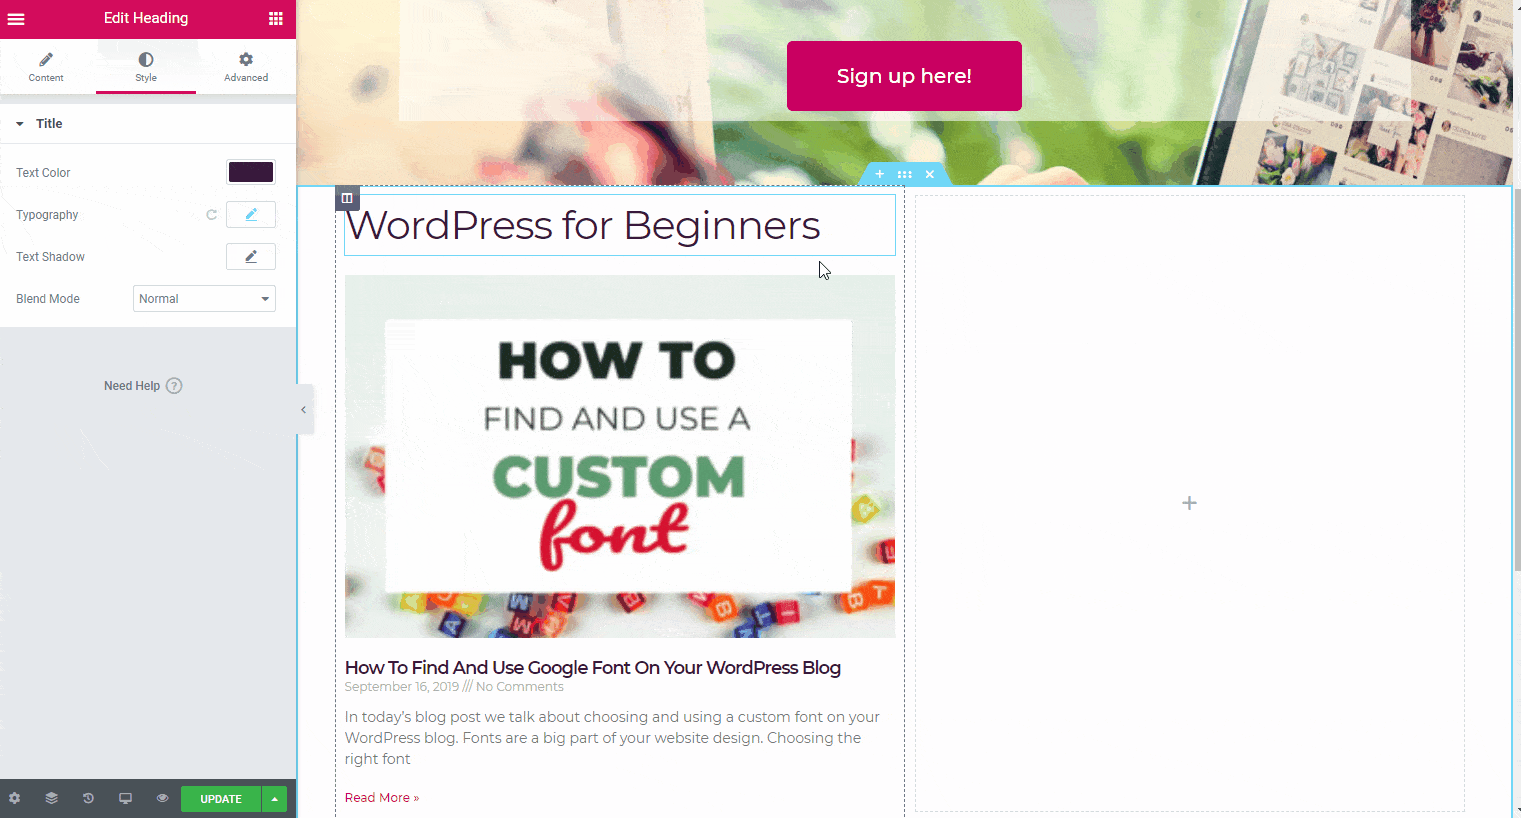
Our new page will have a call to action hero section at the top. Underneath it will have some boxes for the main categories on our site. At the bottom is a section for the latest posts.
This is what we are aiming for:
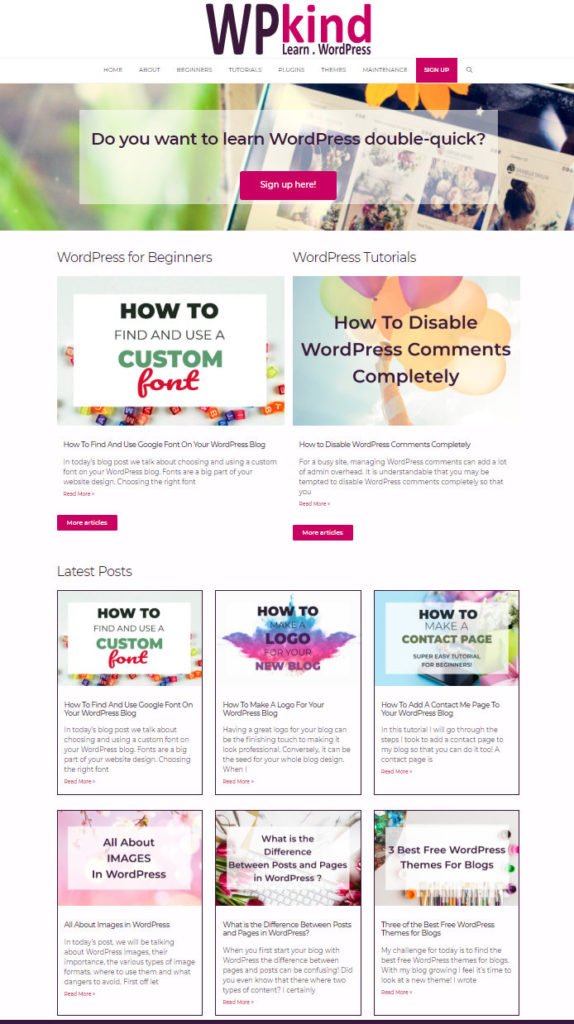
Let’s get started!
Step 1: Install Elementor Pro
If you don’t already have a copy of Elementor Pro, you can buy it here. Currently it costs $49.00 for one year of support and updates.
Download the zip file to your computer and then install it in WordPress:
- Go to Plugins->Add New
- Click Upload Plugin
- Click Choose File
- Select the elementor-pro-x-x-x zip file
- Click Install Now
If you need more help installing the plugin see my guide – How to Install a WordPress Plugin.
The next step is to activate your license so that you have access to the template library. We won’t be using the template library for this tutorial, but it is worth doing now anyway.
- Go to Elementor->Licence
- Click Connect & Activate and follow the directions
Step 2: Create a WordPress page for the new home page
- Go to Pages->Add New
- Change the title to Home
- Click Publish
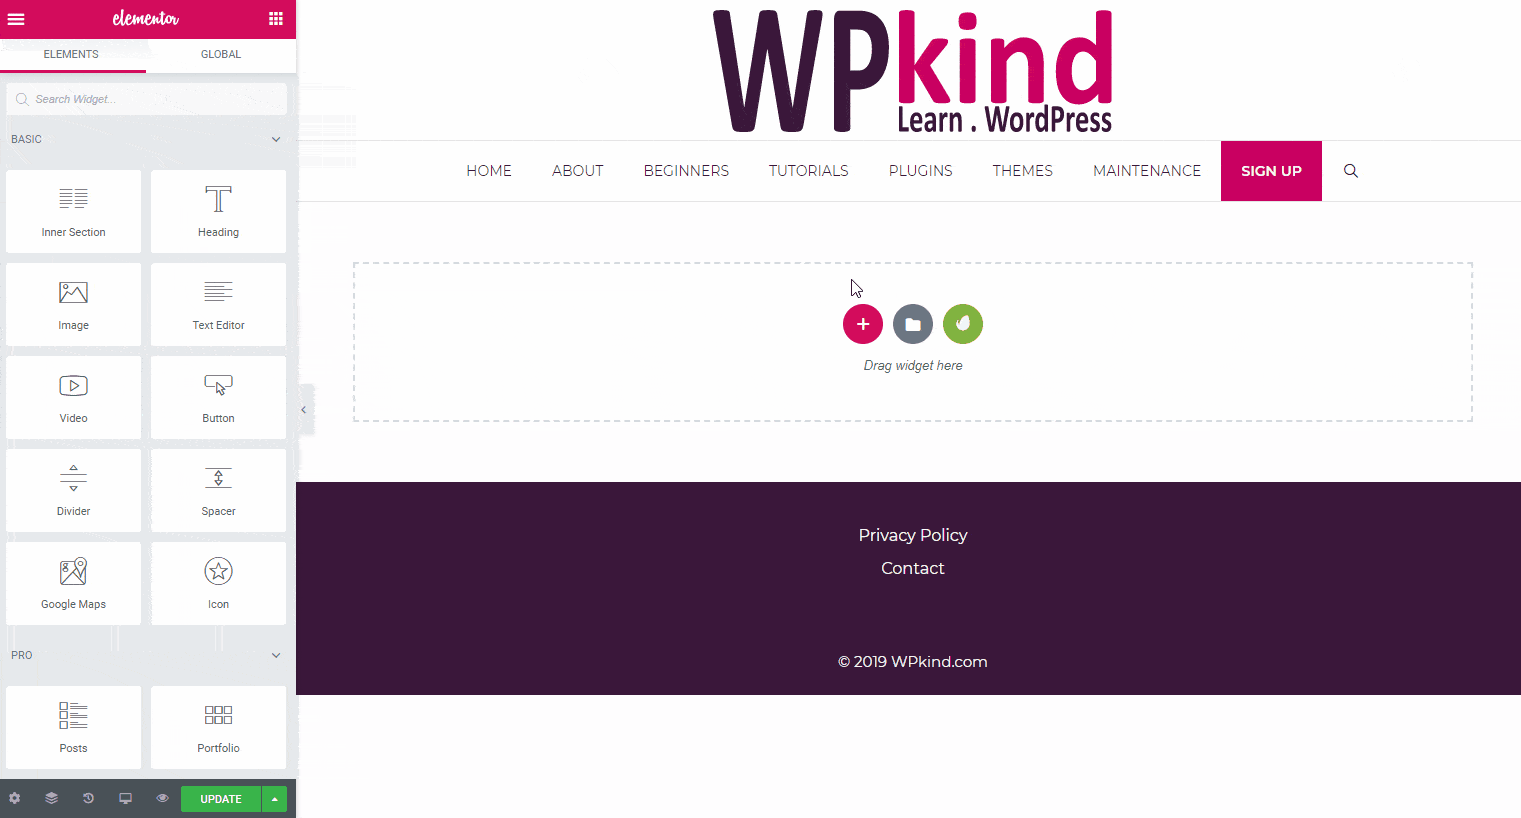
Next, we start editing the page with Elementor.
- Click the blue Edit with Elementor button
We need a full-width layout for this page:
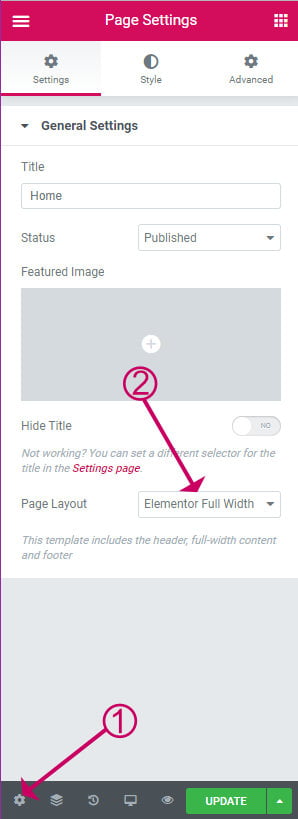
- Click the bottom left cog icon to open the Page Settings panel
- Select Elementor Full Width
Step 3: Setup Elementor global settings
If you are using Elementor for the first time is a good idea to make some default settings for colours and styles. Doing this will make things quicker later on.
- Click the hamburger icon on the top right and click Default Colours
- From there you can set the default primary, secondary, text and accent colours that you will be using on your website
- Click the hamburger icon again and this time click Default Fonts
- Set the font name and weight that you will be using for headers, body text and accent text.
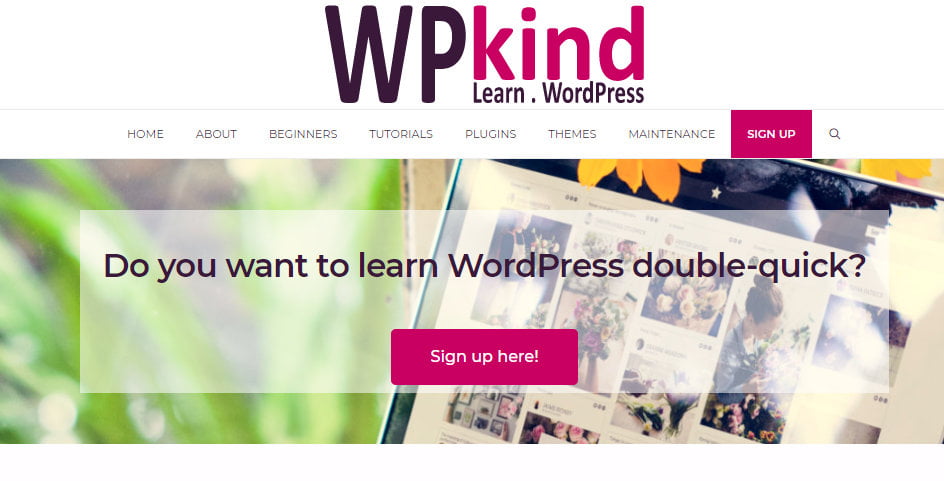
Step 4: Make the call-to-action hero section
The first part of the page layout is going to be a full-width hero section with some text and a call to action button.
In this example, the call-to-action will be our mailing sign-up form. This is what we are aiming for:
- Click the red + icon to create a new section and choose the single-column layout.
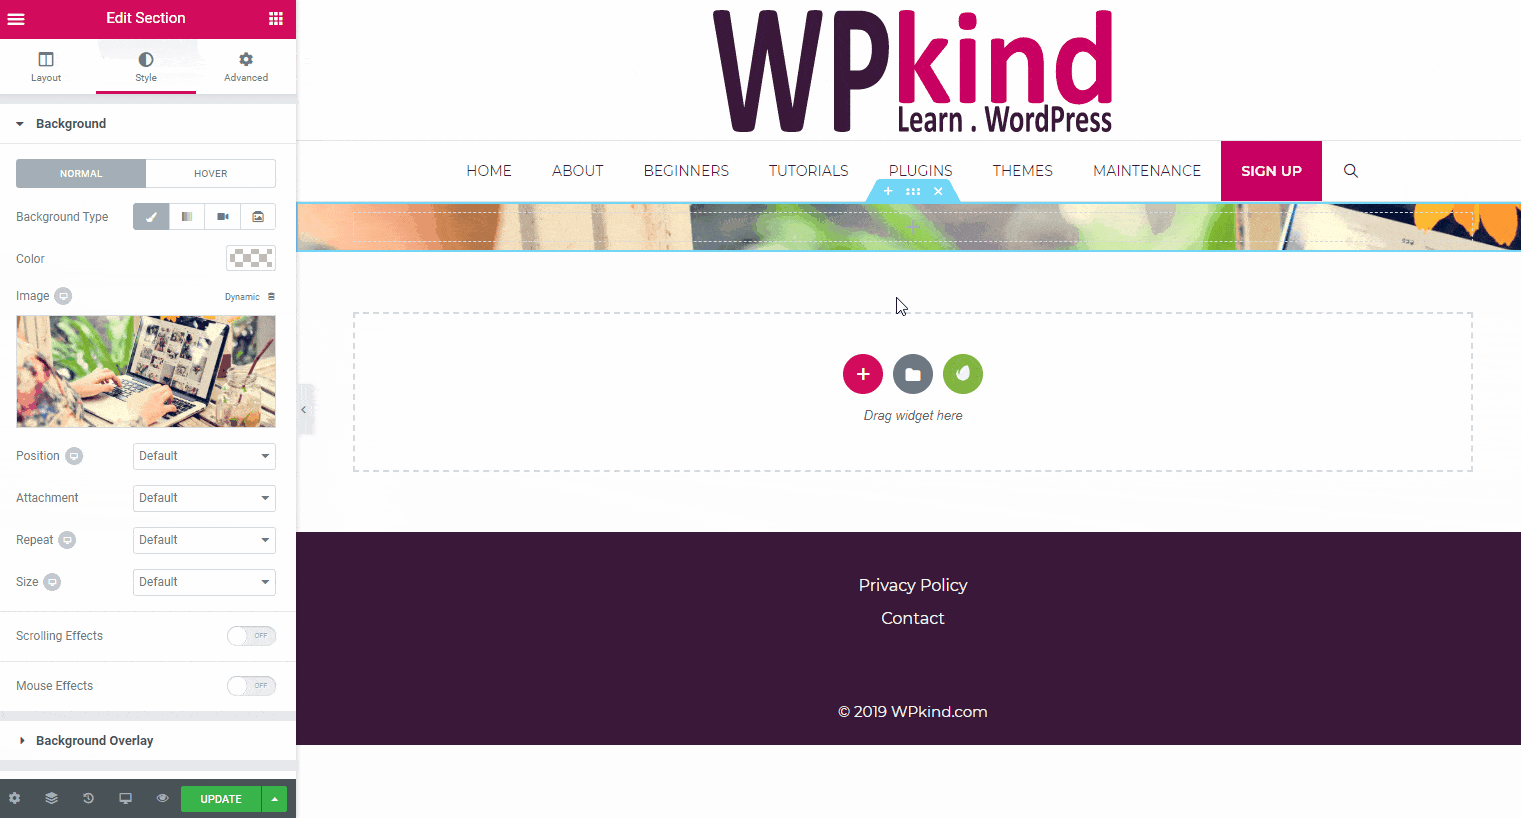
Next, we will set the background for the section to our hero image.
- Click the Style tab
- Select Background Type: Classic
- Click the + icon to select an image from the media library
- Set Repeat to No-Repeat
- Set Size to Cover
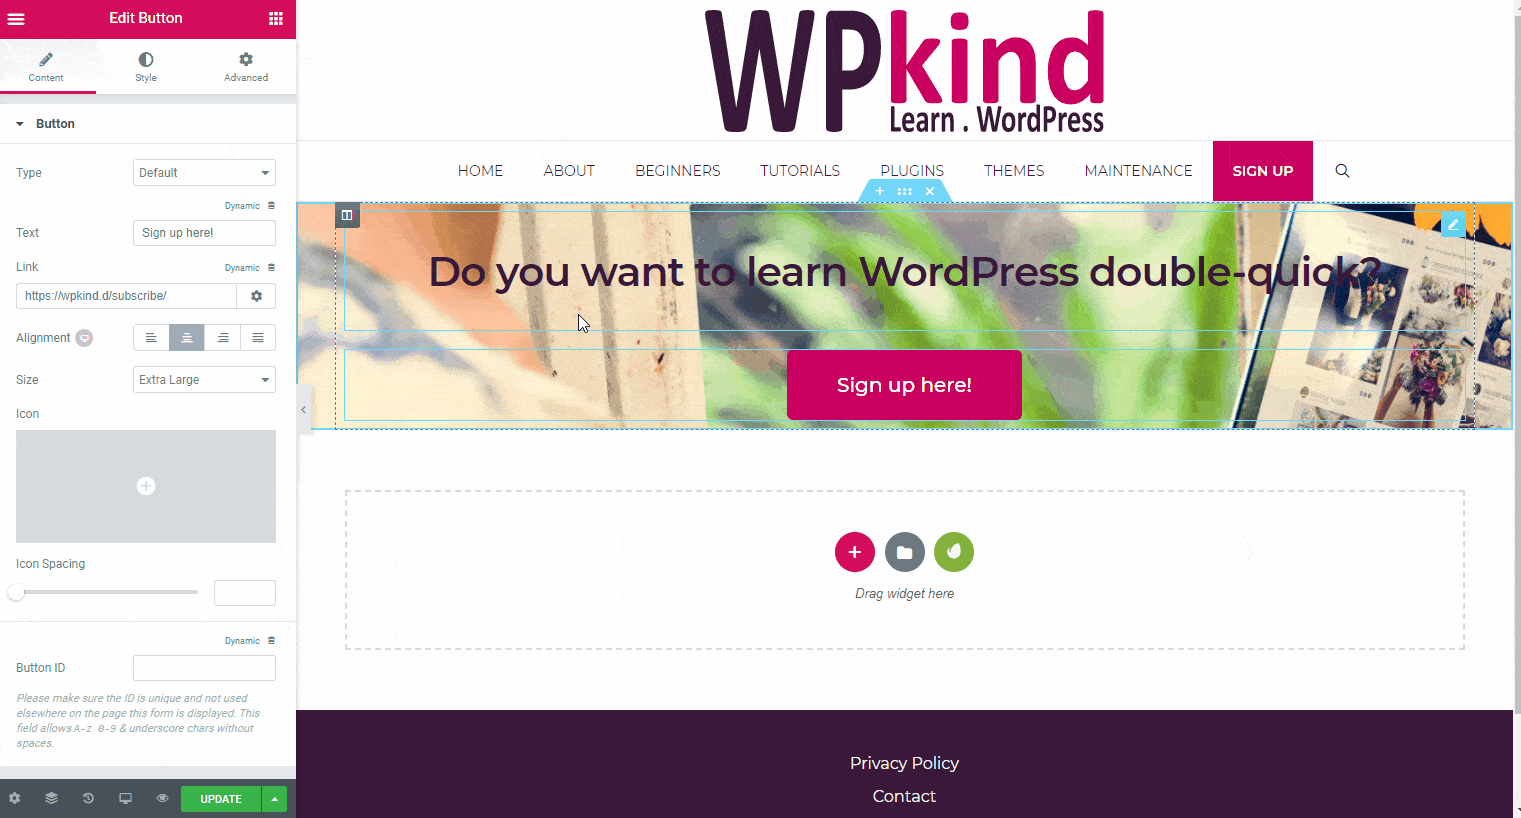
Next, we will add a heading and a call-to-action button:
- Click the + icon to add a new widget
- Drag a heading widget in and then edit the text
- In the Content tab set the alignment to Center
- In the Style tab click Typography and then change the font size and the line height
- Optionally click Text Color to change the color
- Click the Widgets icon (top right on Elementor panel)
- Drag a Button Widget underneath the title
- In the Content tab set the alignment to Center
- Set the Size to Extra Large
- Click the button text to change it to ‘Sign up now!‘
- In the Content tab click the Link box enter the URL of your sign-up page.
The last step is to make the call-to-action stand out a bit more by giving the column a background plus a bit of space around the outside:
- Click the column settings icon (the grey icon on the top left)
- Click the Advanced tab and set the all margins to 64px
- Click the Style tab, click Color and set the background colour, then move the opacity down
At this point, you could click the big green button to update the page with your changes.
Headsup: Elementor saves all our changes as we go so we never lose anything. It does not update the live page until you click the green Update button.
Step 5: Add boxes for our categories
The next part of our page will be our category boxes. These will be the most common categories on your blog and it will help your readers navigate there quickly.
This new section will be wide, i.e. the width of the content area rather than full-width. Each box will show the latest post from a selected category.
- Add a new section by clicking the pink plus button
- Select the two-column layout
- In the Search Widget box type posts
- Drag the Posts widget into the first column
- The column will immediately fill up with your latest posts
- In the Content tab set Posts Per Page and the Columns to 1 under the Layout section
- In the Query section Include By select Term
- In the Term box start typing the name of the category
Next, we will add a title.
- Click the Widgets icon (top right on Elementor’s settings panel)
- Grab a Heading widget and drag it into the first column directly above the posts element you just added
- Click the text to update it
- Click the Style tab and edit the Typography settings to suit.
Next, add a button linking to the category archive.
- Drag a Button widget underneath the posts element
- Click the new button and change the text to ‘More articles‘
- In the Link setting enter the URL of the category archive. If you are not sure of the URL, open a new window and pop over to Posts->Categories and click the View link. Copy the URL.
Now comes the fantastic bit where we copy our work over to the other column, a great time-saver!
- Right-click on the heading text and select Duplicate
- Drag your new copy over to the next column (using the blue edit button on the top right)
- Do the same with the posts and the button element, duplicating and dragging it to the second column
Now we need to change the category of the second post widget and edit the title.
- Click on the second posts widget
- In the Query section change the selected Term to a different category
- Click on the second heading and change it to the new category description
That is the second section complete. If you wish you can click the green Update button and then click the Preview changes icon to see your new page in action.
Step 6: Add the latest posts section
The last section is the latest posts section where we list out all our latest posts in a grid.
Add a heading widget:
- Click the + icon to add a new section
- Select the single column block
- Drag a Heading widget into the new section
- Change the text to ‘Latest posts‘
- Edit the styling to suit.
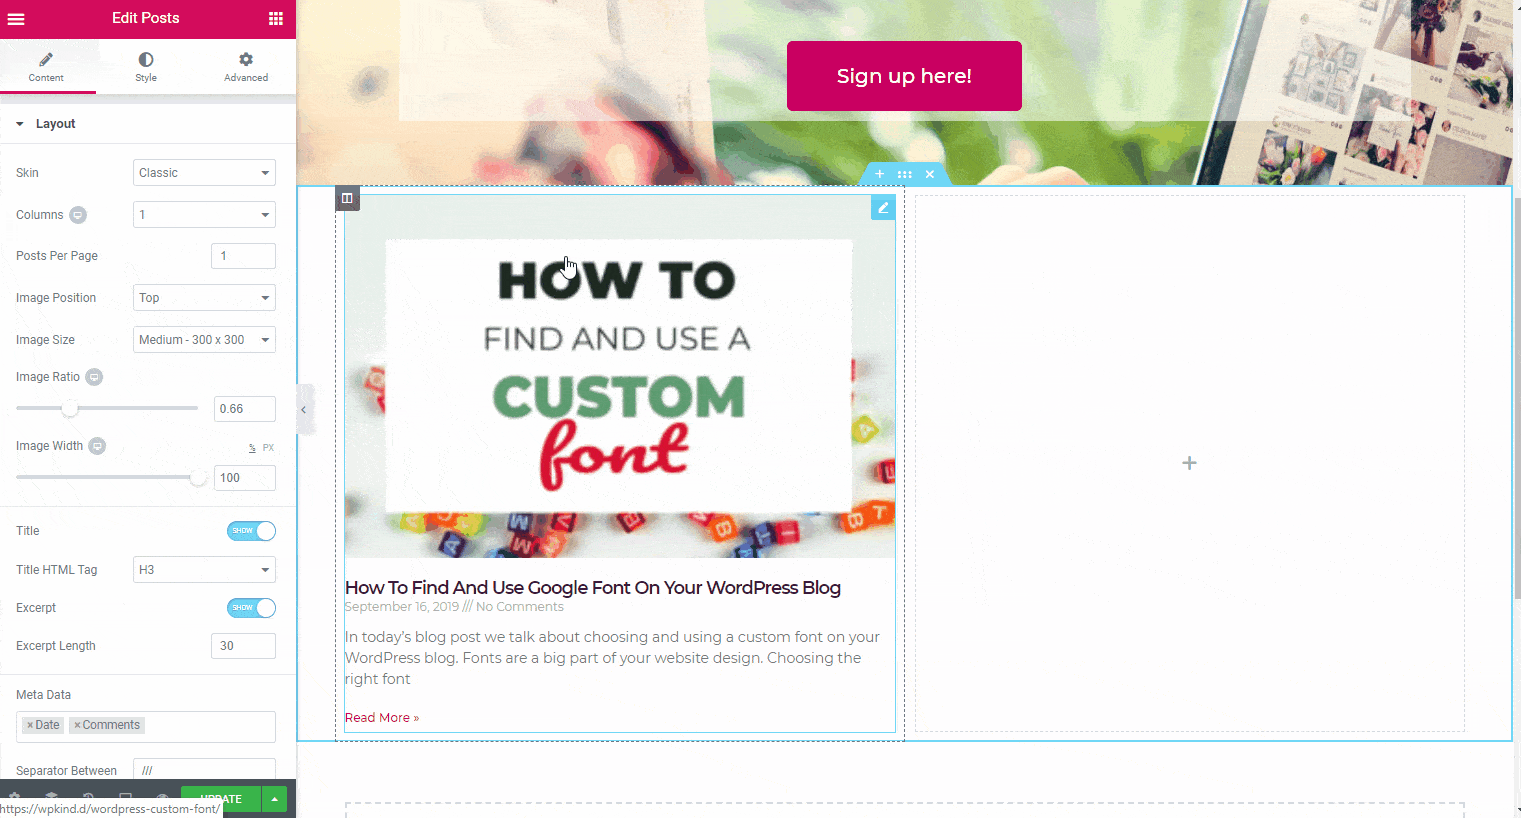
Now add the posts archive:
- Click the + icon to add a new section
- Select the single column block
- Drag a Posts widget into the new section
Later, you could also add a button at the bottom (the same method that we used to add a button above) and link it to your new blog archive page when we have it set up.
You could make more changes to the styling of the Posts element, for example, add a border and change the layout within the box too.
In this example, I made the following changes:
- removed the meta (post date and author) – Content->Layout->Meta Data
- added a border around each box – Style->Box->Set Border Width to 1
- added some padding around the content – Style->Box->Set Content Padding to 16
- gave the title more spacing – Style->Content->Title->Spacing
Now click the green Update button to publish all your changes.
This is what we have designed:
Step 7: Create a new page for blog archive
Now we need to make a new page for the blog archive. It is just a blank page so very easy to do.w
- Go to Pages->Add New
- Enter a title of Blog
- Click Publish
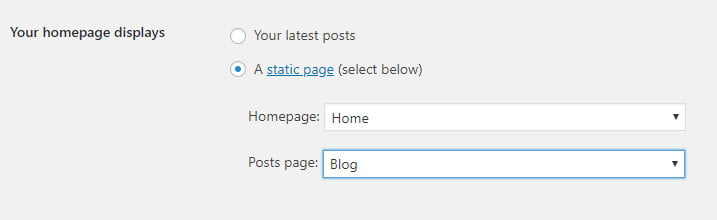
Step 8: Set up the WordPress homepage settings to go live
The next task is to set up your new static page as the home page, and the blog page we created as the blog archive page.
- Go to Settings->Reading
- Click Static page
- In the Homepage list select your new homepage
- In the Posts page list select your blog page
- Click Save Changes
Now when you go to your home page, the newly designed page will show up instead.
When you navigate to /blog it will show your posts archive.
Step 9: Add a link to your blog page on the menu
The very last step is to add the new blog page containing your posts archive to the menu.
- Go to Appearance->Menus
- Make sure the primary menu is selected
- Find your new Blog page in the left-hand list and click Add To Menu
- Click Save Menu
For more help on editing the navigation menu see my post – How to Add a WordPress Navigation Menu.
Wrapping up
In this tutorial, we created a new home page for our blog. We added a new page for the blog posts archive, changed the reading settings to use the new pages, and added the new blog posts page to the navigation menu.
We looked at what Elementor Pro can do in terms of creating a simple home page, but have just scratched the surface. Elementor is very powerful, including animations, special effects and support for post and archive templates.
Elementor has great support for mobile devices. When you view your new page on a mobile, all the sections and boxes will stack nicely. You may find though that the text size is too big. You can change that by clicking on the text and going to Style->Typography. Click the desktop icon next to Size and then click the mobile icon. You can then change the font size and spacing for mobile devices.
To keep this tutorial simple I have shown you how to do the basics. There is a lot more you can learn. Elementor has a fantastic Youtube channel which is a great place to start learning about Elementor.


