Whenever I launch a WordPress blog, there are several things that I always check before take-off to ensure that it has the very best chance of being seen and understood by Google, and of course, has the very best potential to make money.
When you get ready to launch your new blog, or even if you have been live for some time, an SEO audit is a vital exercise. In fact, I recommend you run through this checklist on a regular basis.
Before we begin, I should point out that there are also several tasks I always do after installing WordPress. I thoroughly recommend you visit that post if you haven’t already:
Read it here: 24 Essential Settings After Installing WordPress.
At the beginning of your blogging journey, traffic from Google probably seems a bit far away.
We know it can take up to a year for Google to take notice of a new blog. However, there are plenty of things we can do before then to make sure that when Google is ready, we are too, and hopefully, bring that day forward.
What actually is SEO, and why should I bother with it?
SEO stands for Search Engine Optimisation. The more optimised your site is for search engines, the higher it will be ranked in search results, and in turn, the more traffic you receive.
In this article, I will take you through a checklist of things to do, that will give your blog the very best chance of being seen and indexed by Google.
As Google is the most prolific search engine today, and it can potentially provide us with the most traffic, we will concentrate in this post on pleasing Google in particular.

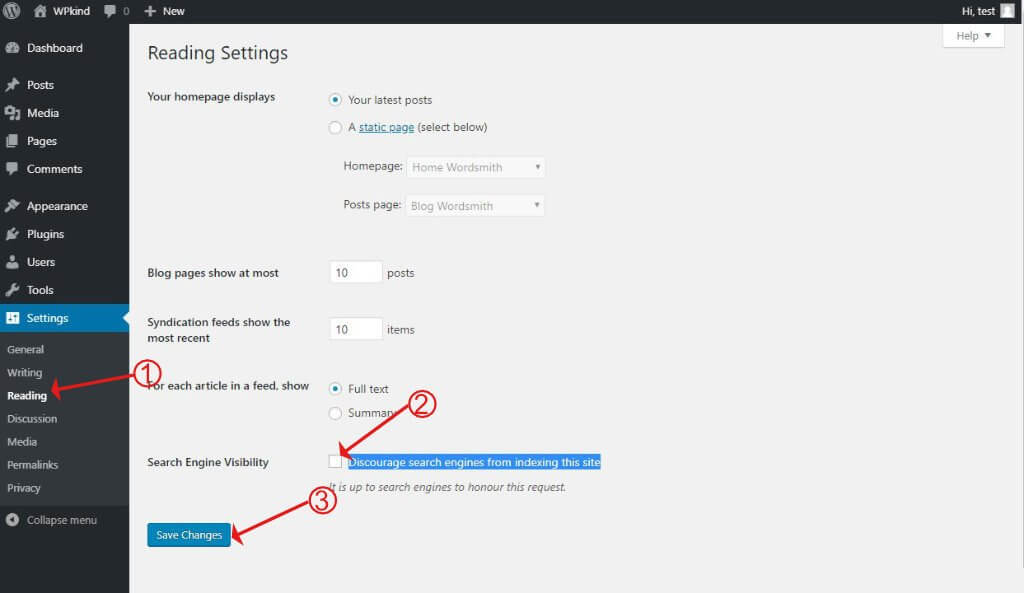
#1 Check WordPress privacy settings
This is where you make sure that Google and other search engines can index your blog.
When you first install WordPress, the setup wizard asks you if you want to ‘Discourage search engines from indexing this site‘.
It is tempting to turn this on when you start a new blog because you probably don’t want people to see it when you are in the midst of building it.
I always recommend that you do not ever tick the box.
When you first start a blog, the truth is that possibly apart from a few friends and family, you will be the only reader. Google won’t rank your blog highly enough at the beginning to send you much if any traffic. It’s not worth discouraging search engines at any stage of your blogging journey.
When you discourage search engines, WordPress adds a special noindex code to all pages and modifies the site’s robots.txt file to suit. This has the effect of sending search engines away, and your site will not appear in search results.
#1 Check WordPress privacy settings
- Go to Settings->Reading
- Check that Discourage search engines from indexing this site is un-ticked
- Click Save
#2 Check robots.txt
The robots.txt file is the first file read by all good search engines when they visit your blog, and it tells them which parts of the website they are allowed to index, and which parts they cannot.
You can see the robots.txt file when you browse to https://my.blog/robots.txt.
This is what you should see:
User-agent: *
Disallow: /wp-admin/
Allow: /wp-admin/admin-ajax.php
Here robots.txt tells search engines they are permitted to index all parts of the site apart from what is disallowed, which in this case is /wp-admin/
WordPress stores all its code in /wp-admin/, we don’t want search engines to waste time indexing it, so we disallow.
If you see this instead:
User-agent: *
Disallow: /
It means that Google should not index your site and is very bad!
The robots.txt file is created ‘virtually‘ by WordPress, the contents of which depend on the privacy settings. You can change the contents of robots.txt by setting the privacy settings as per the previous step.
There is a gotcha though.
If there is a physical robots.txt file the webserver, WordPress will serve it, instead of the virtual one.
If you have turned off privacy settings and you still have the Disallow: / line, you probably have a physical robots.txt file on your webserver.
There are two options open to you:
#2 Check robots.txt
If you delete the robots.txt file from the webserver, WordPress will then be able to create it ‘virtually’, i.e. when the robots.txt file is requested it will respond with the correct code depending on the WordPress privacy settings.
- Go to your hosting control panel and open the File Manager app, or whichever app your host gives you for editing files
- Find the public_html folder
- Look for robots.txt file and rename or delete it
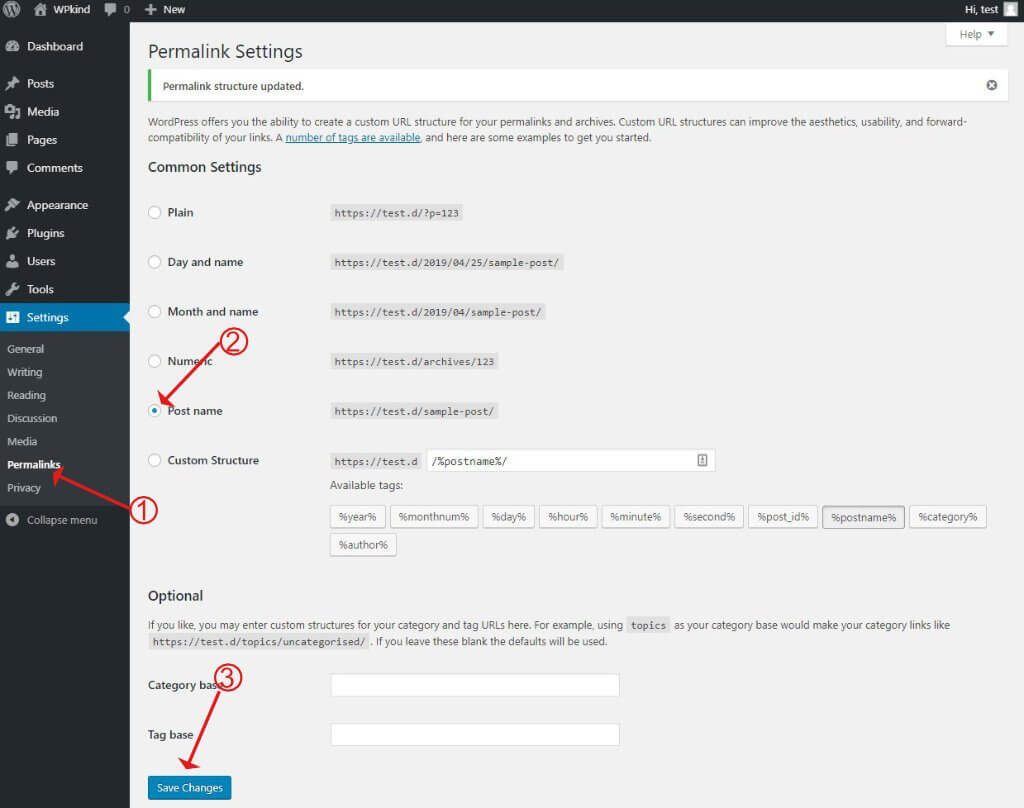
#3 Check your permalink structure
If you have the Yoast plugin installed, you can view and edit the robots.txt file directly. You can’t delete the file, but at least you have the ability to edit it.
- Go to SEO->Tools
- Click on File Editor
- Replace the text with the following:
User-agent: *
Disallow: /wp-admin/
Allow: /wp-admin/admin-ajax.php- Click Save
#3 Check your permalink structure
If your site is already live then, you shouldn’t change the permalink structure as it can play havoc with what is already indexed at Google, causing 404 page not found errors galore.
When you first start your blog, WordPress gives you a very unfriendly way of naming your URLs.
Here is an example:
https://exampleblog.com?p=45678
There are many reasons why this type of URL doesn’t cut it.
First and foremost, most people can’t remember the numbers! Numbers portray nothing about what the post is about in any shape or form and look very unfriendly for your readers.
The second big reason is that when Google comes to index your site, you tell it nothing about the subject of your blog post.
It is much much better to have your URLs say something friendly and informative like this instead:
https://exampleblog.com/five-good-reasons-to-start-a-blog
Using a friendly URL provides the chance to add some keywords pertaining to the subject of the post. The page ranking of the post could improve as a consequence.
Many blogs have the date in the post URL e.g.
https://exampleblog.com/2017/04/20/five-good-reasons-to-start-a-blog
While this is better than a number, a date in the URL, gives away the post’s age. You may have updated since it was first published, but the URL is doesn’t change. An old date can be off-putting for readers. It is possible to update the URL, but you would need to add a redirect from the old one, and things start getting complicated!
#4 Nofollow on external links
There are two recommended ways to set up permalinks. One is to include the category and the post name like this:
https://exampleblog.com/tutorials/how-to-fell-a-tree
or without the category like this:
https://exampleblog.com/how-to-fell-a-tree
Both options are fine, but the second option is preferable because the URL is unchanged when a post switches to a different category, which means there is no need to add redirects from the old URL to the new.
#5 Install the Yoast SEO plugin
- Go to Settings->Permalinks
- Select the Post name option
- Click Save
#4 Nofollow on external links
There are two types of links:
- Internal links that point to another page on your website
- External links that point to another website
Both types are important to have in any blog post.
It’s essential for SEO that those external links are ‘nofollow‘ rather than ‘dofollow‘.
Making a link nofollow tells Google not to follow the link and not to deduct page ranking from your site.
You should always make external links nofollow unless prearranged with the external site. In the case of a guest post, you will probably want to make backlinks to the guest site dofollow, so their page ranking benefits.
#6 Six things you should do on every blog post
You can make a link nofollow by adding rel=”nofollow” to the HTML like this:
<a href="https://google.com/" rel="nofollow">click here</a>However, editing each and every external link can become tedious. I recommend you use Nofollow for External Link plugin By CyberNetikz, which adds nofollow to all external links automatically.
Here is how to get it working:
- Install and activate the Nofollow for External Link plugin By CyberNetikz. If you are not sure how to install a plugin, see my post – How to Install a WordPress Plugin.
- Go to Settings->NoFollow ExtLink
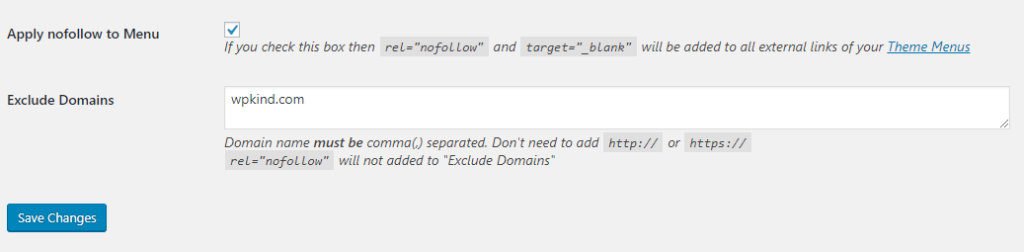
- Click Apply nofollow to Menu so that any external links you put on your navigation menu will be covered.
- Enter your domain in the Exclude Domains box. Also, add domains of any guest posters, so that their domains do not have the nofollow added.
- Make sure you add a comma between your domains.
As well as making external links nofollow, the plugin will also add target=”_blank” attribute. This makes the link open in a new tab stopping your visitors from navigating away from your blog.
Check your footer. Sometimes theme developers put a dofollow link to their site there. If you can remove it using the theme’s settings, I recommend you do. If not, contact the developer.
#5 Install the Yoast SEO plugin

We’ve talked a bit about the Yoast SEO plugin already. If you don’t yet have it, I thoroughly recommend you install it. You don’t need the premium upgrade; the free version is perfectly fine.
An important point to understand about the Yoast SEO plugin is that using it will not immediately make your blog more SEO friendly, but it will help you to achieve much better SEO. Don’t expect to install it and immediately reap the benefits.
#7 Check only one version of the site is browseable
- You can enter the key phrase that you are targeting in Google, and Yoast will use that key phrase to analyse the post using a traffic light system.
- It gives advice on how to improve your text, such as suggesting that you use your chosen key phrase in the title, introduction, and in more places within the main content.
- It provides an editor so that you can add a meta description for your post.
- It allows you to upload an alternative sharing image for Facebook and Twitter
- It creates XML SiteMaps (more about that later)
- It allows you to control whether or not Google should index a particular post, category or tag archive.
Yoast is well known for its traffic light system. Many people strive to achieve a green light on every post, meaning it is ultra optimised for SEO.
I tend to take a relaxed attitude about the green light.
Remember that ultimately, the post is for your reader, not for Google. Unnaturally stuffing content with keywords for the sake of achieving a green light could make the text less enjoyable to read. If reaching a green light causes the text to seem manufactured, I am happy with amber.
#6 Six things you should do on every blog post
The following six steps should be done on all your posts. It may take some time if you have a lot of posts, but you can do it over time.
If you haven’t already done so, install and activate the Yoast SEO Plugin (if you are not sure how to install a plugin, see my post – How to Install a WordPress Plugin.
- Open your post and click on the Yoast icon in the top left of the screen
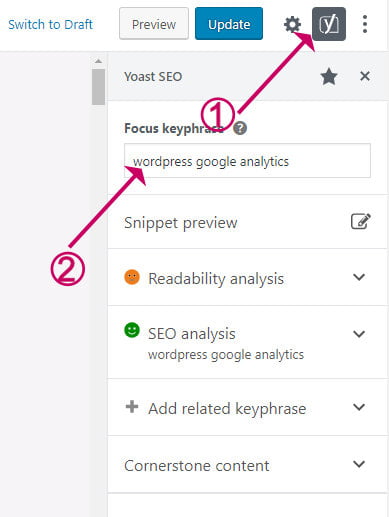
How to add the focus keyphrase to the Yoast Plugin - Enter a key phrase in the Focus keyphrase box.
- Use the chosen key phrase in the title, introduction and throughout the content where it makes sense.
- Expand the SEO Analysis panel for help on where to improve, for example, here we need to add some internal links.
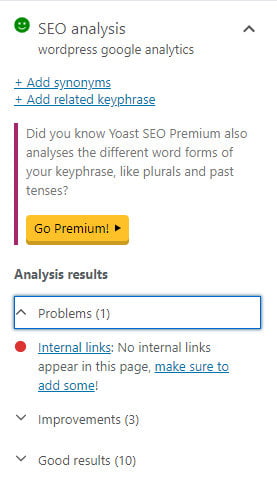
Yoast SEO Plugin Analysis results - Click on Snippet Preview
- Add a Meta description. The text should include your keyphrase.
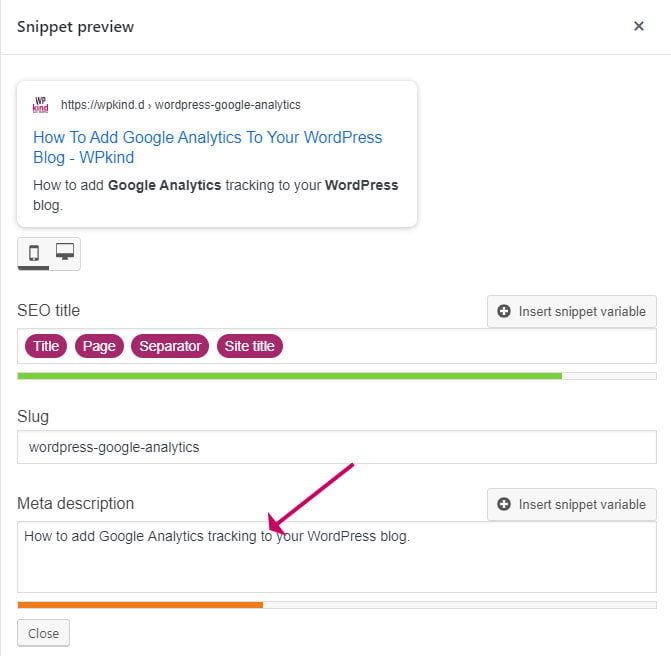
Add a Meta description to Yoast plugin
#8 Mobile responsiveness
How to choose a key phrase deserves its own post!
Before you start writing, you should always have some keywords in mind and ensure that your content is based on those keywords.
To find keywords, search for a phrase that you think people might use for your chosen topic and then refine that phrase into a few words.
Here are some free tools to help you find keywords:
Once you have your keywords, find some long-tail keywords that you can also use within the content using Yoast Suggest.
Long-tail is a refinement of the primary keyword; for example, ladies summer shoes is a long-tail of shoes. It is going to be much easier to rank for ladies summer shoes than on shoes alone.
Depending on the popularity of your primary keyword, it might be better to write your whole post about a long-tail keyword instead, if you are more likely to rank for it.
#7 Check only one version of the site is browseable
Did you know that it can be possible to get to your site from more than one address?
For example, for the domain myblog.com these domains could all point to the same site:
https://myblog.com
http://myblog.com
https://www.myblog.com
http://www.myblog.com
You should check out each version of your domain as above. They should all redirect to the primary URL.
For this blog, all versions redirect to https://wpkind.com, which is the main URL.
If you don’t redirect each version correctly, Google will see each URL as a separate website, and penalise you for duplicate content.
If you have a WWW domain, that should redirect to the raw domain (without WWW,) the best thing to do is to delete the www subdomain from your account, which you should be able to do in your web host’s admin settings.
If you have been using WWW as your blog URL and want to change it to the raw domain you should set up a proper 301 redirect otherwise 404 page not found errors will result. You should be able to create a redirect in your web hosting admin panel.
#9 Internal linking
You can force the HTTP version of your site to redirect to HTTPS in the cPanel settings if you have that.
- Open up cPanel
- Click on Domains
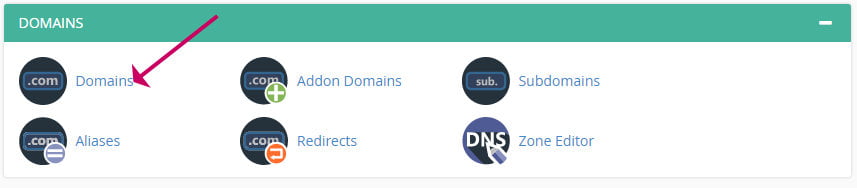
cPanel Domains - Check that Force HTTPS Redirect is switched on

cPanel Domains redirect to https.
If you have any issue with redirects or deleting subdomains, your host should be able to help.
#8 Mobile responsiveness
If you have picked a great theme, your blog will be mobile responsive out of the box. Most themes are mobile responsive nowadays, but if your theme is not, you should consider swapping themes immediately.
Google now favours mobile responsive sites in search results. It is imperative that your site looks great on a mobile, not only for your mobile readers but for better page ranking too.
If your blog theme is already mobile-responsive, there may be refinements you can make to improve the appearance on smaller screens, such as reducing the size of the logo or making the heading fonts smaller.
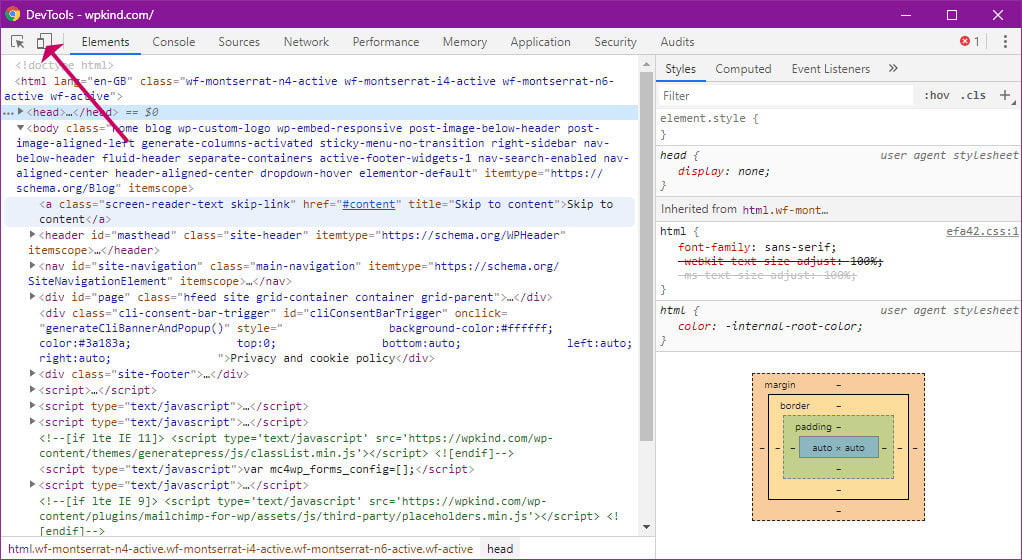
I’m guessing you have probably already checked your site on a phone and tablet, but did you know you can configure your browser to simulate a phone/tablet view?
#10 Check image names and ALT text
If you don’t already have Google Chrome, you can download it here.
- Once Google Chrome browser is installed, open it up and browser to your blog
- Press SHIFT+CTRL+I or SHIFT+CMD+I on Mac to open the Chrome developer tools, or click on the top left Toggle Device Toolbar icon as shown in the screenshot.
Chrome Developer Tools Window - Your website will then show up at the same width as a mobile device
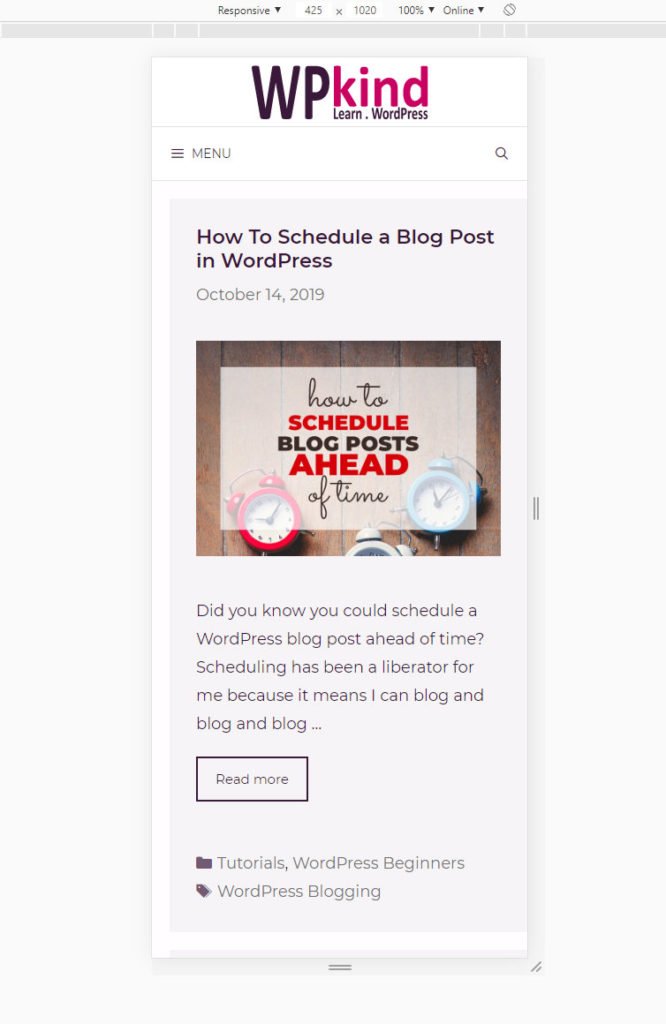
Viewing website in mobile device mode - Select Responsive from the drop-down at the top, then you can click the grey strip underneath to select various widths.
If you find you need to make changes to font-sizes, or logo sizes the best place to check is in the theme settings, where you will usually find you can select font sizes according to media size. You can certainly do this very easily in GeneratePress if you have it.
#9 Internal linking
We touched on the importance of internal linking previously. It is one of the things that the Yoast plugin checks on when it analyses your post content.
Fortunately, by design, WordPress is very good at creating a hierarchy of internal links via the tag and category system.
When you give your posts a category and/or tag, you can create a hierarchical structure to your site, which has enormous benefits for SEO.
Related reading:
- Categories VS Tags In WordPress And How To Use Them Properly
- This One Tweak Can Improve SEO Ranking Immediately
In addition to tags and categories, linking to related posts is great for your readers and also great for SEO, plus it encourages readers to stay on your site for longer.
Posts that have a lot of internal links directed at them are deemed more important by Google, and therefore will rank higher.
You can create an internal link by simply highlighting text and clicking CTRL+K (CMD+K on Mac).
#10 Check image names and ALT text
Like on-page SEO in the previous steps, this is another big one, which could be a huge task to put right, unfortunately.
Image names are an excellent opportunity to use the focus keywords for associated post content.
For example, for a post about the best ironing board covers, you should name your featured image photo, best-ironing-board-cover.jpg, rather than img04567.jpg.
Related reading:
- All About Images in WordPress
- 7 Mistakes You Are Probably Making With Images – And How To Fix Them
- 5 Ways To Add Images to a Blog Post in WordPress
If you haven’t been renaming your images and you have a large number of posts, it will be no small task to rename, and then reinsert each image.
At the very least, though, you can make sure an image has some ALT text.
ALT text is read by Google to understand further what the image is about, and it is another opportunity to use your keyphrase.
#11 Check your site speed
- Click on the image to reveal the toolbar
- Click on the Pencil icon
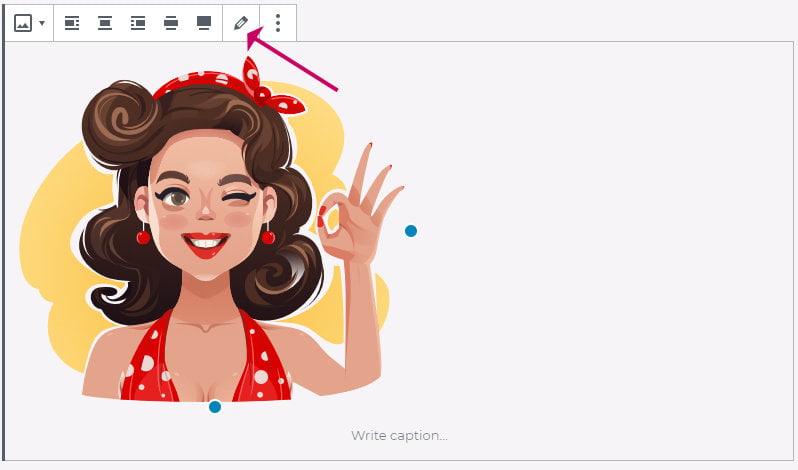
How to enter ALT Text on a WordPress image - Enter a description of the text in the ALT Text box
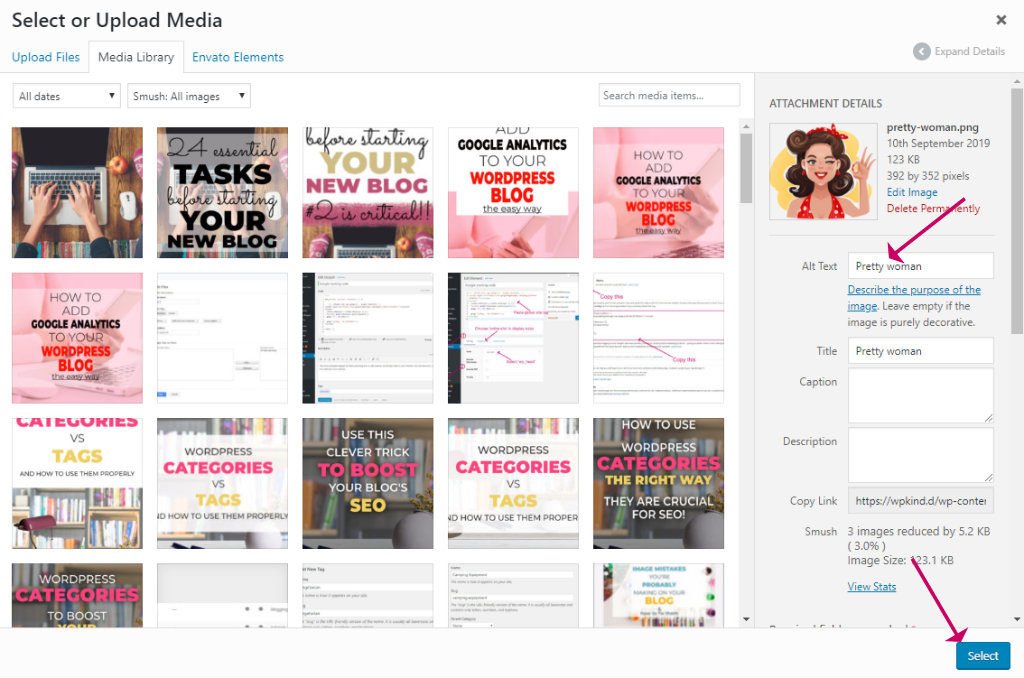
How to enter ALT Text on a WordPress image
#11 Check your site speed
Google loves fast sites. In fact, like mobile responsiveness, a fast site will rank higher in search results.
There is a lot you can do to speed up your blog. The biggest of which is choosing good hosting and installing a caching plugin.
Speeding up your WordPress blog is a topic all of its own.
I have a whole post about it here: 14 Super Easy Ways To Speed Up WordPress.
I thoroughly recommend you visit that post; the benefits of a fast site are enormous.
#12 Check keywords on your posts
We talked about keywords and key phrases in an earlier step and how the Yoast SEO plugin can help with making sure that your chosen key phrase occurs in the right places.
Here are all the areas where you can incorporate a key phrase:
- The Post title
- The Post URL (slug)
- The Meta description
- The file names of images
- The ALT text of images
- In sub-titles (H2, H3 etc.)
- Within the post content
#13 Use tags and categories
WordPress has a fabulous built-in system of categories and tags which help you to structure your blog by grouping related posts together.
A well-structured blog can help both your readers and Google to understand the major topics and how posts relate to one other.
Create categories for each key topic you talk about on your blog. I recommend that every post is a member of one or two categories.
You can use tags to inter-link posts in a different way.
For example, you might group all your posts about Children’s Toys into one category. You could then add a tag system to allow you to group items by age too, e.g. under 5 and under 10. You might use those same tags for the Children’s Clothing category too.
The names of categories and tags are an excellent opportunity to use keywords.
Related reading:
- Categories VS Tags In WordPress And How To Use Them Properly
- This One Tweak Can Improve SEO Ranking Immediately
We know that tags and categories have archive pages.
But did you know that well-designed categories and tags can have a positive effect on SEO?
Search engines treat archive pages in the same way as posts and pages; this means that archive pages have the potential to rank in their own right in search results, just like posts.
Healthy meal recipes, for example, is most likely a highly competitive search term.
However, you can give yourself a higher chance to rank for it if you make a category or a tag for that search term, rather than a single post.
Then create posts under that category optimized for related long-tailed key phrases.
For the term Healthy meal recipes, long-tailed search terms might be healthy lunch recipes or healthy vegetarian lunch recipes. You would create posts for each of those long-tailed keywords and then assign those posts to the Healthy meal recipes category.
Due to WordPress’s system of hierarchy, posts underneath a category/tag automatically link up to the parent, giving the parent archive greater importance in the eyes of search engines.
You can help a category/tag to rank for a keyword or key phrase by using it in the category name, the slug (URL), and the description.
#14 Allow readers to search
Having a search box on your blog is not strictly SEO related but rather a nice to have feature. I always like to make one available.
You can add a search box to your sidebar by dragging a search widget into it.
- Go to Appearance->Widgets
- Find the Search widget and drag it into a widget area, such as the sidebar.
GeneratePress has the option to add a search box to the menu, which is a very elegant way of including it.
#15 Submit a Sitemap to Google
You can help Google to index your site immediately by submitting a sitemap to Google.
To do this, you will need the Yoast SEO plugin.
#12 Check keywords on your posts
- Install and activate the Yoast SEO plugin
- Go to SEO->General
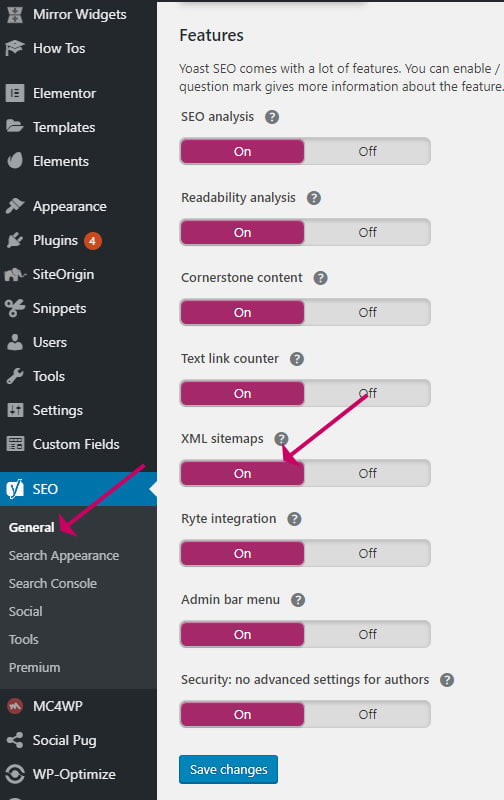
Turn on Yoast SEO Sitemap - Check that XML sitemaps are turned on

Turn on Yoast SEO Sitemap - Click the Question mark icon to expand the options
- Click See the XML sitemap link to view it.
- Note down the name of the XML file. It will be something like this: sitemap_index.xml
- Sign in to Google Search Console (if you haven’t used Google Search Console before you will need to create an account and add your site)
- Select your site from the sidebar
- Click on Sitemaps
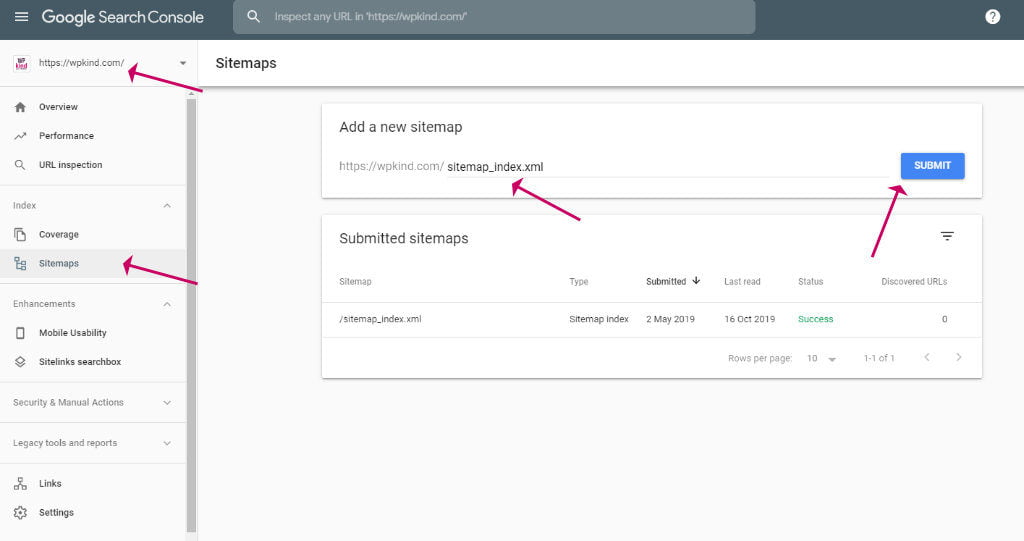
Submit sitemap to Google Search Console - Enter sitemap_index.xml in the sitemap box
- Click Submit
#16 Add Google Analytics
Google Analytics is a tool you can install on your website that allows you to track your site visitors.
Google Analytics opens up a wealth of information about your site visitors’ behaviour.
It gives you so many advantages:
- You get to know general (anonymous) information about visitors including gender, age, interests, location and device used.
- Tells you what social platforms your readers are coming from
- How long readers spent on your blog, and how many pages they visited
- Extremely easy to set up (no technical knowledge required)
- The information helps you to make decisions about what posts to write, and how to improve your blog
- It’s free!
I have a full post that helps you to set it up here – How To Add Google Analytics To Your WordPress Blog.
#17 Run WPCheckup
One last thing you can do is to check your whole site with WPCheckup.
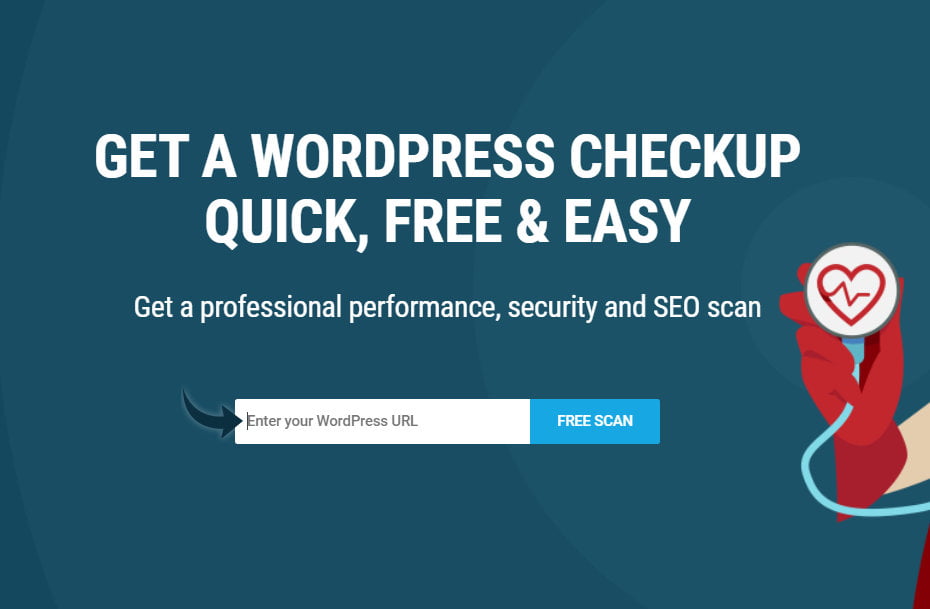
WPCheckUp is a great way to clean up loose ends you might have missed.
The tool will check things like speed, images without ALT text, meta descriptions; it will also check search engines can crawl your blog.
The tool will do some security checks, including checking you have the latest WordPress update, check that directories cannot be listed out, and you have changed your admin username.
Related reading:
Wrapping up
In this post, I have taken you through all the things that you should check before launching a new blog.
The checklist is also very handy for periodic audits, flagging up any problems that can arise as a result of a new plugin, a new theme, changes on your hosting server, or a lapse in SEO optimisation.


