In this tutorial, I will show you how to start a new WordPress blog on SiteGround.
If you have arrived here because you want to start your first blog, then let me tell you that you have made a great decision!
I love blogging. I especially love the writing aspect. Give me a laptop, and a quiet place and I will write and write. The great thing about blogging is that you can do it anywhere in the world, all you need is an internet connection!
I have to say though, and I’m sure you already realise this, that blogging isn’t a get-rich-quick kind of thing. If you want to make money with your blog, you have to be prepared to work at it, and there is a lot of learning to do too. It will take you only a few minutes to set up your new blog with SiteGround because the onboarding process is so streamlined; it is actually the best sign-up process I have come across.
However, you probably also know that setting up your new blog is only the start. There are many more hours to be spent, designing your blog, writing posts, marketing your content and lots more.
Fortunately, I have a huge number of beginner tutorials on this site. If you join my mailing list I will send you weekly tips.
Do check out the links at the bottom of this post, if you read all the posts in order you will have a very good understanding of how to use WordPress to make a successful blog.
Need more in-depth help? I’ve got that covered too. Have a look at the services I have on offer, or drop me a line and let me know what you are struggling with.
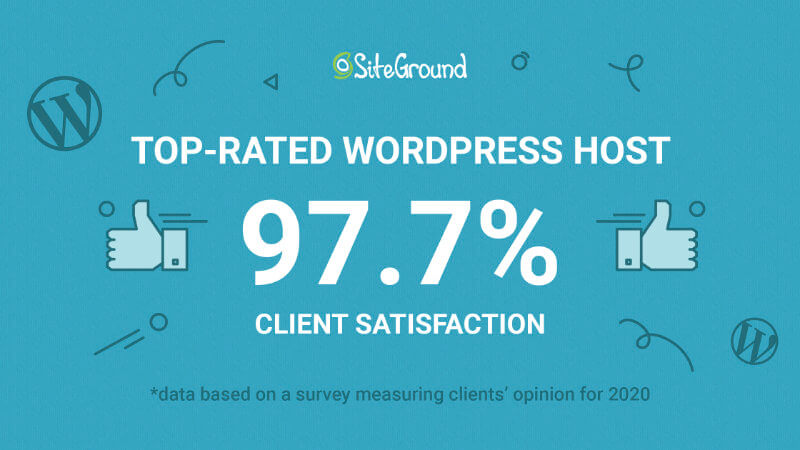
There are a number of great hosts around, and SiteGround is one of the top recommended WordPress hosting provider by WordPress.org. It also has a 97.7% client satisfaction rate.
Step 1 – Set up your new WordPress blog on SiteGround
I have to say that I am very fussy with hosting. Absolutely everything has to be good about the host before I will commit.
I am a tough cookie to crack. I always start a chat with potential hosts, which of course I did with SiteGround, to gauge how knowledgable and helpful they are. I have to say they really knew their stuff.
- SiteGround is recommended by WordPress
- Support is top-notch
- There is usually a 50% discount for new accounts.
- It is super-easy to set-up WordPress and start a blog in no time with SiteGround
- Due to the automation they now have you can get up and running in minutes.
Before we start your first blog with SiteGround, or with any other hosting provider, there is a very important task to carry out first.
Choose a domain name.
If you haven’t decided on a domain yet, here is some advice to get you started.
- Should be memorable
Test it out with friends and family, does it roll off the tongue, or is it too obscure? - Six letters or less is good
But not always possible, so don’t worry if you can’t do that. - Avoid hyphens
myfirstblog.com is preferable to my-first-blog.com - Is your domain available on social media Twitter, Facebook, Pinterest, Instagram?
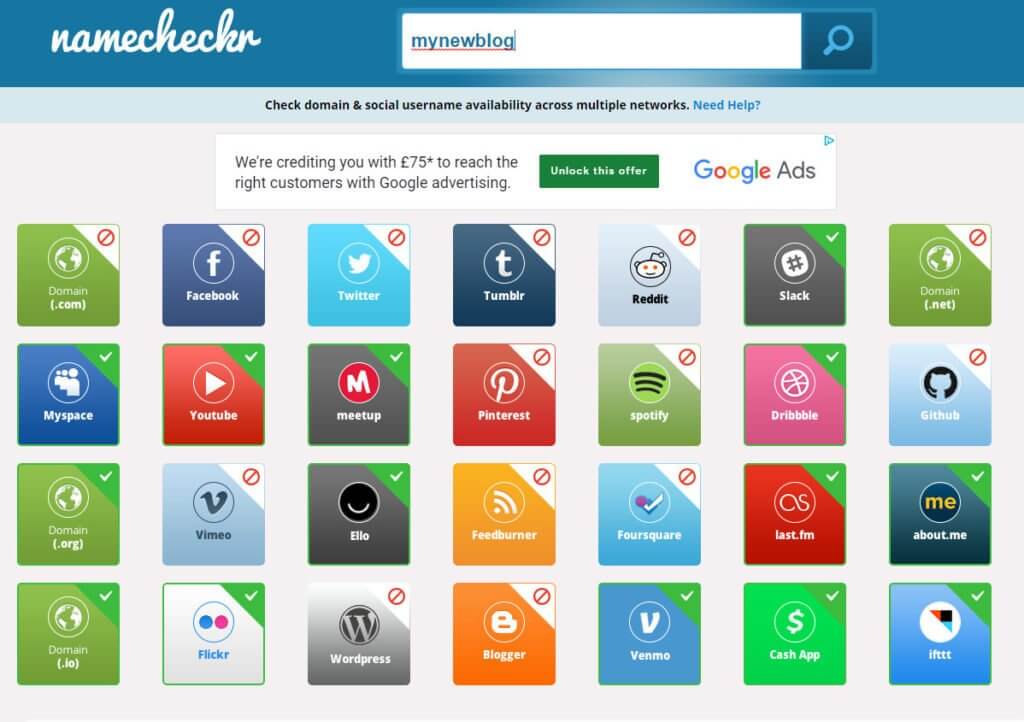
Namecheckr.com lets you know which handles are available.
Type the first part of the domain (with the .com bit) into Namecheckr, and it will let you know whether your choice is available as a .com URL (top left box) and whether it is also available as a username for all the main social networks too.
You might find your domain is available as a URL but if it is already taken as a username at Pinterest and Facebook, then it probably isn’t such a good idea to go forward with it.
My advice is not to get too hung up on your domain name!
It really doesn’t matter too much, as long as you don’t go for something that has no bearing at all on your blog content or could get misconstrued.
Try out your domain idea on your friends and family. Do they think they could remember it? What picture/feeling/emotion does the name conjure up for them?
You can register a domain with whomever you like, NameCheap, GoDaddy, 123Reg, to name a few. You can also register a domain at SiteGround when you open a new account with them.
Do you have your domain chosen? Great! Let’s get on and create our new blog on SiteGround!
If you are unsure, I encourage you to start a chat with them. I guarantee you will find them amazing.
Step 1 – Set up your new WordPress blog on SiteGround
In this step, we will open a SiteGround account and set up our new WordPress blog.
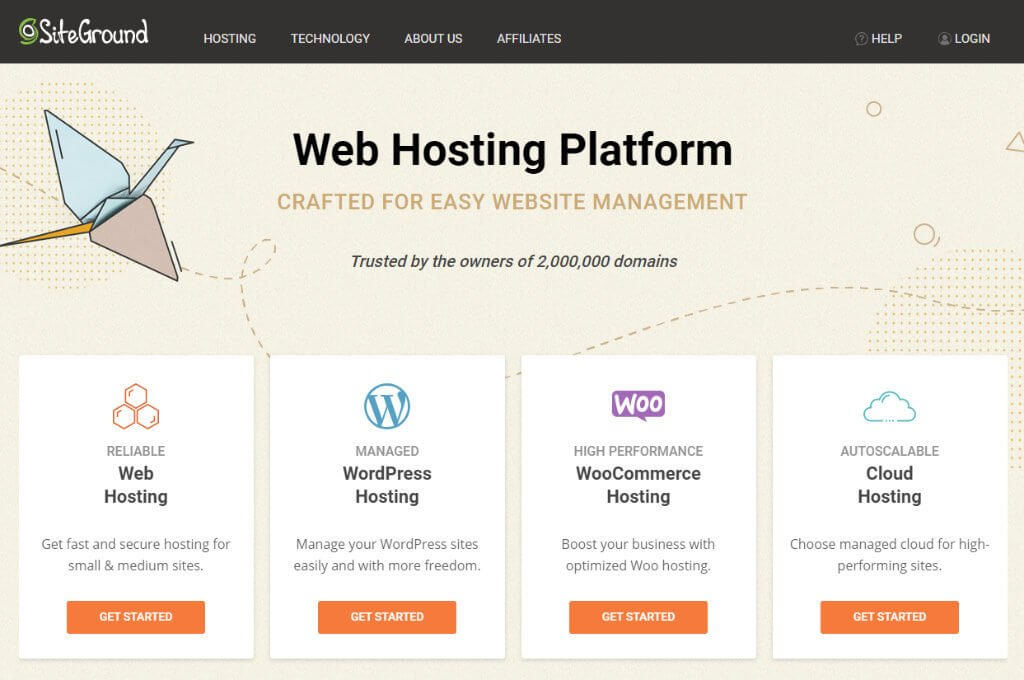
- Go to SiteGround and click on Web Hosting or WordPress Hosting it doesn’t matter which, and they are the same products, just marketed differently (I asked them that during my chat :)).
- Click on StartUp and then click Get Plan.
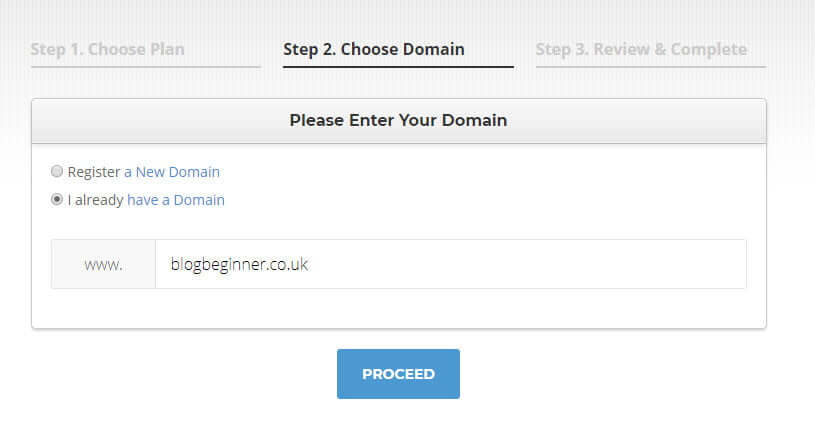
- On the next screen, enter the domain name you registered earlier, or choose one now. I already have a domain registered, so I’ve entered it in the domain box.
- In the next screen, create a login and enter your credit card details.
- You should then get an email confirming your purchase, with a link called – Launch Wizard. Click the link to begin setting up your new WordPress blog
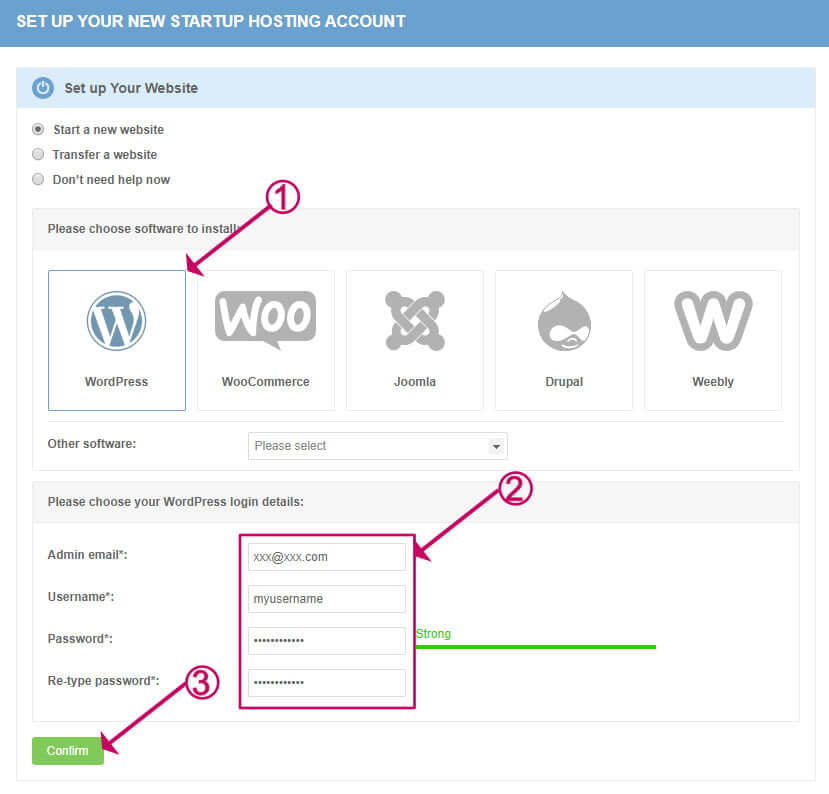
- Click the WordPress box, enter your new WordPress blog admin email, username and password and click Confirm.
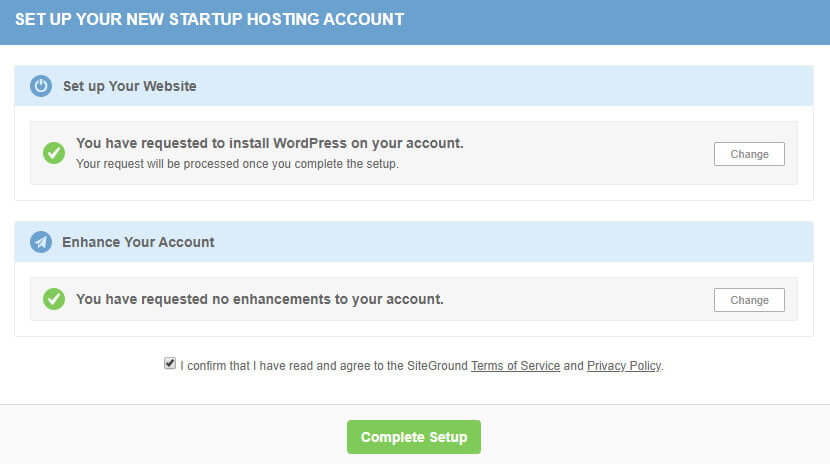
- On the next screen, click Confirm then Complete Setup
- Wait while your new WordPress blog is set up. Then you should get a message to say your hosting account is ready to use!
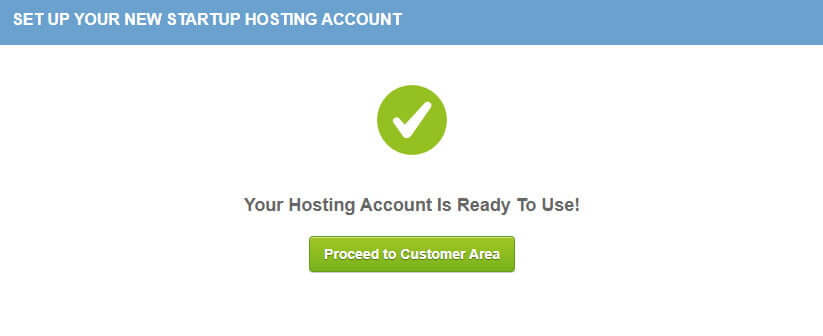
- Click Proceed to Customer Area
- That’s it your new blog should now be set up
Step 2 – Update DNS
If you registered a new domain when you opened your SiteGround account, you can skip this bit.
If you already had a domain registered with another registrar now is the time to pop over to them and update the DNS settings, so that your domain is now hosted at SiteGround.
The nameservers will have been sent to you in the welcome email from SiteGround.
Here are the nameservers I was sent, but yours may be different:
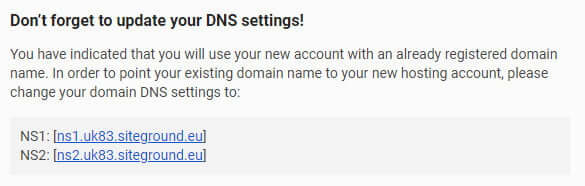
Login to your registrar and enter the nameservers, as per the example below.
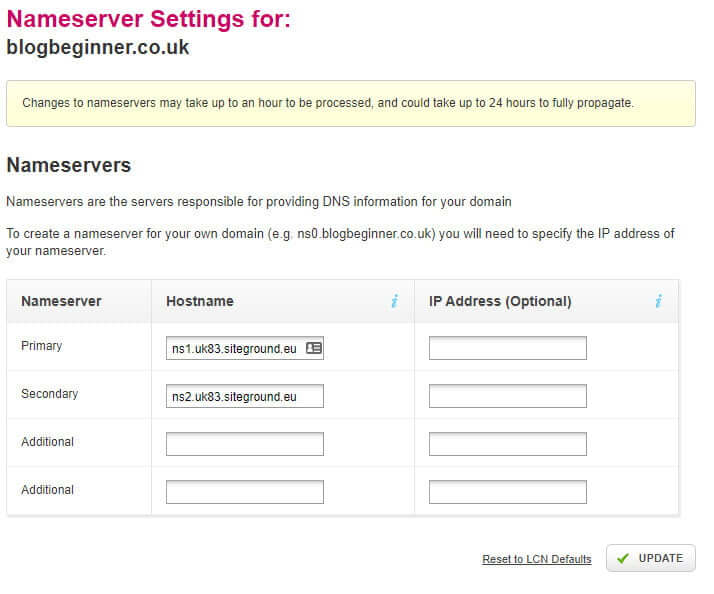
Changes to nameservers may take up to an hour to be processed and could take up to 24 hours to fully propagate. Your new domain may not work for at least an hour.
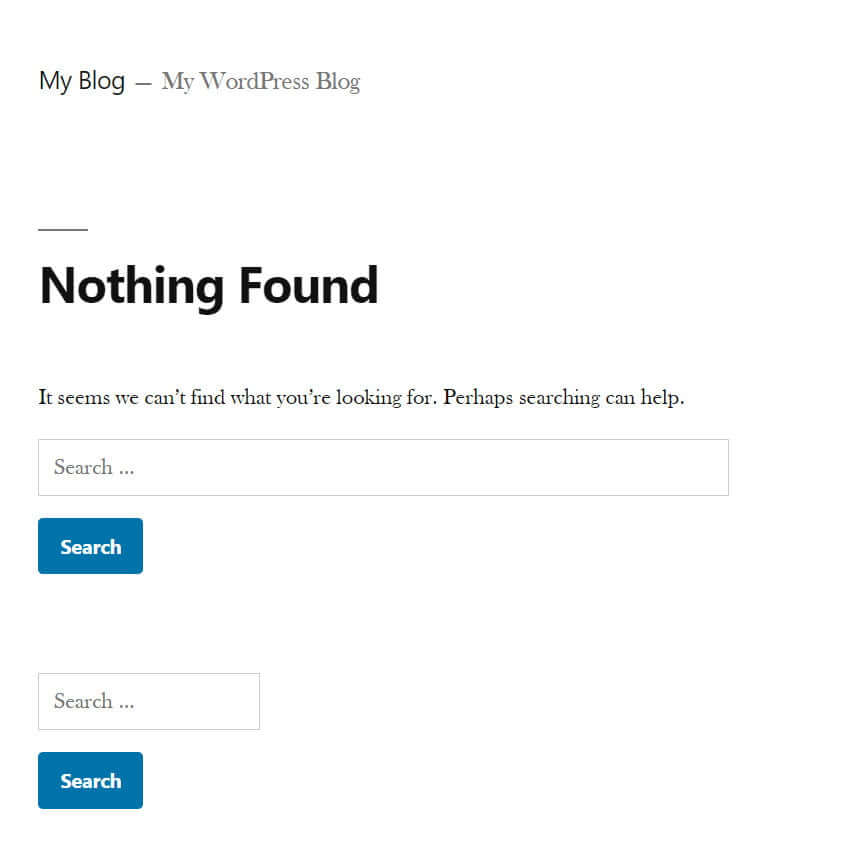
After the DNS changes are complete, you should find that when you browse to your domain name, you see the default WordPress site.
Here is what I see when I open https://blogbeginner.co.uk
Step 3 – Check HTTPS settings
In this step, we will do a some small tweaks to make sure that our blog runs on HTTPS, which is a secure protocol that all websites should use.
- Log back into your new SiteGround account, click the My Accounts tab and then click Go to Admin Panel button.
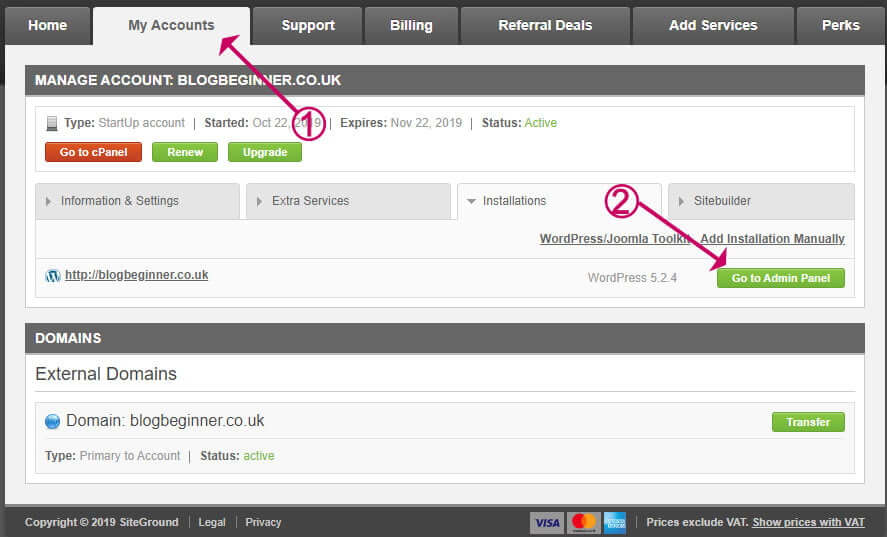
The admin dashboard of your new WordPress blog should open up.
SiteGround has automatically added a security certificate to your domain. But you need to make sure that WordPress itself is configured to use HTTPS rather than HTTP.
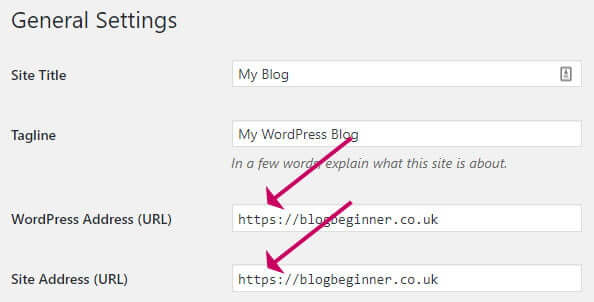
- Go to Settings->General
- Make sure that the WordPress Address URL and Site Address both begin with HTTPS rather than HTTP and update them if not.
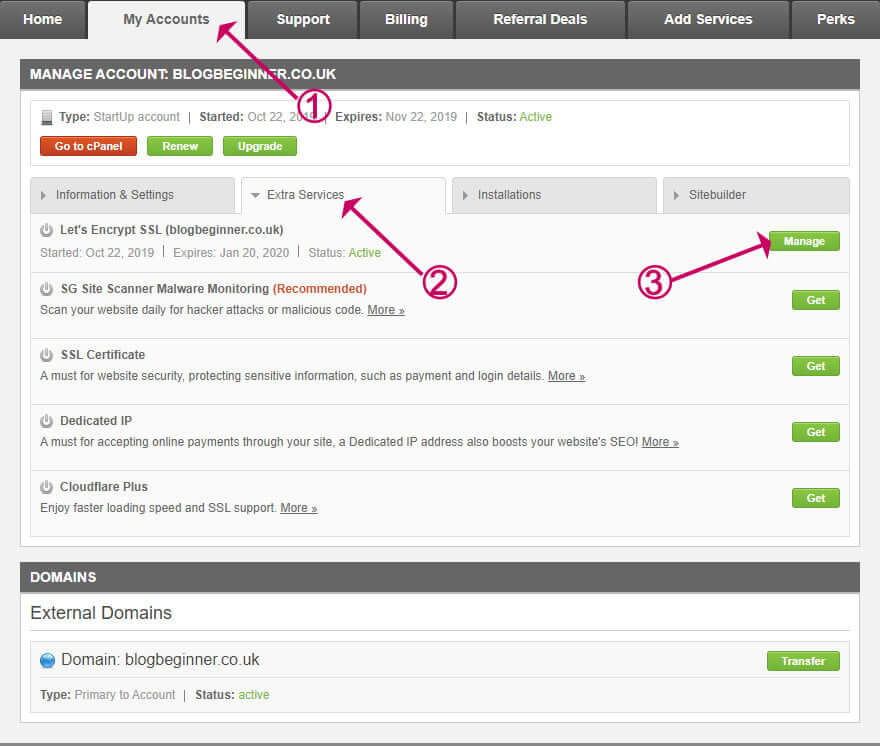
- Now go back to SiteGround and select My Accounts->Extra Services->Manage.
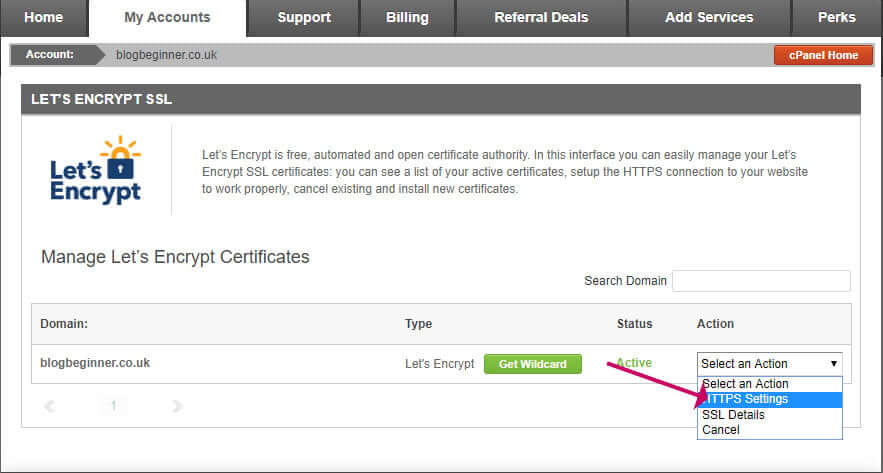
- Select HTTPS Settings from the action list.
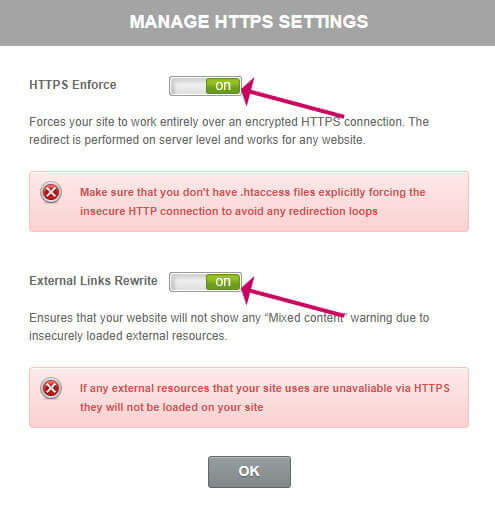
- Make sure the HTTPS Enforce and External Links Rewrite are both switched on.
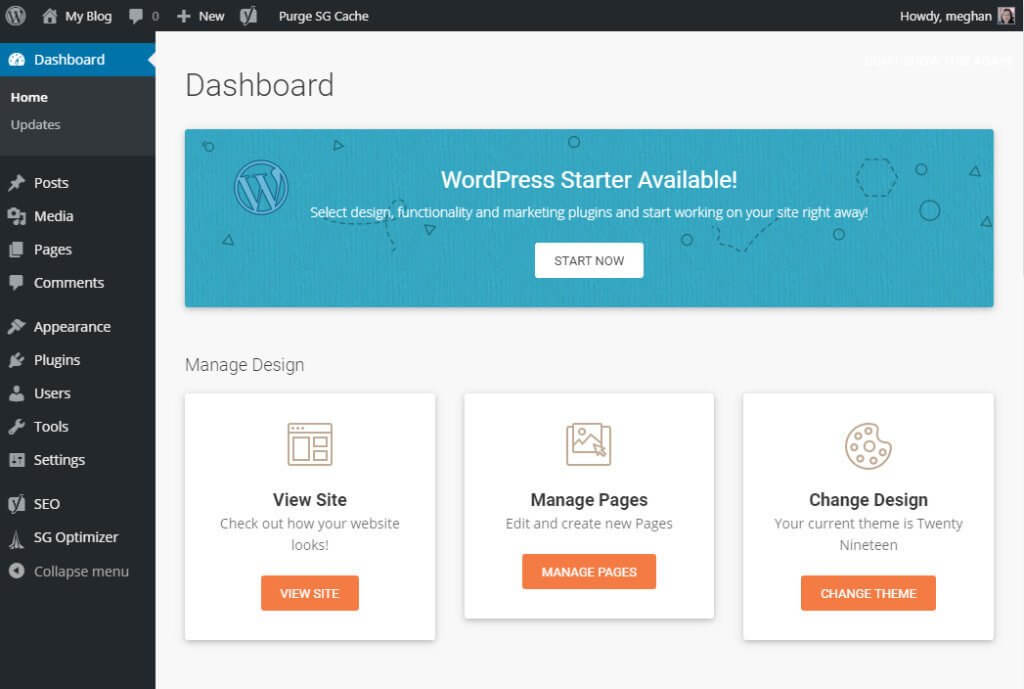
Step 4 – Get to know the WordPress dashboard
If you are new to WordPress, it is well worth getting to know the dashboard. It will save you so much time later on.
I have a guide on everything you need to know about the WordPress dashboard.
Read it here: A Complete Guide To The WordPress Admin Dashboard
Step 5 – Choose a theme
This is the most important aspect of setting up your blog. You could waste a lot of time later switching themes if you don’t get it right at the beginning.
Step 2 – Update DNS
Think of WordPress as a basic car, with standard paintwork and no extra options.
You can upgrade the car by adding some plugins, such as power steering and air conditioning and you can improve its look with a theme giving you some shiny metallic paint, for example.
There are thousands of WordPress themes available, and you must have one active theme on your WordPress site to make it work.
When you first set up a WordPress site, it has a default theme installed called Twenty Nineteen.
At the beginning it can be tempting to head over to Appearance->Themes->Add New, and install any free theme that takes your fancy.
Before you click ‘install‘ here are some considerations:
Don’t choose a free theme
It is tempting to go for a free theme because as a new blogger, spending money is probably something you don’t want to do too much of at the start. I quite understand, of course.
Here are two good reasons why free themes are not a good idea:
- Free themes often lack options to customise the design.
For example, the position of the sidebar, the number of widgets in the footer, and how the header is laid out. - Free themes often don’t offer support.
As a new blogger, you need the best support possible.
On the other hand, there are some things to avoid in a premium theme too:
- Avoid premium themes that are not designed for blogs.
They often have extra bloat in them, for functions that you may never use, such as a portfolio, or shop, for example. - Avoid premium themes that include an in-built page builder.
I always avoid these types of theme, because it can lead to theme lock-in, where it is not possible to swap to another theme very easily without re-working pages.
When you choose a theme, go for something that has the type of layout you need, because the layout is the hardest to change. It is easy to change fonts, and colours, and add your own logo and images, but the layout is more difficult to change.
There are some great FREE themes I DO recommend.
Having said that you should always go for a premium theme, there are some great free themes that I DO recommend. These themes have premium upgrades but have plenty of functionality in the free version. I recently went through the process of picking a new theme for this site, and I wrote a post on it:
Read it here: Best Free WordPress Themes for Blogs.
For lots more advice on how to pick your perfect theme, I have the perfect guide.
Read it here: How to pick a WordPress theme.
When you have chosen a theme, here is how to install it:
Read it here: How to Install a WordPress Theme
Step 6 – Set-up your new WordPress blog
At this point, I advise taking a backup of your site and then getting to know the theme you have installed.
Before you begin, there are some essential things that are vital to get right at the start.
Read my blog post here: 24 Essential Settings After Installing WordPress
Hopefully, you have learned a bit about your new theme during your research. If not, it is well worth paying a visit to the theme site and watching any videos and tutorials they have. Find out how to get support, which will save a lot of time later.
The next tasks you need to do on your new blog are:
- Upload your logo
I have a useful post here to help you make a logo and upload it to WordPress How To Make A Logo For Your WordPress Blog - Set up your menu
How to Add a WordPress Navigation Menu - Set up the categories and tags you decided on earlier
Categories VS Tags In WordPress And How To Use Them Properly - Set up your sidebar
How to Edit Your WordPress Sidebar With Widgets
How to Add an About Me Section to Your WordPress Sidebar - Install some essential plugins
15 Essential WordPress Blog Plugins - Add Google Analytics
Find out who is reading your blog and gain valuable insights. How To Know Who Is Reading Your WordPress Blog
Depending on which theme you chose, there may be customisations available such as setting the accent colour (colours for links etc.) and font.
Usually, you can do this in the WordPress customiser which you can get to here: Appearance->Customise.
If you have chosen a solid WordPress theme (like GeneratePress), you will be able to make all your changes I list above within the customiser itself, with the added benefit of being able to see the effect of changes immediately.
My favourite thing about the customiser is that, should you not like what you see, you can always hit the Discard button, and nothing will change.
Of course, if you happen to hit Publish instead and you need to go back, you can always restore the backup you made earlier (so don’t forget to do that!).
I have a full post on using the theme customiser:
Read it here: How To Customise a WordPress Theme
Wrapping up
In this free guide, we have gone through everything that you need to do to start a WordPress blog on SiteGround.
I hope you now have a clear picture in your mind about what is involved, and how to create your dream blog.
I have a lot of posts on this blog to help you with technical struggles, and it is growing all the time. If you have a particular problem that you can’t find the answer to, do let me know on my contact page, or comment below. I’m always looking for new ideas for blog posts.
If you need more in-depth help I also have a list of services I can offer. If you need any other help please drop me a line and let’s talk about it.
I love blogging, it gives me enormous pleasure, and I am sure that you will love it too, just keep pushing, and you will have the money-making blog you dream of!


